Resource Packs [WIP]
Resource Packs
Resource Packs enable you to modify certain assets of Minecraft or Mods, like SWEM.
Purpose
You can use Resource Packs to:
- Modify default horse coats
- Modify entity animations
- 1.20.1-1.5+ Add new animations
- Modify default horse model
- Modify item inventory or block textures
Limitations
Resource packs are an override, meaning the content a resource pack contains will replace the default asset.
You cannot* use Resource Packs to:
- Add new coats*
- Add new entities or breeds (see section on model overrides)
* There are some clever Resource Packs out there with entity variations, but this is not straightforward or simple!
[EXPAND] Model Overrides
Several talented Creators have created "Add On" Resource Packs with "breed" models, or custom features (ie mane variations).
- Packs may include one option (ie Arabian or Fjord)
- Packs may support multiple breeds +/- features
- Packs may support the default model coats (ideally) or override it entirely
RELEVANT INFORMATION (USERS / SERVERS)
Model Overrides are used at your own "risk" and support for issues should be sought via the Pack Creator not SWEM.
How do they work?
- In simple terms, it works by adding extra blocks to the default model
- If a coat artist leaves the blocks uncolored (invisible) you will see all / some of the default horse
- If a coat artist colors the blocks in, you will see those additional blocks on the default horse
EXAMPLEIf a coat texture color in blocks added around the hoof, a horse would have "feathers"
Can I use more than one model?
- If you install multiple model override packs, only the highest in load order will apply
- If you want models from different Creators, they would have to merge their packs
Can I use model overrides with a community pack or coat replacement resource pack?
- If the model does not modify (only add on to) the default model, custom coats should work fine
- If not, this may 'break' default or custom coats
Example:Horses with no mane or tail using some models - It might be rare to get a 'custom model coat' if you are mostly using ones designed for the default model
Can I use model overrides with an animation pack (ie Dressage animations)?
- TBC It is unlikely custom models will support all animation packs
- If you load a model pack above an animation pack, it will override any animations they both share
- If you load a model pack below an animation pack, it may not correctly animate the custom model
Can I use model overrides on a server?
SERVERYou may be able to install a model resource pack server-sideCLIENT (PLAYER)If you install a model override in multiplayer, only you will see it
→ Read the section about community packs + coat replacements above (may affect what you see in game)
→ TBC Server packs may override client side unless you can opt out of using it
RELEVANT INFORMATION (CREATORS)
Model overrides use copyrighted SW assets and must be FREE USE ONLY
→ You can accept optional donations
→ You can sell coat textures that require your add on, provided it is 100% your own work (no SW coat edits)
- You should not modify any of the core blocks involved in tack rendering
- You should add to (not modify where possible) the model to avoid breaking default + custom coats
- You will need to adjust the default animations for any additional blocks added
- You should be able to (optional) add support for custom animations in animation packs
→ Consent may be required to include a modified animation from other Creators
→ TBC If add on models can support "new" custom animations via 1.20.1-1.5+ features
Creating Basic Resource Pack Files
This guide covers how to create a basic resource pack folder. Alternatively, download the premade template on Discord.
[EXPAND] Instructions
STEP ONE: CREATE YOUR RESOURCE PACK FOLDER
- Create a new folder
→ It can be anywhere for now (ie Documents) - Name your resource pack
→ This can include capitals, some symbols and spaces - Go inside the folder
- Create a new folder here
- Name it
assets
→ This must be in lowercase exactly as shown
STEP TWO: CREATE YOUR PACK.MCMETA FILE
- Open a blank text editor file using Notepad (Windows) or TextEdit (Mac)
- Paste in the pack template (below)
- Edit the template to your pack
→descriptionAny information to display in game ✅"description": "Pack Name V1.0 By Creator Name"
Note: Supports color + format&l&9Pack Name V1.0 &0By &dCreator=Pack Name V1.0 By Creator
→pack_formatWhich format (MC version) is supported ✅"pack_format": 15=MC 1.20 - 1.20.1
Note: Format gives a harmless warning when a resource pack is used in other versions (even if it works fine) - Select
file > save as - Select the resource pack folder (not assets)
- Name the file
pack.mcmetain lowercase - Save as the correct file type:
→ Windows:Save As Type: All Files(Drop down menu, change from .txt)
→ Mac: - Check it displays as a
MCMETAfile type in your folder
[EXPAND] pack.mcmeta Template
{
"pack": {
"description": "Text Here",
"pack_format": 15
}
}
STEP THREE: CREATE YOUR PACK ICON
- Choose or create an icon for your pack
- Name it
packand save it as a.png - Paste it in your resource pack folder (not assets)
STEP FOUR: ADD YOUR CONTENT
Go to the section(s) below for the content you want to add.
Custom Coat Overrides
This is to override one or more default coats - to add new coats use a Community Pack!
It is not permitted to modify SW mod assets for sale or re-upload. Textures must be 100% your own work from scratch!
This guide will not cover how to create a coat, for information please read our resources on Discord.
[EXPAND] Instructions
STEP ONE: CREATE A COAT TEXTURE
- Create your coat texture in Blockbench
- Choose a coat to override from the list of default coats
- Save the texture as a
.pngfile - Name the texture to match the coat it will replace
STEP TWO: CREATE ASSETS SUB-FOLDERS FOR YOUR COAT
- Go inside
assets - Create a folder called
swem - Inside that, create a folder called
textures - Inside that, create a folder called
entity - Inside that, create a folder called
horse - Inside that, create a folder called
coats - Paste your texture file here
→ If you have more than one override you can add them also
STEP THREE: FINAL STEPS
- Your pack is ready and may work unzipped
- You can zip it so it is easier to share or keep it unzipped to add new files
→ If your zip does not show up in game, check your files are not too deep
→ ✅Pack Name (Zip) > assets / pack.mcmeta / pack
→ ❌Pack Name (Zip) > Pack Folder > assets / pack.mcmeta / pack - Load into Minecraft
- Open the Resource Pack menu
- Open the folder (button)
- Paste in your Resource Pack
- Enable the Resource Pack
- Check it is working in game
→ Summon the coat you chose to override
→ Confirm it uses the replacement coat, not original
→ Check there are no texture errors and it looks correct on the horse
This page will not provide any resources for troubleshooting errors with texture files.
You can look up a tutorial for texturing entities or ask for assistance with details on your issue in our Tech Help channels.
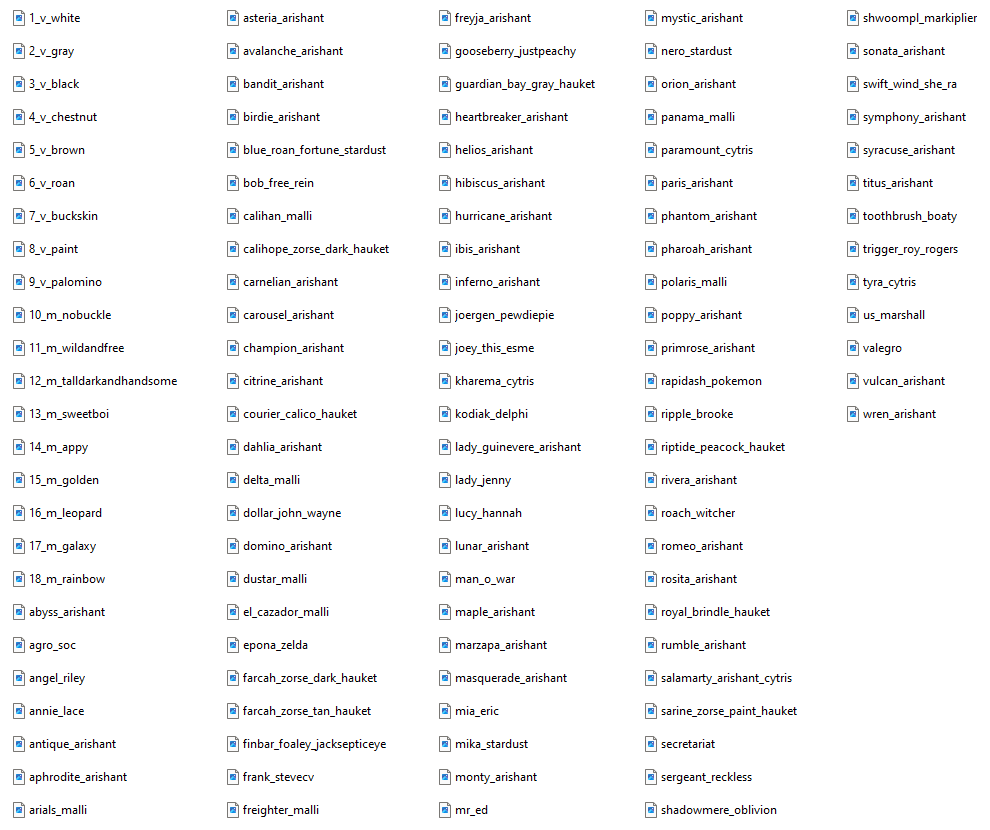
[EXPAND] Default Coat Names
| 📂 TXP_name |
📂 assets | 📂 swem |
📂 textures |
📂 entity |
📂 horse |
📂 coats |
🖼️ coat_name.png |
| 🖼️ pack.png | 🖼️ coat_name.png | ||||||
| 🗒️ pack.mcmeta | 📂 foal (optional) | ||||||
|
Shown: The file structure for texture packs overriding default horse +/- foal coats. |
|||||||
| File Type | Description | Note |
| 📂 Pack Name | A folder with the name of your resource pack | |
| 🖼️ pack.png | PNG image for your pack - displayed in game. | This must remain named pack.png |
| 🗒️ pack.mcmeta | MCMETA file with your pack's description and version(s) | This must remain named pack.mcmeta |
| 🖼️ coat_name.png | PNG for the coat to override. | This must be the name of a valid swem coat |
Coat names in files might not be identical to in-game names or values. Example swem:sweetboi = 13_m_sweetboi
→ You must use the file names, a list of valid names can be found above
Custom Animation Overrides / Additions
It is not permitted to modify SW mod assets for sale or re-upload. Animations must be 100% your own work from scratch!
This guide will not cover how to create animations. You can request help from other creators in our Tech-Help channel (Discord).
[EXPAND] Instructions
STEP ONE [A]: CREATE A NEW ANIMATION
- Create an animation in Blockbench
- Save the
swem_horse.jsonfile
→ This should include your animation(s) and all default animations
STEP ONE [B]: MODIFY AN EXISTING ANIMATION
- Modify one or more default animation in Blockbench
- Save the
swem_horse.jsonfile
STEP ONE [B]: CREATE ASSETS SUB-FOLDERS FOR YOUR COAT
- Go inside
assets - Create a folder called
swem - Inside that, create a folder called
animations - Paste your
swem_horse.jsonfile here
STEP THREE: FINAL STEPS
- Your pack is ready and may work unzipped
- You can zip it so it is easier to share or keep it unzipped to add new files
→ If your zip does not show up in game, check your files are not too deep
→ ✅Pack Name (Zip) > assets / pack.mcmeta / pack
→ ❌Pack Name (Zip) > Pack Folder > assets / pack.mcmeta / pack - Load into Minecraft
- Open the Resource Pack menu
- Open the folder (button)
- Paste in your Resource Pack
- Enable the Resource Pack
- Check it is working in game
→ Tame and mount a horse
→ Use/swem rrp anim <Animation Name>to trigger the animation
→ Confirm the animation works as expected
This page will not provide any resources for troubleshooting errors with animations.
You can look up a tutorial for animating or ask for assistance with details on your issue in our Tech Help channels.
| 📂 Pack Name |
📂 assets | 📂 swem |
📂 animations |
🗒️ swem_horse.json |
| 🖼️ pack.png |
🗒️ swem_horse_foal.json |
|||
| 🗒️ pack.mcmeta | ||||
|
Shown: The file structure for animation packs overriding default horse +/- foal coats. |
||||
| File Type | Description | Note |
| 📂 Pack Name | A folder with the name of your resource pack | |
| 🖼️ pack.png | PNG image for your pack - displayed in game. | This must remain named pack.png |
| 🗒️ pack.mcmeta | MCMETA file with your pack's description and version(s) | This must remain named pack.mcmeta |
| 🗒️ swem_horse.json | JSON file with your new / modified animations | This must remain named swem_horse.json |
Custom Item Texture Overrides
It is not permitted to modify SW mod assets for sale or re-upload. Textures must be 100% your own work from scratch!
This guide will not cover how to create icons or how to override models.
[EXPAND] Instructions
STEP ONE [A]: EXTRACT THE MOD FILE
- Download a copy of whatever version of the swem mod you intend to modify
- Right click the jar file in your downloads and extract it
→ This may require a program such as WinRar (Windows) - Go inside
assets > swem > textures - Locate the folder for whatever you want to override
→blockIncludes any textures for building blocks or items that can be placed. Example: Wheelbarrows
→entityIncludes any textures for horse poop, rope knots and the wormieboi entity.
→entity_iconIncludes textures for entity icons named the same as an existing coat.
→guiIncludes textures for jump bar and the jump creation tool
→gui > containerIncludes textures for various inventory items Example: Saddle Bags or Tack Boxes
→itemIncludes the textures of virtually every item you can have in your inventory (inventory icon)
→models > armorIncludes the textures of some armor pieces.
→paintingIncludes the textures of any paintings added by the mod.
→particleIncludes the textures of any particle effects emitted by horses for various interactions or events. - Locate the texture(s) for whatever asset(s) you want to override:
→ Note the exact file names
→ Note the exact types - some assets need multiple textures (ie for different blockstates, sides etc)
→ Note the texture size - for some blocks and items you may be able to scale textures up or down, but not for all!
STEP TWO [B]: CREATE A NEW TEXTURE
- Create an texture in your preferred painting program
- Save the file as a png with the exact name for the item/block etc you are overriding (above).
STEP THREE [C]: CREATE ASSETS SUB-FOLDERS FOR YOUR TEXTURE
- Go inside
assets - Create a folder called
swem - Inside that, create a folder called
textures - Create a folder that matches your item (step one)
→ Example: If you're replacingrack_saddlefromblockthen create ablockfolder - Paste your
png(texture) file here - Repeat for any addition textures you want to override (correct folders for each item)
STEP FOUR [D]: FINAL STEPS
- Your pack is ready and may work unzipped
- You can zip it so it is easier to share or keep it unzipped to add new files
→ If your zip does not show up in game, check your files are not too deep
→ ✅Pack Name (Zip) > assets / pack.mcmeta / pack
→ ❌Pack Name (Zip) > Pack Folder > assets / pack.mcmeta / pack - Load into Minecraft
- Open the Resource Pack menu
- Open the folder (button)
- Paste in your Resource Pack
- Enable the Resource Pack
- Check it is working in game
→ Obtain or place your item(s) and check the new texture shows
→ Check for any texture errors (missed pixels etc)
This page will not provide any resources for troubleshooting errors with textures.
You can look up a tutorial for animating or ask for assistance with details on your issue in our Tech Help channels.
| 📂 Pack Name |
📂 assets | 📂 swem |
📂 textures |
📂 block |
🖼️ block_name.png |
| 🖼️ pack.png |
📂 entity |
||||
| 🗒️ pack.mcmeta |
📂 entity_icon |
🖼️ coat_artist.png |
|||
|
📂 gui |
🖼️ gui_type.png |
||||
|
📂 container -> 🖼️ container_type.png |
|||||
|
📂 item |
🖼️ item_name.png |
||||
|
📂 models |
📂 armor -> 🖼️ armor_layer.png |
||||
|
📂painting |
🖼️ painting_name.png |
||||
|
📂particle |
🖼️ particle_name.png |
||||
|
Shown: The file structure for animation packs overriding default textures - only use folders you are creating overrides for. |
|||||