Installing Mods
Using ModsIntroduction
TheInstalling followingmods topicscan arebe complicated for new and experienced users alike, so we have provided toas assistmuch usersguidance inas installingpossible. mods.As Severalsuch, optionsthere existis a lot of information here that might feel overwhelming. Use the page navigation bar to dojump this,to andsections aor brieflauncher outlineguides - this is on the right of PC browsers, or under the maininfo methodstab haveif beenviewing noted.on mobile.
About Mods
- Mods are .jar files and should not be extracted
- Mods go directly in the 'mods' folder - they will not work in sub-folders
- Mods will not load without the correct modding API (ie Forge)
- They
doare notfunctionthe same as texture or shader packs and will notworkfunction intheresourcepack/datapcksresourcepack/shaderpackorfoldersshader folders!
SWEM Staff & HelpersWe cannot guarantee support in anyfor mod setup or non-SWEM issues (includingin useour of mods) that are unrelated to errors with SWEM itself.Discord. UsersPlease are expected to seek solutions to their owncommon issues using ample resources available online.
SWEM Requirements
Select the dropdown for your chosen version to see requirements and download links!
Jar files are usually safe when sourced from trusted sites like CurseForge or Modrinth. You should never download jar (or any) files from untrusted or unknown sources - doing so can introduce malware to your PC or devices!
SWEM Requirements
Select the dropdown for your chosen version to see requirements and download links!
SWEM for Minecraft 1.18.2
LATEST RELEASE
| Requirement | Version Required |
| Minecraft Version | 1.18.2 |
| Forge | 40.2.0 or higher |
| Java | Java 17 |
| RAM (Memory) | 2.5-4GB+ This may increase with larger mods / modpacks or shaders! |
| Mod Requirements | |
| SWEM | LINK COMING SOON |
| Geckolib | 1.18-3.0.57 or higher |
| Player Animator | 0.4.0+1.18 ONLY to avoid known issues. |
If using shaders, this version will likely have some animation render issues unless you disable entity shadows. Credits go to DC user Hichi for the shader setting suggestion/solution. This will NOT resolve the jump animation desync sometimes seen on MP servers. That is an entirely different issue.
SHADER 'STABLE' VERSION
There is no 'shader stable' version (a version that does not require disabling shader entity shadows) for 1.18 at present.
SWEM for Minecraft 1.16.5
LATEST RELEASE
| Requirement | Version Required |
| Minecraft Version | 1.16.5 |
| Forge | 36.2.34 or higher |
| Java | Java 8 |
| RAM (Memory) | 2.5-4GB+ This may increase with larger mods / modpacks or shaders! |
| Mod Requirements | |
| SWEM | 5.3.21 |
| Geckolib | 3.0.99 or higher |
| Player Animator | 0.3.5+1.16.5 ONLY to avoid known issues. |
If using shaders, this version will likely have some animation render issues unless you disable entity shadows. Credits go to DC user Hichi for the shader setting suggestion/solution. See below for alternate recommendations.
SHADER 'STABLE' VERSION
To use SWEM and shaders without disabling Entity Shadows you will need to downgrade versions. Some users have been able to use Complementary or BSL shaders on low-medium settings with newer versions of SWEM without experiencing any issues, though this has not been a reliable solution for many. The recommended 'shader safe' (little to no animation desync) version are listed here.
| Requirement | Version Required |
| Minecraft Version | 1.16.5 |
| Forge | 36.2.34 or higher |
| Java | Java 8 |
| RAM (Memory) | 2.5-4GB+ This may increase with larger mods / modpacks or shaders! |
| Mod Requirements | |
| SWEM | 5.3.0 |
| Geckolib | 3.0.97 |
| Player Animator | 0.3.5+1.16.5 ONLY to avoid known issues. |
This will NOT resolve the animation desync (jumps) sometimes seen on MP servers. That is an entirely different issue.
OtherRequirements Explained
Java Requirement
VanillaWhat canis findJava?
Java accessis the integratedcoding language for Minecraft Java installationEdition. thatYour vanilla Minecraft game comes with Minecrafta -version of Java 8 installed, but modssometimes oftenmodded requirelaunchers Javalike to displayCurseforge and workMultiMC properlycannot - some mod launchers also need you toautomatically locate it so you may need to usedownload thethis app!yourself. TheIn goodrecent newsyears, is,newer versions of MC Java need updated Java versions - you can downloadcheck which version is required and installdownload Java,below! even
1.16.5 (or older) Java 8 Download Java 8 for Windows Download Java 8 for MAC 1.18.2+ Java 17 Download Java 17 for Windows Download Java 17 for MAC Note: You do not need to remove Java 8 to use
Java 8
17 for 1.18+. You will still need Java 8 isto requiredplay older versions!
How to install
You will likely need to go into your modlauncher to locate and specify the version you downloadedwant to use.
Troubleshooting
Certain browsers might download the wrong version (x32bit) of Java - which will not work properly. Unfortunately, it andis not always obvious if this is the filecase, (javaw.exe)or shouldhelp beto underresolve it if it is not clear. Here are a filefew namedsuggestions:
We recommend using a browser likeUse Chrome or Firefox browsers that willare recognisemost likely to recognize the correct specifications of your PCsystem.
requires

The responding text should specify 64-bitBit download,and notthe 32.correct version (ie 17 or 8 depending on what you have installed). If it states 32-Bit, you should uninstall Java and try again!
Extracting Files
Overview
Some bundledfiles may come in .ZIP or .RAR format - this is usually to compress the file size so it is easier to send many files at once. Understanding what to do with these files may not seem straightforward, but we are here to give some tips on what to do and when!
MODPACKS
If you are playing a server that provides a zipped modpack, or a friend sends you a zip of their mods, modpacks,they or downloads like the MultiMC Launcher, maywill need to be extractedunzipped directly into the mods folder to work.
WORLD FILES
World files that come zipped will need to be unzipped and placed in orderthe save folder as an unzipped folder.
SHADERS & TEXTUREPACKS
Shaders and TXPs come in zip format and these should NOT be unzipped. Just put them in their respective folders and leave them be unless you're confident in editing files (for TXPs more specifically, you should not ever need to unzip your shaders).
Windows: Right click file > 'Extract All' OR right click file > 'Extract Here' if you have WinRar installed.
Mac: Double click a compressed ZIP file.
Windows: Install WinRar > Right click file > Extract here
Mac:
.JARDo NOT extract mod JAR files or they will no longer work. Place directly in your mods folder as they are.
WinRar is a free trialware program for Windows that allows you to useextract them.many Thefile vasttypes. majorityThere are plenty of computerstutorials are naturally able to extract files..
Option 1: MultiMC
We highly recommend using the MultiMC app - which is a popular choice amongst the staff team!
Download & Information
- Simple straight-forward design, open source project and no annoying ads!
- No need to do a forge installation via external sites, select the version you want when creating instances.
- Create multiple instances, sort in groups, give instances icons, add and remove mods easily.
- Custom installation settings - default Java and RAM settings OR designate them custom to each installation!
- Import a complete instance from ZIP files
- Create instances with popular modpacks from Modrinth, ATLauncher, FTBAppImport, FTBLegacy and Technic!
- Download MultiMC
Installing
Go to the link above and download the file specific to your PC type (Windows, Mac, Linux)
1. Once downloaded, extract the file to access the Application files.
2. You can move the folder to wherever you want it, and suggest making a shortcut or pin-to-start the MultiMC.exe application.
3. Launch the MultiMC.exe file to open MultiMC.
4. On first launch, you will need to follow the in-app setup process, including locating your Java and Minecraft.
5. In the top right corner, drop down to Manage Accounts and log into your Minecraft account as instructed!
Creating A New Instance
On the MultiMC App, select Add Instance on the top menu bar, which will open a new interface to select your preferences.

1. Give your instance a Name (such as SWEM V1)
2. Choose your preferred setup:
[★] Vanilla: Select a Minecraft version to create a vanilla instance. You can add a forge installation in afterwards to play with mods.
Import from zip: Import a copy of a user's or preset instance in ZIP format which easily installs with all the settings and mods.
Modrinth | ATLauncher | FTB | Technic: Browse popular preset modpacks for and install them automatically with ease.
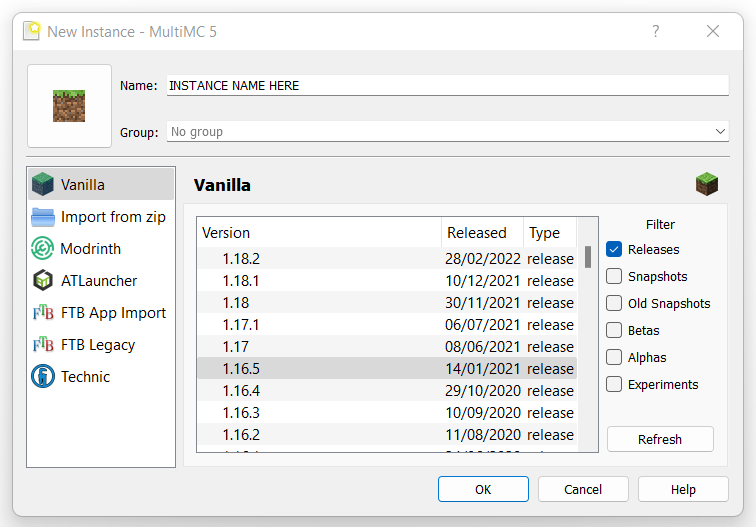
If you import from ZIP or a preset modpack, you should be ready to play once it is setup. Vanilla installations need a few extra steps!
Install Forge
To use mods, your new installation will require a forge installation (Forge Modding API).
1. Right click your instance icon > Edit Instance OR click the icon and select Edit Instance on the right side of the app.
2. Under Version select Install Forge on the right side of the menu.
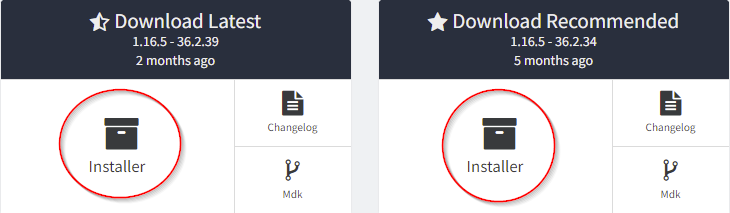
3. Select the version of Forge to be installed. The starred version indicates the recommended stable release.
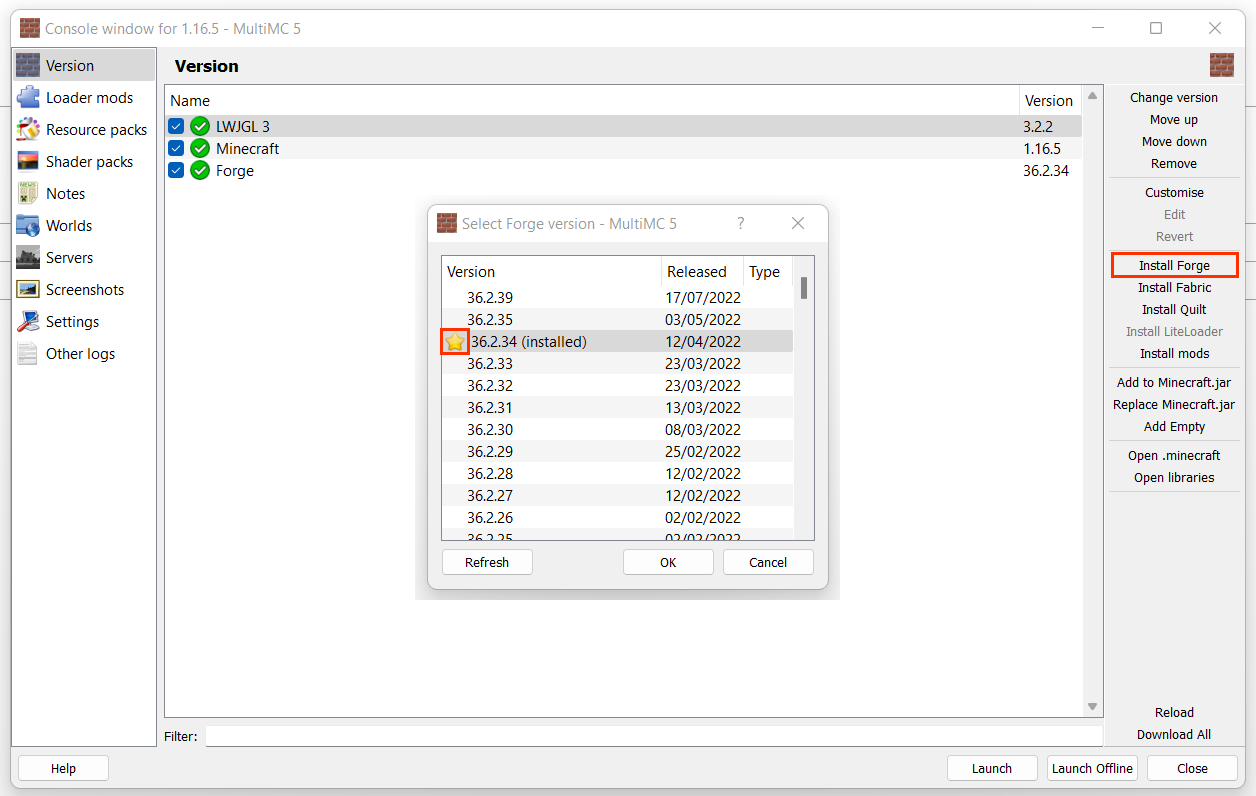
SWEM requires Forge 36.2.34 or higher to work properly. Using an incorrect or outdated version will cause loading errors.
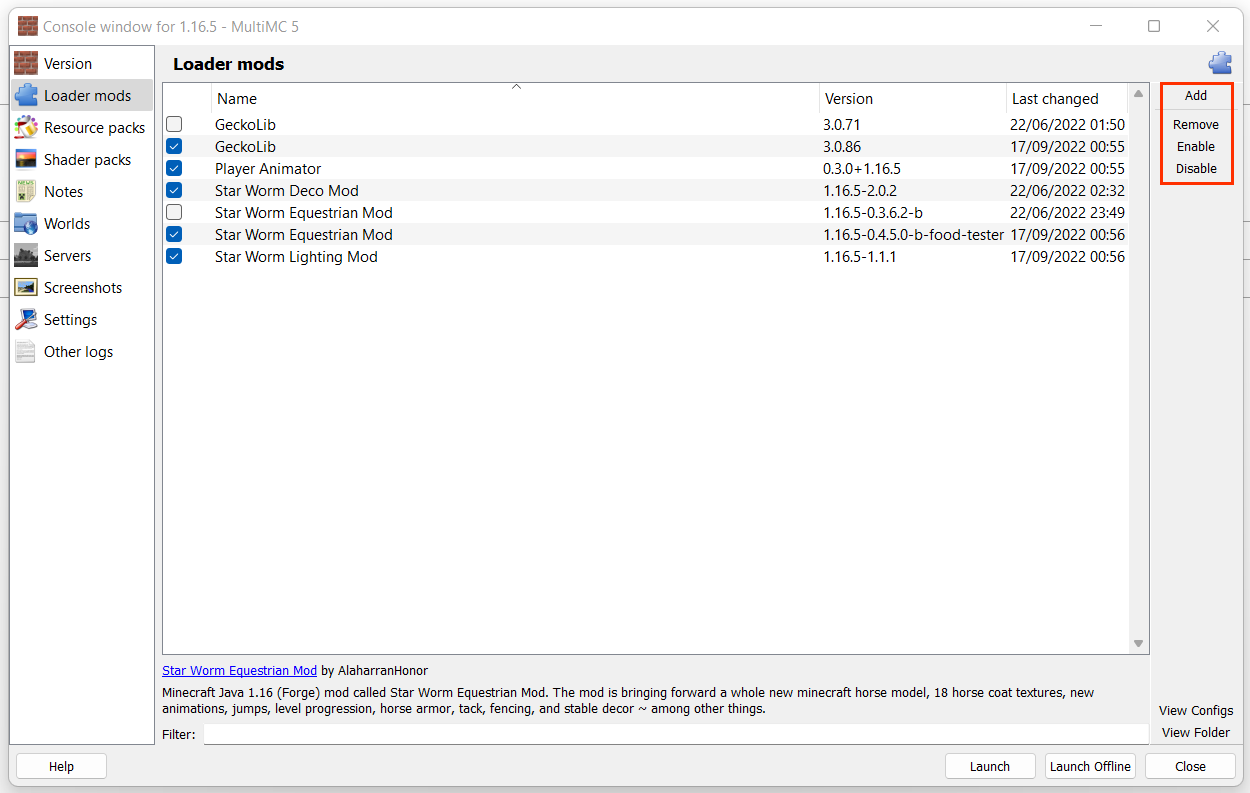
Install Mods
To install new mods, or manage existing mods:
1. Right click your instance icon > View Mods OR click the icon and select View Mods on the right side of the app.
2. You can do multiple things from the view mods menu:
Add: Browse and add new mods to your instance. Mods must be .jar files
Remove: Permanently remove a mod from your instance. Removing a mod deletes it from the mod folder.
Enable: Enable a previously disabled (see below) mod. When enabled, a mod will be active when MC is launched.
Disable: Disable an installed mod. When disabled, mods will not load when MC is launched. You can also check or uncheck the checkbox to enable/disable. Unchecked mods will not load (disabled).
Disabling mods that your world actively uses (ie SWDM) can alter builds, structures, remove items and entities or even corrupt the world on load if there is no newer version enabled.
Allocating RAM (MultiMC)
Minecraft uses RAM (memory) to load and run the game and its assets. To a point, more RAM means you can load faster and process quicker - though that is also dependent on other elements of your PC. A few notes:
- Vanilla default is 2GB but requirement increases with HD texture packs, shader uses and mods.
- Small-medium Modpacks recommend a minimum of 3-4GB of allocated RAM.
- Large Modpacks and some intensive mods may require even more!
- Your computer requires an absolute minimum of 1GB free at all times, but for the sake of your computer's hardware and performance the recommended minimum is 2-3GB free at all times.
- Excessive RAM does not guarantee better performance, so you should not allocate more than you NEED.
1. On the MultiMC App, select Settings on the top menu bar, which will open a new interface.
2. Under the Java tab you can see current memory (RAM) allocation.
3. Set your required amount for minimum and maximum values. PermGen should be left at what it is by default.MultiMC uses megabytes (MiB) over gigabytes (GB) - 1024MB is equal to 1GB.
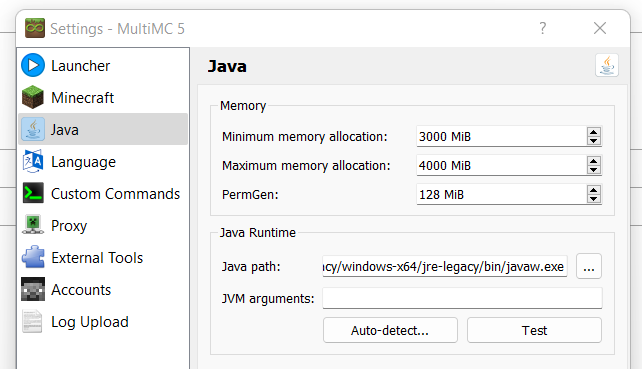
Your PC has a set amount of RAM built-in (installed) and requires several GB of that to run background apps, etc!
Other
MultiMC Features
You can manage your instance under Edit Instance to use:
Resource Packs: Add or remove texture packs (ZIP file)
Shader Packs: Add or remove shaders (ZIP file)
Notes: Make notes on anything you want for planning or future reference!
Worlds: View your worlds - add, rename, copy, remove, use MCEdit (if installed), reset icon and copy seed.
Servers: View, add or remove saved servers.
Screenshots: View screenshots.
Settings: Edit your (instance specific) RAM allocation and java version.
Other Logs: Find your latest crash logs.
You can access other features by right clicking an instance to use:
Change Icon: Select from preset Minecraft themed icons, or upload your own icon.
Rename: Edit the (in-app) instance name.
Group: Assign an instance to custom groups (ie by version, themes)
Minecraft Folder: View the Minecraft folder, which contains mods, saves, logs, config folders etc.
Config Folder: Open the config folder to view configs of any installed mods.
Export: Export your entire instance (settings, mods, saves, servers) to share with others or transfer to another PC.
Delete: Delete the instance. Deleting the instance will remove all mods, saves and settings.
Option 2: CurseForge App
CurseForge is a popular mod launcher and, if MultiMC is not for you, we would recommend using a launcher like CF. CurseForge is not the same thing as Forge,Forge installation (below), and the app is not the same thing as the website.
Download & Information
- Easy to use and great for first-time mod users.
- No need to do a forge installation via external sites, select the version you want when creating instances.
- Create multiple instances on multiple versions of Minecraft.
- Create instances with popular mods and Modpacks direct from CurseForge within the app!
- Download CurseForge
Installation
Go to the link above and download the file specific to your PC type (Windows, Mac, Linux)
1. Once downloaded, run the file by double clicking the installer.
2. Follow the installation instructions.
3. On first launch, you will need to follow the in-app setup process, including detecting your Java and Minecraft.
4. CurseForge uses the vanilla launcher when loading the game - you may need to log into your Minecraft account.
Creating A New Instance
On the CurseForge App, select Create Custom Profile on the top bar to open a preferences menu.

1. Give your instance (profile) a Name (such as SWEM V1)
2. Choose your preferred settings:
Minecraft Version: The version of Minecraft your profile will use.
Game Type: [★] Forge | Fabric | Vanilla.
Modloader Version: Forge version
3. Create once you have input your preferences.
4. CurseForge will take up to a few minutes to create an instance and install updates.
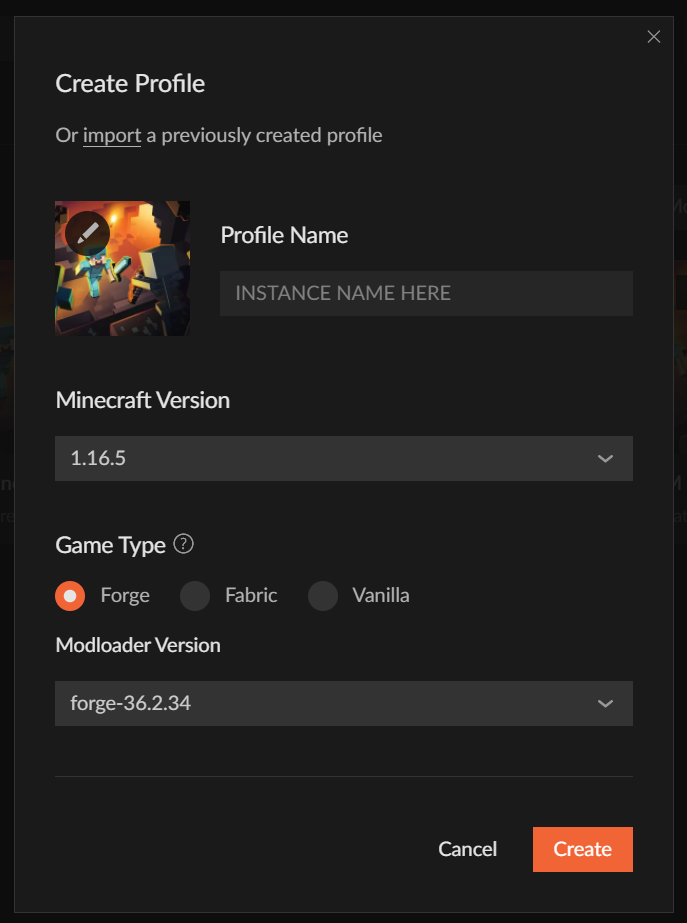
SWEM requires Forge 36.2.34 or higher to work properly. Using an incorrect or outdated version will cause loading errors.
Worlds are saved to the instance they were created with, meaning you cannot play on worlds in one instance if the world was created while using another instance.
Install Mods
To install new mods, or manage existing mods:
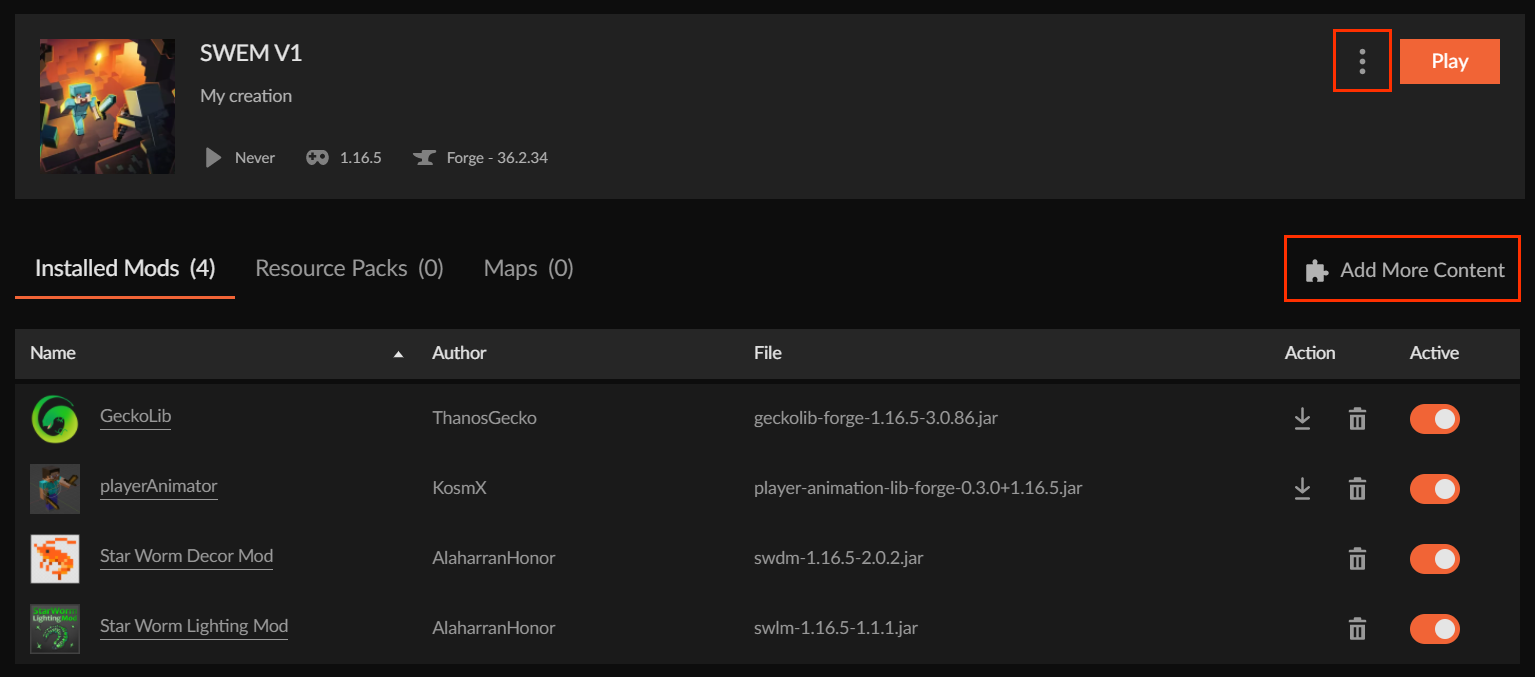
1. Click on the Instance (Profile) image to view and edit - pressing 'Play' will launch the instance instead!
2. You can add mods two ways:
Search CurseForge: Select Add More Content to browse for mods on CurseForge via the app.
Add via Mod Folder: Select ... next to Play and choose Open Folder. Drag or paste any mods into the mod folder.
Allocating RAM (CurseForge)
In the bottom left corner of the app, click the settings icon (gear). Select Minecraft under the "Game Specific" section and scroll down to Java Settings. Edit as required:
- Vanilla default is 2GB but requirement increases with HD texture packs, shader uses and mods.
- Small-medium Modpacks recommend a minimum of 3-4GB of allocated RAM.
- Large Modpacks and some intensive mods may require even more!
- Your computer requires an absolute minimum of 1GB free at all times, but for the sake of your computer's hardware and performance the recommended minimum is 2-3GB free at all times.
- Excessive RAM does not guarantee better performance, so you should not allocate more than you NEED.
CurseForge uses megabytes (MiB) over gigabytes (GB) - 1024MB is equal to 1GB.
Other
CurseForge Features
Profile Options: Click the ... next to Play to open Profile Options and change name, forge version and RAM etc.
Export Profile: Export your entire instance (settings, mods, saves, servers) to share with others or transfer to another PC.
Delete Profile: Delete the instance. Deleting the instance will remove all mods, saves and settings.
Update: Clicking the downward arrow to the right of an installed mod will update it to the newest release.
Delete: Clicking the trash can icon to the right of an installed mod will delete the mod.
Active: Toggling the Active button next to Installed Mods will enable or disable loading a mod on launch.
Disabling mods that your world actively uses (ie SWDM) can alter builds, structures, remove items and entities or even corrupt the world on load if there is no newer version enabled.
Option 3: Minecraft Launcher + Forge
We do not encourage the use of a Forge Installation to first-time modders, while simple it also:
Download & Information
- Directs users to download via an advert site that is not discerning with its advertisements and seems sketchy.
- Forge installation allows for only one active modpack - mods must be manually added in and out for different packs.
- Forge installation increases the chance of accidentally loading a save with the wrong/missing mods, corrupting it.
- Download the Minecraft Launcher
Installing
Go to the link above and download the file specific to your PC type (Windows, Mac, Linux)
1. Once downloaded, run the downloaded file MinecraftInstaller and follow the installation steps.
2. Find and open the newly downloaded application called Minecraft Launcher.
3. On the first launch, you will need to sign in with your Microsoft account, by clicking the Microsoft Login button.
Installing Forge
2. Open the downloaded file, and select Install Client.
3. If the file path at the bottom is not pointing to your minecraft, click the three ... and point it to your minecraft installation. Default installation paths
4. Click install
5. Relaunch your Minecraft Launcher and if you click installations it should now contain a forge installation.
6. Click the green Play button, to setup the instance.

Install Mods
To install mods for the minecraft launcher, you need to open the .minecraft folder.
An easy way to do that is clicking the folder icon on hovering one of the installations:

When the file explorer has been opened, go back one folder so you are standing in the minecraft folder.
1. Open the folder named mods if that folder is not present, you can create it.
2. Open the folder mods and make sure it's empty of any files.
3. Drag all your downloaded mod files into this folder. (If you downloaded a zipped modpack, you need to unzip it and drag ONLY .jar files in here.
Allocating RAM (Minecraft Launcher)
Minecraft uses RAM (memory) to load and run the game and its assets. To a point, more RAM means you can load faster and process quicker - though that is also dependent on other elements of your PC. A few notes:
- Vanilla default is 2GB but requirement increases with HD texture packs, shader uses and mods.
- Small-medium Modpacks recommend a minimum of 3-4GB of allocated RAM.
- Large Modpacks and some intensive mods may require even more!
- Your computer requires an absolute minimum of 1GB free at all times, but for the sake of your computer's hardware and performance the recommended minimum is 2-3GB free at all times.
- Excessive RAM does not guarantee better performance, so you should not allocate more than you NEED.
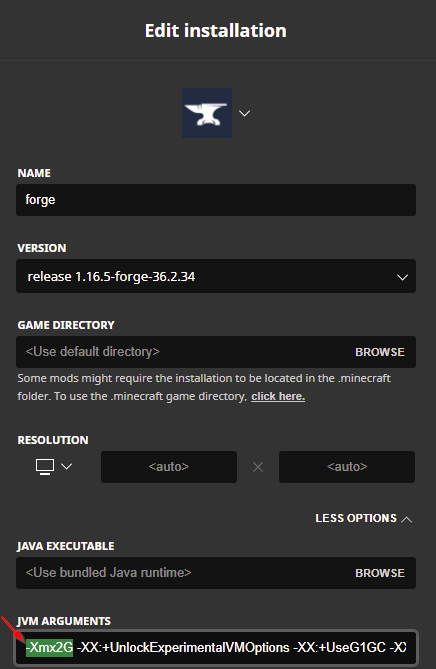
1. On the Minecraft Launcher, select Installations on the top menu bar.
2. Click the proper forge installation. (1.16.5 and 36.2.34 or above)
3. Click the More Options at the bottom right.
4. In the field JVM Arguments you should see -Xmx2G (2 being the amount of GB's allocated)
5. Change that number to the required amount.
Updating Your World
With the release of 1.18.2, some users may be interested in porting forward their existing SWEM worlds. Please carefully read the information here if you are unfamiliar with porting forward modded instances!
Important Notes
SWEM Horses (and many other modded entities) will not be carried over to the new 1.18 version. Read more on Discord.
Optifine H7 often crashes 1.18 unless using outdated Forge. Optifine H9 pre2 or above is recommended for Forge 40.2.0!
How to Update
It is recommended that you start a NEW instance / profile and copy your world file over. It is possible to update instances / profiles with some launchers, but this is not advisable as you cannot reverse any corruption or issues that might occur - and will not be able to go back to play your old world if you later want to do so.