Installing Mods
Using Mods
The following topics are provided to assist users in installing mods. Several options exist to do this, and a brief outline of the main methods have been noted.
SWEM Staff & Helpers cannot guarantee support in any mod issues (including use of mods) that are unrelated to errors with SWEM itself. Users are expected to seek solutions to their own issues using ample resources available online.
Java
Vanilla can find and access the integrated Java installation that comes with Minecraft - but mods often require Java to display and work properly - some mod launchers also need you to locate it to use the app! The good news is, you can download and install Java, even having multiple different versions downloaded to use with newer Minecraft releases.
Java 8
Java 8 is required for Minecraft 1.16.5 and earlier.
MultiMC
We highly recommend using the MultiMC app - which is a popular choice amongst the staff team!
- Simple straight-forward design, open source project and no annoying ads!
- No need to do a forge installation via external sites, select the version you want when creating instances.
- Create multiple instances, sort in groups, give instances icons, add and remove mods easily.
- Custom installation settings - default Java and RAM settings OR designate them custom to each installation!
- Import a complete instance from ZIP files
- Create instances with popular modpacks from Modrinth, ATLauncher, FTBAppImport, FTBLegacy and Technic!
- Download MultiMC
Creating A New Instance
On the MultiMC App, select Add Instance on the top menu bar, which will open a new interface to select your preferences.

1. Give your instance a Name (such as SWEM V1)
2. Choose your preferred setup:
Vanilla: Select a Minecraft version to create a vanilla instance. You can add a forge installation in afterwards to play with mods.
Import from zip: Import a copy of a user's or preset instance in ZIP format which easily installs with all the settings and mods.
Modrinth | ATLauncher | FTB | Technic: Browse popular preset modpacks for and install them automatically with ease.
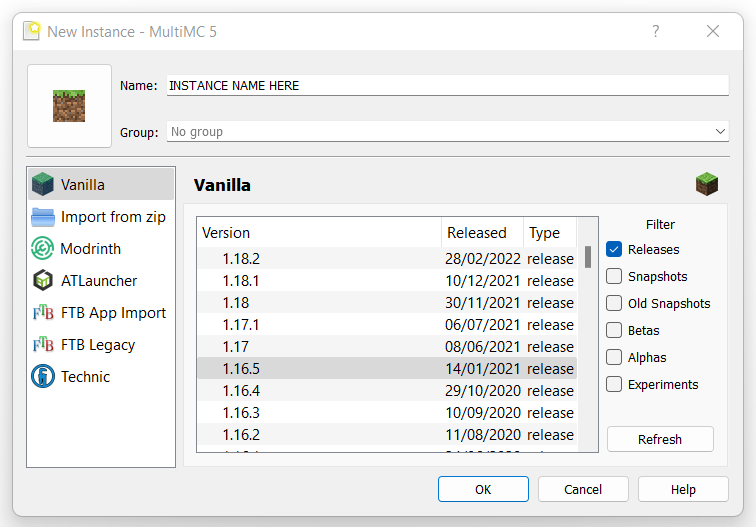
If you import from ZIP or a preset modpack, you should be ready to play once it is setup. Vanilla installations need a few extra steps!
Install Forge
To use mods, your new installation will require a forge installation (Forge Modding API).
1. Right click your instance icon > Edit Instance OR click the icon and select Edit Instance on the right side of the app.
2. Under Version select Install Forge on the right side of the menu.
3. Select the version of Forge to be installed. The starred version indicates the recommended stable release.
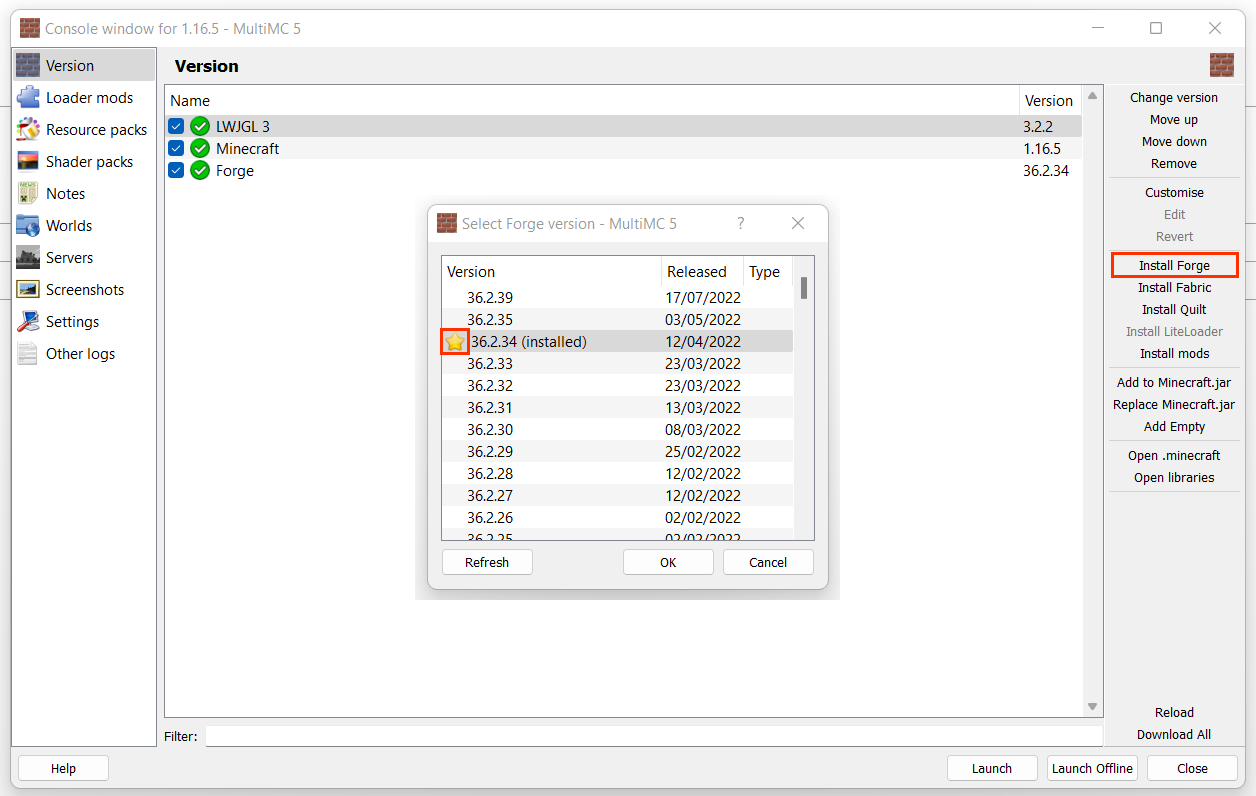
SWEM requires Forge 36.2.28 or higher to work properly. Using an incorrect or outdated version will cause loading errors.
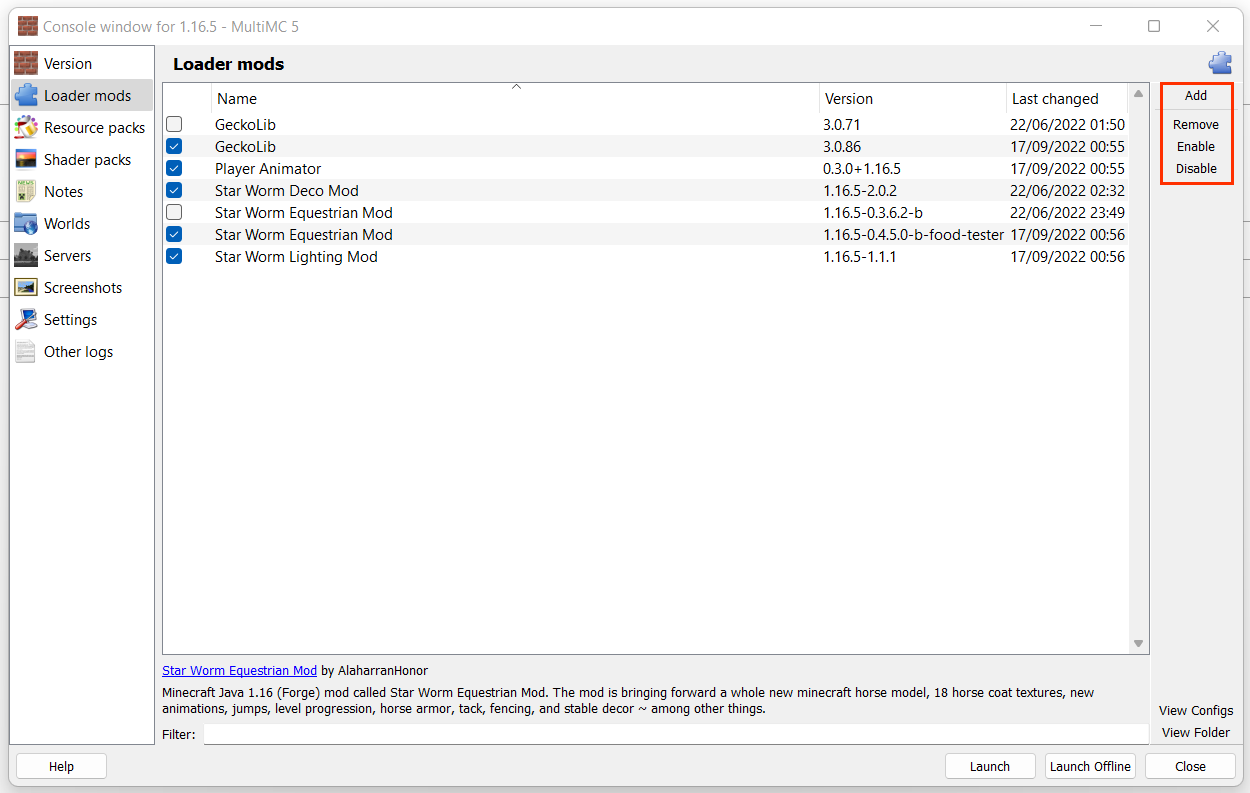
Install Mods
To install new mods, or manage existing mods:
1. Right click your instance icon > View Mods OR click the icon and select View Mods on the right side of the app.
2. You can do multiple things from the view mods menu:
Add: Browse and add new mods to your instance. Mods must be .jar files
Remove: Permanently remove a mod from your instance. Removing a mod deletes it from the mod folder.
Enable: Enable a previously disabled (see below) mod. When enabled, a mod will be active when MC is launched.
Disable: Disable an installed mod. When disabled, mods will not load when MC is launched. You can also check or uncheck the checkbox to enable/disable. Unchecked mods will not load (disabled).
Disabling mods that your world actively uses (ie SWDM) can alter builds, structures, remove items and entities or even corrupt the world on load if there is no newer version enabled.
Allocating RAM (MultiMC)
Minecraft uses RAM (memory) to load and run the game and its assets. To a point, more RAM means you can load faster and process quicker - though that is also dependent on other elements of your PC. A few notes:
- Vanilla default is 2GB but requirement increases with HD texture packs, shader uses and mods.
- Small-medium Modpacks recommend a minimum of 3-4GB of allocated RAM.
- Large Modpacks and some intensive mods may require even more!
- Excessive RAM does not guarantee better performance, so you should not allocate more than you NEED.
1. On the MultiMC App, select Settings on the top menu bar, which will open a new interface.
2. Under the Java tab you can see current memory (RAM) allocation.
3. Set your required amount for minimum and maximum values.MultiMC uses megabyes (MiB) over gigabytes (GB) - 1000MB is equal to 1GB.
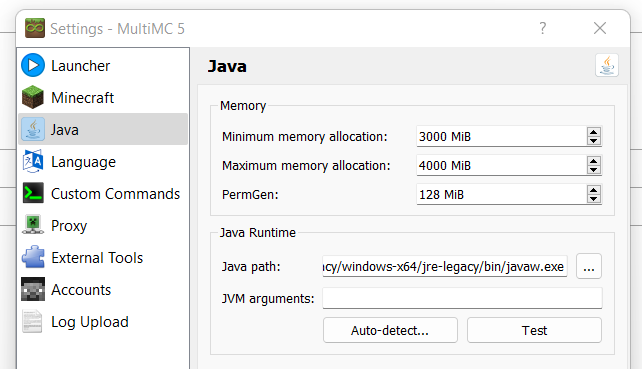
Your PC has a set amount of RAM built-in (installed) and you required several GB of that to run background apps etc!
Other
You can manage your instance under Edit Instance to use:
Resource Packs: Add or remove texture packs (ZIP file)
Shader Packs: Add of remove shaders (ZIP file)
Notes: Make notes on anything you want for planning or future reference!
Worlds: View your worlds - add, rename, copy, remove, use MCEdit (if installed), reset icon and copy seed.
Servers: View, add or remove saved servers.
Screenshots: View screenshots.
Settings: Edit your (instance specific) RAM allocation and java version.
Other Logs: Find your latest crash logs.
You can access other features by right clicking an instance to use:
Change Icon: Select from preset Minecraft themed icons, or upload your own icon.
Rename: Edit the (in-app) instance name.
Group: Assign an instance to custom groups (ie by version, themes)
Minecraft Folder: View the Minecraft folder, which contains mods, saves, logs, config folders etc.
Config Folder: Open the config folder to view configs of any installed mods.
Export: Export your entire instance (settings, mods, saves, servers) to share with others or transfer to another PC.
Delete: Delete the instance. Deleting the instance will remove all mods, saves and settings.
CurseForge
TEXT HERE