Introduction
Behind the Scenes
Why the Mod Started
SWEM started because of a stubborn, green, beautiful horse named Lucy. When family troubles meant I couldn't afford to be with her anymore, all of my love had to go somewhere. I started pouring it into work and games with horses. After crying to my roommate a few too many times about needing to reset the backups because 'Lucy' was blown up by a creeper for the 10th time, I decided to make a mod to make destriers out of Minecraft horses. I wanted to upgrade their model, animations, and enchant their armor. I did some research to see if other people have made a horse mod or if others would even want the mod I wanted to make. Turns out that there were thousands of people begging for a full-fledged, updated horse mod. After the initial additions - I started adding little things to the list like saddles, saddle/bridle racks, feeders, separators, stall doors, plans for expansions, a dimension, and a clean community on top of all that, etc. Soon the mod turned into a crusade. Here we are now, 2.5 years later with a release date and name to live up to. Star Worm Equestrian Mod.
For horses. For equestrians. For Lucy.
~ AlaharranHonor (Hannah)
Our Pillars for Design
We have pillars for our goals as well as some themes for keeping the mod within one version.
Pillars are known in design as the three MAIN ideals for an addition to the project. If something doesn't have all three pillars supporting it, it won't get added in.
SWEM Phase 1 (V1)
// With love for the equine
// For all ages and all disciplines
// Necessary and core function for future
Other mantras we have for develop are used throughout, from devving to building to texture art.
// Everything must be made with love. If you're not doing it with love, come back later when you can or let someone else do it.
// Always care for details. You never know when something might break and the users see something they shouldn't.
// Everything must make sense, even details the player might not see or even think of. We must train ourselves to think critically. Every brain comes prepacked with information. Not making sense = uncanny valley = brain unhappy = unhappy player. The player doesn't even notice it, but their brains do, especially when you show them something better. Be better.
Our Belief on "Magic" in the Mod
We use "magic" as the sense of wonder to the mod, fill in the little gaps of logic, and to open up an entire world of development for us to make. Our magic does have rules, however.
Cloth - Like bandages and wraps, the magic of healing.
Iron - Magic protection. Resilient and protecting our warriors from evil magicks.
Gold - Gold holds water magic. Given that its weak and malleable, its not very good for defense but just a little goes a long way!
Diamond - Fire Magic! Or more so, protection from it.
Amethyst - The power of flight. How does it feel to float? What is it like to fly?
Netherite - No magic power yet.
Emerald - No magic power yet.
Copper - No magic power yet.
Trivia
- SWE/M started as a lighting mod (SWLM 1.12.2) because I was sick of ruining my castle aesthetic with 1000 torches.
- SWEM is technically SWLM continued.
- SWEM started in 1.15.2 and didn't release till 1.19 was already out. That's a long time to develop!
- SWEM had amethyst in it long before we knew vanilla was adding it. It looks like we skipped netherite and users are confused, but when I planned it all out, neither existed yet.
How To Help
Volunteering
September 2023: SWEM is no longer seeking volunteers and is only maintaining the project. Check Discord for updates.
Social Media
Following and sharing helps spread the word about SWE/M. The more people we can reach, the more people in our community and the more community to help us in return!


Pssst. You can click those...
BisectHosting Discount
Promo codes can be applied on checkout prior to payment. Enter FORLUCY and validate the code to receive the discount.
Creating your own server? BisectHosting kindly offers SWEM support via the partner program which helps us run our Beta and VIP servers. We have an affiliate link and promo code to pass savings on to our users - you can get 25% discount on your first month of hosting. This helps the project with a little bonus for each person that uses our code: FORLUCY

Donations
September 2023: Donations post-shutdown will go towards maintaining and bug fix dev days. No perks can be offered.
As much as we want the mod to run off of nothing but our passion and love alone ... It can't. We have to be able to pay for server hosting, art, marketing, and our ultimate goal, to be able to work on the mod full-time as a team. To do all of that and then more, we need help from our community through donations. Every bit helps and gets us closer and closer to our goal. For long term support we have a Ko-Fi linked below.

If you would like to help support the Owner directly, AlaharranHonor, directly for things like rent, soda, and stress food - please donate via PayPal to paypal.me/hannturpinswem.
Reporting Bugs
Our GitHub is currently closed to the public. If you find an issue, please report it to our bugs channel on Discord.

How To Get Help
Discord
A lot of the things you would need help with can be found in this Wiki but if you need to ask specific questions, we are most active on Discord, link below.
![]()
Website
The website is no longer being maintained and is outdated. Use the wiki for the most up to date information.
The website holds a lot of general information that would be helpful for answering questions or linking to wear you'd like to go!
https://www.swequestrian.com/
Github
Our GitHub is currently closed to the public. If you find an issue, please report it to our bugs channel on Discord.
Found a bug? You can submit an issue on Github. You help us find a bug, we help you by fixing the bug!
![]()
Any questions or issues posted to our socials (YT etc) or Curseforge comments will not be seen and will receive no support.
Volunteers
SWEM is made possible by a large group of volunteers spanning the frame of several years. If you believe your name should be on this list, please contact an Admin on Discord and let us know something is amiss. ![]()
Version 1.16.5 Volunteers
Owner and Production Lead
AlaharranHonor - AKA, Hannah
Programming
| Primary | Secondary | Tertiary |
| Legenden | ||
| Mentions |
||
| Silverwolf | Mothfet | Dronade |
| TheJYT |
SysAdmin
| Primary | Secondary | Tertiary |
| GrizzyBurr | Legenden | |
| Mentions |
||
| RileyCasper |
Animation
| Primary | Secondary | Tertiary |
| Eric | Brooke | Raven |
| Mentions |
||
| lilCatSilly |
Texture Artists
| Primary | Secondary | Tertiary |
| Cytris | Eric | Mothfet |
| Mentions |
||
| Shelly | Golden | Calileo |
Coats
| Primary | Secondary | Tertiary |
| Arishant | Stardust | MachoMustang |
| Mentions |
||
| Hauket | Cytris | Everyuki |
| Eric |
Model Artists
| Primary | Secondary | Tertiary |
| AlaharranHonor | ||
| Mentions |
||
Marketing
| Primary | Secondary | Tertiary |
| Peachy | Jenny | Redzeal |
| Mentions |
||
| Rrrose | Anonyma |
Administration
| Primary | Secondary | Tertiary |
| Delphi | RileyCasper | |
| Mentions |
||
Common Work
| Primary | Secondary | Tertiary |
| Delphi | Brooke | Lace |
| Mentions |
||
| Evie | Everyuki |
Data Processing
| Primary | Secondary | Tertiary |
| Delphi | RileyCasper | |
| Mentions |
||
Research and Development
| Primary | Secondary | Tertiary |
| Delphi | Lace | Boatyboatman |
| Mentions |
||
| Vera |
Additional Mentions
| Rhea | Whitewolf | Ffensie |
| Blue Moon | Eliot | Caroline |
| CholitoBuritto |
Super Beta Spotlight
| Crystal0314 | Keroa | Trsom |
| Zaliexx | TheSilentHawke | Wolfzy_King |
|
Toastybeans |
Wild_Horses | HaileeByrd |
| TwerkyCupcake |
Barn Cat Spotlight
| Emsnotfound | 404_Unknown(Seven) | SweetIRL |
| PancakeDuhBird | Lizardden | Noah (2by2) |
Additional thank you to those who we couldn't put in Super-Beta spotlight or Barn-Cat spotlight because they were so dedicated to the project that they became staff.
Donation List
| $500+ Donators | ||
| NightShadeLily | Ryaroar | IBPixelmaur |
| $300+ Donators |
||
| XxMistSniperxX | AbbyRhea | MixedOpinions |
| AlmoudMilky | ||
| $200+ Donators | ||
| Moo Moo | OnyxButNot | WorldofEmber |
| Abigail Pinehaven | barrelracing | Novalux |
| SarahLuigi | ||
| "Ritzy and a Half" Donators | ||
| BlueMaggot | IRISLightning23 | KarmenKimmei |
User Contributions
Translations
All of our translations are done by our community members! So they need some credit for helping us out.
| Language | Credit |
| Danish (100%) | legenden, SilverHornz, IceAura, RoedSmiley, Gloomwolf145, Kryds |
| Dutch (100%) | MeLikeToast, error 404, Lisa7780, TABEE, RynxHatake |
| Swedish (100%) | Rationality, emsnotfound, LordEstil |
| French (100%) | Ortoxie, El kien, bitjes, Shado |
| Polish (100%) |
Penny, Kokomi, LeafHere, waikikamoocaw, czumulu, Aksiosa, Hanaxq, sc4ry_dreams, Etile |
| German (100%) | Johanna, Jenny, Malli, Lea, Katrin, Emilie, Josefine |
| Romanian (100%) | Julie, Ale |
| Portuguese (BR) (100%) | Kris, Sopa, Txavierzin, Ksalo, Catto |
| Portuguese (PT) (100%) | Sofikit, Ashiko |
| Italian (85%) | Miry, Myra, Yureky, vividlyindigo, bobbywolf |
| Finnish (100%) | Paahtis, Moonlintu, Nincrex, Chinsuzilla, Sagarr, RoseV |
| Russian (100%) | Sarutoshi, SelenaTyan, Shans, Anna |
| Spanish (100%) | Blixx, bitjes, TetsuTetsu, LxvelyMxcha, XiuSiaa, Naexi, Mario, Alice |
| Japanese (100%) | Shadowweaver105, vividlyindigo |
| Slovak (61%) | Minecrap, Amália, Bella |
| Czech (100%) |
eli.slav, Fishnana |
| Hungarian (66%) | Hikory_chan, Imci, Duckling |
| Norwegian (44%) | Bella Fishcobbler, Carmen, Klaudyna |
| Irish (48%) |
x.Rebecc.x |
| Estonian (80%) | Anna <3 |
| Chinese (39%) |
unblockabl |
| Lithuania (62%) | Vilté, Phlyxia |
| Turkish (58%) | bella, DogofWar, bananaa |
| Korean (50%) | Daejung |
| African (50%) | LynnAbrWyrda |
| Serbian (46%) | slayjiafei |
Is this list missing your native language? Fear no more, you can make it happen! All translations are welcome, even if the language is on the list, it's always good to have an extra pair of eyes validating everything. The translations can be found here.
Installing Mods
Introduction
Installing mods can be complicated for new and experienced users alike, so we have provided as much guidance as possible. As such, there is a lot of information here that might feel overwhelming. Use the page navigation bar to jump to sections or launcher guides - this is on the right of PC browsers, or under the info tab if viewing on mobile.
About Mods
- Mods are .jar files and should not be extracted
- Mods go directly in the 'mods' folder - they will not work in sub-folders
- Mods will not load without the correct modding API (ie Forge)
- They are not the same as texture or shader packs and will not function in resourcepack/datapcks or shader folders!
We cannot guarantee support for mod setup or non-SWEM issues in our Discord. Please seek solutions to common issues using ample resources available online.
SWEM Requirements
Select the dropdown for your chosen version to see requirements and download links!
Jar files are usually safe when sourced from trusted sites like CurseForge or Modrinth. You should never download jar (or any) files from untrusted or unknown sources - doing so can introduce malware to your PC or devices!
SWEM for Minecraft 1.20.1
LATEST RELEASE
| Requirement | Version Required |
| Minecraft Version | 1.20.1 |
| Forge | 47.2.0 or higher |
| Java | Java 17 |
| RAM (Memory) | 2.5-4GB+ minimum allocated to Minecraft. 5-6GB is recommended if your PC has at least 8GB+. |
| Mod Requirements | |
| SWEM | 1.20.1-1.5.3 |
| Geckolib | 1-4.2.3 or higher |
| Player Animator | 1.0.2-rc1+1.20 |
Animations should be fixed for 1.20 SWEM when using shaders thanks for fixes included in Geckolib 4 (1.19+)
SWEM for Minecraft 1.18.2
LATEST RELEASE
| Requirement | Version Required |
| Minecraft Version | 1.18.2 |
| Forge | 40.2.0 or higher |
| Java | Java 17 |
| RAM (Memory) | 2.5-4GB+ minimum allocated to Minecraft. 5-6GB is recommended if your PC has at least 8GB+. |
| Mod Requirements | |
| SWEM |
1.4.6 has some noted issues with Horse Data files + Food Pathing. Read more via links. |
| Geckolib | 1.18-3.0.57 or higher |
| Player Animator | 0.4.0+1.18 or higher |
If using shaders, this version will likely have some animation render issues unless you disable entity shadows. Credits go to DC user Hichi for the shader setting suggestion/solution. This will NOT resolve the jump animation desync sometimes seen on MP servers. That is an entirely different issue.
SHADER 'STABLE' VERSION
There is no 'shader stable' version (a version that does not require disabling shader entity shadows) for 1.18 at present.
SWEM for Minecraft 1.16.5
LATEST RELEASE
| Requirement | Version Required |
| Minecraft Version | 1.16.5 |
| Forge | 36.2.34 or higher |
| Java | Java 8 |
| RAM (Memory) | 2.5-4GB+ This may increase with larger mods / modpacks or shaders! |
| Mod Requirements | |
| SWEM | 5.3.21 |
| Geckolib | 3.0.99 or higher |
| Player Animator | 0.3.5+1.16.5 ONLY to avoid known issues. |
If using shaders, this version will likely have some animation render issues unless you disable entity shadows. Credits go to DC user Hichi for the shader setting suggestion/solution. See below for alternate recommendations.
SHADER 'STABLE' VERSION
To use SWEM and shaders without disabling Entity Shadows you will need to downgrade versions. Some users have been able to use Complementary or BSL shaders on low-medium settings with newer versions of SWEM without experiencing any issues, though this has not been a reliable solution for many. The recommended 'shader safe' (little to no animation desync) version are listed here.
| Requirement | Version Required |
| Minecraft Version | 1.16.5 |
| Forge | 36.2.34 or higher |
| Java | Java 8 |
| RAM (Memory) | 2.5-4GB+ This may increase with larger mods / modpacks or shaders! |
| Mod Requirements | |
| SWEM | 5.3.0 |
| Geckolib | 3.0.97 |
| Player Animator | 0.3.5+1.16.5 ONLY to avoid known issues. |
This will NOT resolve the animation desync (jumps) sometimes seen on MP servers. That is an entirely different issue.
Requirements Explained
Java Requirement
What is Java?
Java is the coding language for Minecraft Java Edition. Your vanilla Minecraft game comes with a version of Java 8 installed, but sometimes modded launchers like Curseforge and MultiMC cannot automatically locate it so you may need to download this yourself. In recent years, newer versions of MC Java need updated Java versions - you can check which version is required and download below!
| Minecraft Version | Java Version | Downloads (Select your PC system) |
|
| 1.16.5 (or older) | Java 8 | Download Java 8 for Windows | Download Java 8 for MAC |
| 1.18.2+ | Java 17 | Download Java 17 for Windows | Download Java 17 for MAC |
| Note: You do not need to remove Java 8 to use Java 17 for 1.18+. You will still need Java 8 to play older versions! | |||
How to install
- Download the file, run it and follow the normal installation procedure for your system.
- Install it somewhere you can easily locate it again if required!
- Note the chosen location incase you have to manually select the file in your modded launcher.
You will likely need to go into your modlauncher to locate and specify the version you want to use.
Troubleshooting
Certain browsers might download the wrong version (x32bit) of Java - which will not work properly. Unfortunately, it is not always obvious if this is the case, or help to resolve it if it is not clear. Here are a few suggestions:
- Use Chrome or Firefox browsers that are most likely to recognize the correct specifications of your system.
- Window: Open Command Prompt via the start menu, type java -version and press enter.
- Mac: Open the Terminal app via finder, type java -version and press enter.

The responding text should specify 64-Bit and the correct version (ie 17 or 8 depending on what you have installed). If it states 32-Bit, you should uninstall Java and try again!
Extracting Files
Overview
Some files may come in .ZIP or .RAR format - this is usually to compress the file size so it is easier to send many files at once. Understanding what to do with these files may not seem straightforward, but we are here to give some tips on what to do and when!
MODPACKS
If you are playing a server that provides a zipped modpack, or a friend sends you a zip of their mods, they will need to be unzipped directly into the mods folder to work.
WORLD FILES
World files that come zipped will need to be unzipped and placed in the save folder as an unzipped folder.
SHADERS & TEXTUREPACKS
Shaders and TXPs come in zip format and these should NOT be unzipped. Just put them in their respective folders and leave them be unless you're confident in editing files (for TXPs more specifically, you should not ever need to unzip your shaders).
| File Type | Instructions on Extracting (IF required) |
| .ZIP |
Windows: Right click file > 'Extract All' OR right click file > 'Extract Here' if you have WinRar installed. Mac: Double click a compressed ZIP file. |
| .RAR |
Windows: Install WinRar > Right click file > Extract here Mac: |
| .JAR |
Do NOT extract mod JAR files or they will no longer work. Place directly in your mods folder as they are. |
|
WinRar is a free trialware program for Windows that allows you to extract many file types. There are plenty of tutorials online on how to download use this or similar programs. Only use SAFE AND REPUTABLE download sites. |
|
Option 1: MultiMC
We highly recommend using the MultiMC app - which is a popular choice amongst the staff team!
Download & Information
- Simple straight-forward design, open source project and no annoying ads!
- No need to do a forge installation via external sites, select the version you want when creating instances.
- Create multiple instances, sort in groups, give instances icons, add and remove mods easily.
- Custom installation settings - default Java and RAM settings OR designate them custom to each installation!
- Import a complete instance from ZIP files
- Create instances with popular modpacks from Modrinth, ATLauncher, FTBAppImport, FTBLegacy and Technic!
- Download MultiMC
Installing
Go to the link above and download the file specific to your PC type (Windows, Mac, Linux)
1. Once downloaded, extract the file to access the Application files.
2. You can move the folder to wherever you want it, and suggest making a shortcut or pin-to-start the MultiMC.exe application.
3. Launch the MultiMC.exe file to open MultiMC.
4. On first launch, you will need to follow the in-app setup process, including locating your Java and Minecraft.
5. In the top right corner, drop down to Manage Accounts and log into your Minecraft account as instructed!
Creating A New Instance
On the MultiMC App, select Add Instance on the top menu bar, which will open a new interface to select your preferences.

1. Give your instance a Name (such as SWEM V1)
2. Choose your preferred setup:
[★] Vanilla: Select a Minecraft version to create a vanilla instance. You can add a forge installation in afterwards to play with mods.
Import from zip: Import a copy of a user's or preset instance in ZIP format which easily installs with all the settings and mods.
Modrinth | ATLauncher | FTB | Technic: Browse popular preset modpacks for and install them automatically with ease.

If you import from ZIP or a preset modpack, you should be ready to play once it is setup. Vanilla installations need a few extra steps!
Install Forge
To use mods, your new installation will require a forge installation (Forge Modding API).
1. Right click your instance icon > Edit Instance OR click the icon and select Edit Instance on the right side of the app.
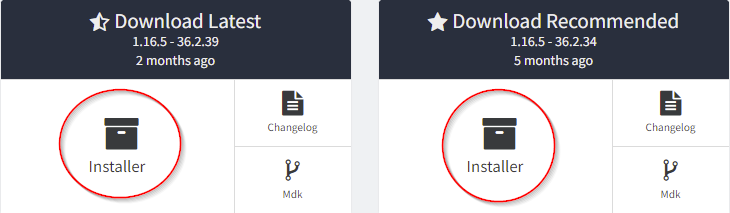
2. Under Version select Install Forge on the right side of the menu.
3. Select the version of Forge to be installed. The starred version indicates the recommended stable release.

Using an incorrect version of Forge will cause loading errors - check which one your version SWEM needs (top of page)!
Install Mods
To install new mods, or manage existing mods:
1. Right click your instance icon > View Mods OR click the icon and select View Mods on the right side of the app.
2. You can do multiple things from the view mods menu:
Add: Browse and add new mods to your instance. Mods must be .jar files
Remove: Permanently remove a mod from your instance. Removing a mod deletes it from the mod folder.
Enable: Enable a previously disabled (see below) mod. When enabled, a mod will be active when MC is launched.
Disable: Disable an installed mod. When disabled, mods will not load when MC is launched. You can also check or uncheck the checkbox to enable/disable. Unchecked mods will not load (disabled).
Disabling mods that your world actively uses (ie SWDM) can alter builds, structures, remove items and entities or even corrupt the world on load if there is no newer version enabled.

Other Guides
Click the dropdown to see more information on our other guides for MultiMC!
MultiMC: Allocating RAM
Minecraft uses RAM (memory) to load and run the game and its assets. To a point, more RAM means you can load faster and process quicker - though that is also dependent on other elements of your PC. A few notes:
- Vanilla default is 2GB but requirement increases with HD texture packs, shader uses and mods.
- It is generally recommended that modded Minecraft requires 3-4GB or more, depending on what you are running.
- Excessive RAM does not guarantee better performance, only allocate what you NEED.
1. On the MultiMC App, select Settings on the top menu bar, which will open a new interface.
2. Under the Java tab you can see current memory (RAM) allocation.
3. Set your required amount for minimum and maximum values. PermGen should be left at what it is by default.MultiMC uses megabytes (MiB) over gigabytes (GB) - 1024MB is equal to 1GB.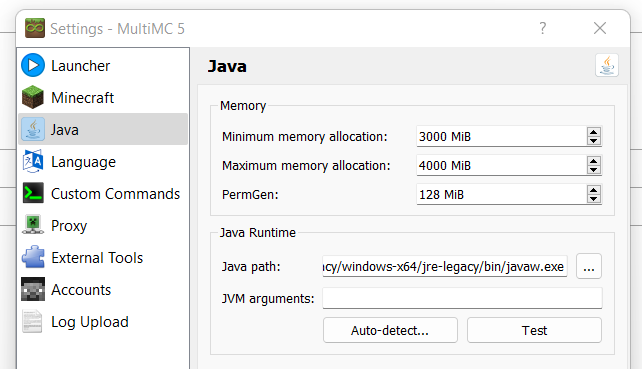
Your PC has a set amount of RAM built-in (installed) and requires several GB of that to run background apps, etc!
MultiMC: Java Versions
MultiMC allows users to setup Java per Instance - which is great for players who play on multiple MC versions which need different Java.
Default Java
When installing MultiMC the user will have been prompted to select their Java version. This becomes the default of all new instances created. To set or check the default Java version:
- Select Settings on the top menu bar.
- A pop up menu will open, select Java on the left-hand list of options.
- Clicking Auto-detect will search for Java installed on the PC that can be used, displaying it's version etc.
- Select the desired version and press okay to save it.
- If your version does not show up, you will need to manually locate it in your files. Once you have found the Java folder, select the version you want, open the bin folder and select javaw or javaw.exe ONLY. These should be an application file type.
Installation-specific Java
Setting an installation specific Java is useful for playing those newer (or older) releases that need a different Java version to your default - for example, wanting to play 1.18 (Java 17) though you usually play 1.16 (Java 8).
- Right click your instance icon > Edit Instance
- Under Settings check the tickbox next to Java to override default
- Follow the same steps (2-5) as above to locate your desired Java version.
MultiMC: Accessing the .Minecraft Folder
Accessing the .Minecraft folder can be useful for finding your mods, shaders, resource packs and save and config folders.
- Right click your instance icon > Edit Instance OR click the icon and select Edit Instance on the right side of the app.
2. Under Version select Open .Minecraft on the right side of the menu.
Folders Explained
Config: Some mods offer tweakable values that can be adjusted, enabled or disabled via txt files.
Crash reports: Logs of crashes, useful when requesting support for a crashing issue.
Logs: Similar to the above, logs provide a record of your client console logs. Latest.log is particularly useful for tech support.
Mods: Stores all mods for your instance - you can add and remove mods from here too if necessary.
Resourcepacks: The folder for your texture pack files.
Saves: The location where all your world files are stored. You can copy world folders from here to backup or move them.
Screenshots: Find all your in-game photos.
Shaderpacks: The folder for your shader files if you have Optifine (or similar) installed.
You might also have other files depending on your installed mods, and several that were not listed due to being defunct.
MultiMC: Features Explained
You can manage your instance under Edit Instance to use:
Resource Packs: Add or remove texture packs (ZIP file)
Shader Packs: Add or remove shaders (ZIP file)
Notes: Make notes on anything you want for planning or future reference!
Worlds: View your worlds - add, rename, copy, remove, use MCEdit (if installed), reset icon and copy seed.
Servers: View, add or remove saved servers.
Screenshots: View screenshots.
Settings: Edit your (instance specific) RAM allocation and java version.
Other Logs: Find your latest crash logs.
You can access other features by right clicking an instance to use:
Change Icon: Select from preset Minecraft themed icons, or upload your own icon.
Rename: Edit the (in-app) instance name.
Group: Assign an instance to custom groups (ie by version, themes)
Minecraft Folder: View the Minecraft folder, which contains mods, saves, logs, config folders etc.
Config Folder: Open the config folder to view configs of any installed mods.
Export: Export your entire instance (settings, mods, saves, servers) to share with others or transfer to another PC.
Delete: Delete the instance. Deleting the instance will remove all mods, saves and settings.
Option 2: CurseForge App
CurseForge is a popular mod launcher and, if MultiMC is not for you, we would recommend using a launcher like CF. CurseForge is not the same thing as Forge installation (below), and the app is not the same thing as the website.
Download & Information
- Easy to use and great for first-time mod users.
- No need to do a forge installation via external sites, select the version you want when creating instances.
- Create multiple instances on multiple versions of Minecraft.
- Create instances with popular mods and Modpacks direct from CurseForge within the app!
- Download CurseForge
Installation
Go to the link above and download the file specific to your PC type (Windows, Mac, Linux)
1. Once downloaded, run the file by double clicking the installer.
2. Follow the installation instructions.
3. On first launch, you will need to follow the in-app setup process, including detecting your Java and Minecraft.
4. CurseForge uses the vanilla launcher when loading the game - you may need to log into your Minecraft account.
Creating A New Instance
On the CurseForge App, select Create Custom Profile on the top bar to open a preferences menu.

1. Give your instance (profile) a Name (such as SWEM V1)
2. Choose your preferred settings:
Minecraft Version: The version of Minecraft your profile will use.
Game Type: [★] Forge | Fabric | Vanilla.
Modloader Version: Forge version
3. Create once you have input your preferences.
4. CurseForge will take up to a few minutes to create an instance and install updates.

Using an incorrect version of Forge will cause loading errors - check which one your version SWEM needs (top of page)!
Worlds are saved to the instance they were created with, meaning you cannot play on worlds in one instance if the world was created while using another instance without moving the save file manually.
Install Mods
To install new mods, or manage existing mods:
1. Click on the Instance (Profile) image to view and edit - pressing 'Play' will launch the instance instead!
2. You can add mods two ways:
Search CurseForge: Select Add More Content to browse for mods on CurseForge via the app.
Add via Mod Folder: Select ... next to Play and choose Open Folder. Drag or paste any mods into the mod folder.

Other Guides
Click the dropdown to see more information on our other guides for CurseForge!
CurseForge: Allocating RAM
Minecraft uses RAM (memory) to load and run the game and its assets. To a point, more RAM means you can load faster and process quicker - though that is also dependent on other elements of your PC. A few notes:
- Vanilla default is 2GB but requirement increases with HD texture packs, shader uses and mods.
- It is generally recommended that modded Minecraft requires 3-4GB or more, depending on what you are running.
- Excessive RAM does not guarantee better performance, only allocate what you NEED.
- Open the CurseForge app and click the Settings icon (gear) in the bottom left corner.
- Select Minecraft under the "Game Specific" section
- Scroll down to Java Settings and edit the value as required.
CurseForge uses megabytes (MiB) over gigabytes (GB) - 1024MB is equal to 1GB.
CurseForge: Access the .Minecraft Folder
Accessing the .Minecraft folder can be useful for finding your mods, shaders, resource packs and save and config folders.
- Open the profile of the installation you want to access files for.
- Click the ... next to Play and select 'Open Folder'
- Your .Minecraft folder will be opened, from here you can select whichever sub-folder you want.
Folders Explained
Config: Some mods offer tweakable values that can be adjusted, enabled or disabled via txt files.
Crash reports: Logs of crashes, useful when requesting support for a crashing issue.
Logs: Similar to the above, logs provide a record of your client console logs. Latest.log is particularly useful for tech support.
Mods: Stores all mods for your instance - you can add and remove mods from here too if necessary.
Resourcepacks: The folder for your texture pack files.
Saves: The location where all your world files are stored. You can copy world folders from here to backup or move them.
Screenshots: Find all your in-game photos.
Shaderpacks: The folder for your shader files if you have Optifine (or similar) installed.
You might also have other files depending on your installed mods, and several that were not listed due to being defunct.
CurseForge: Features Explained
Profile Options: Click the ... next to Play to open Profile Options and change name, forge version and RAM etc.
Export Profile: Export your entire instance (settings, mods, saves, servers) to share with others or transfer to another PC.
Delete Profile: Delete the instance. Deleting the instance will remove all mods, saves and settings.
Update: Clicking the downward arrow to the right of an installed mod will update it to the newest release.
Delete: Clicking the trash can icon to the right of an installed mod will delete the mod.
Active: Toggling the Active button next to Installed Mods will enable or disable loading a mod on launch.
Disabling mods that your world actively uses (ie SWDM) can alter builds, structures, remove items and entities or even corrupt the world on load if there is no newer version enabled.
Option 3: Minecraft Launcher + Forge
We do not encourage the use of a Forge Installation to first-time modders, while simple it also:
Download & Information
- Directs users to download via an advert site that is not discerning with its advertisements and seems sketchy.
- Forge installation allows for only one active modpack - mods must be manually added in and out for different packs.
- Forge installation increases the chance of accidentally loading a save with the wrong/missing mods, corrupting it.
- Download the Minecraft Launcher
Installing
Go to the link above and download the file specific to your PC type (Windows, Mac, Linux)
1. Once downloaded, run the downloaded file MinecraftInstaller and follow the installation steps.
2. Find and open the newly downloaded application called Minecraft Launcher.
3. On the first launch, you will need to sign in with your Microsoft account, by clicking the Microsoft Login button.
Installing Forge
2. Open the downloaded file, and select Install Client.
3. If the file path at the bottom is not pointing to your minecraft, click the three ... and point it to your minecraft installation. Default installation paths
4. Click install
5. Relaunch your Minecraft Launcher and if you click installations it should now contain a forge installation.
6. Click the green Play button, to setup the instance.

Install Mods
To install mods for the minecraft launcher, you need to open the .minecraft folder.
An easy way to do that is clicking the folder icon on hovering one of the installations:

When the file explorer has been opened, go back one folder so you are standing in the minecraft folder.
1. Open the folder named mods if that folder is not present, you can create it.
2. Open the folder mods and make sure it's empty of any files.
3. Drag all your downloaded mod files into this folder. (If you downloaded a zipped modpack, you need to unzip it and drag ONLY .jar files in here.
Other Guides
Click the dropdown to see more information on our other guides for Forge Installations!
Forge Installation: Allocating RAM
Minecraft uses RAM (memory) to load and run the game and its assets. To a point, more RAM means you can load faster and process quicker - though that is also dependent on other elements of your PC. A few notes:
- Vanilla default is 2GB but requirement increases with HD texture packs, shader uses and mods.
- It is generally recommended that modded Minecraft requires 3-4GB or more, depending on what you are running.
- Excessive RAM does not guarantee better performance, only allocate what you NEED.
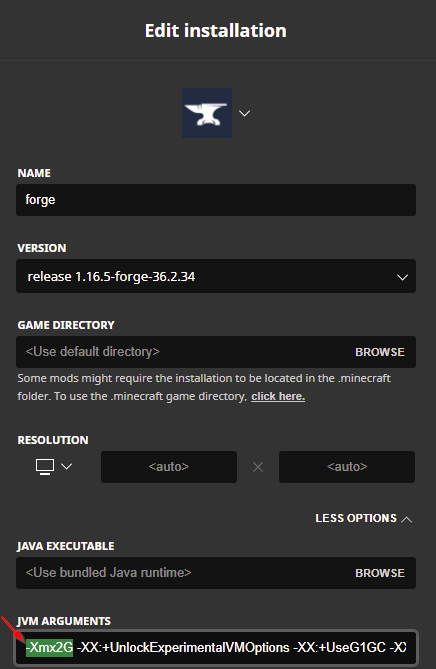
- On the Minecraft Launcher, select Installations on the top menu bar.
- Click the proper forge installation. (1.16.5 and 36.2.34 or above)
- Click the More Options at the bottom right.
- In the field JVM Arguments you should see -Xmx2G (2 being the amount of GB allocated)
- Change that number to the required amount.
Updating Your World
With the release of 1.18.2, some users may be interested in porting forward their existing SWEM worlds. Please carefully read the information here if you are unfamiliar with porting forward modded instances!
Important Notes
- Porting forward can corrupt worlds in some (rare) instances. Always take a backup of your valued saves!
- Porting forward without original mods will result in missing items, blocks or entities at best, and corruption at worst. For that reason, it is not recommended to port forward any worlds that has mods which never updated to 1.18.2+
- Ported worlds will NOT have newer terrain generation in any explored chunks - newly generated chunks should be fine.
- Ported worlds will have config files reset to default - make sure to tweak these as required.
SWEM Horses (and many other modded entities) will not be carried over to the new 1.18 version. Read more on Discord.
Optifine H6 or H7 crashes 1.18 unless using outdated Forge. Optifine H9 pre2 or above is recommended for Forge 40.2.0!
How to Update
It is recommended that you start a NEW instance / profile and copy your world file over. It may be possible to update instances / profiles with some launchers, but this is not advisable as you cannot reverse any corruption or issues that might occur - and will not be able to go back to play your old world if you later want to do so.
- Download and install Java 17 if you do not already have it.
- Follow the instructions above for your chosen launcher type to setup a new instance / profile / forge installation.
- MultiMC / Curseforge: Select the recommended forge version.
- MultiMC / Curseforge: Allocate sufficient RAM - this may not be carried over between instances.
- MultiMC: Check you are using the right Java version, or setup your required version if necessary.
- Curseforge: You do not necessarily need to do anything with Java, provided you have it installed.
- Download or install ALL essential mods from your original world in 1.18.2 versions.
- Open the .Minecraft folder of your original world, go to saves and copy the folder with your world(s) name.
- Paste it into the saves folder for your new 1.18 instance / profile / forge installation.
Troubleshooting
Okay... so something has gone wrong and you are stuck, or things are not doing what they ought to do. It is frustrating and it happens often, so here is a brief overview of the most common issues and how to solve them.
Read First
Most issue that occurs on Minecraft has been noted, asked and resolved many hundreds of times over. Often the answer is a quick google search away, or has a handful of very informative videos available on how to fix it. When you run into trouble, we ask that you first try to seek your own answer rather than defaulting to SWEM's help channels on Discord, doing so for easily resolved issues means there are fewer resources and less time to help those with more complex problems or take away from those who have consciously tried to find their own solutions. Our support for general MC modding is entirely voluntary!
Types of Issues
Game Crashing
Your game crashing can be one of the hardest things to solve for those who are not technically minded. However, here's a few tips:
- If you receive an error number or text - google it first. It is most likely one someone else has had before.
- If you cannot find a solution, find your latest.log file (in the .minecraft > logs folder) and request someone able to interpret logs takes a look at it in our Discord or another modding community.
For crashing help, you must upload your logs or as much error info as possible, otherwise there is nothing to go on.
Loading Errors
If Minecraft will not load, or spends a long time or even gets stuck loading, it can be due to MANY factors:
- You have the wrong mods for your version, or are missing dependencies (mods that other mods need to function). In this case, read the information MC provides you carefully, and fix the mods it is telling you are wrong. Common issues here are using fabric mods with forge, or using older/newer versions of MC mods on another MC version.
- If you are stuck loading for a long time or endlessly, chances are you do not have enough RAM. Check the guides above for allocating RAM (specific to your mod launcher or method).
If seeking help, you must upload your logs or as much error info as possible, otherwise there is nothing to go on.
Lag
If your game is lagging, these are the most common causes:
- You have too many mods for your PC to handle, or you are asking it to do too much (render or graphics too high)
- One or several mods are poorly optimised and are causing your PC or Minecraft to struggle
- Running shaders or HD texturepacks
- Too many entities
What most of this boils down to is the RAM you have available or allocated. To a point, more RAM means you can load faster and process quicker - though that is also dependent on other elements of your PC. Allocating RAM should be a bigger consideration than just 'giving it more' though, and here's why:
- Excessive RAM does not always equate to better performance, too high and it can actually make it worse so you should stick to what you NEED.
- PCs do not have limitless RAM, in fact many low-end PCs do not have much. Your PC requires an absolute minimum of 1-2GB free at all times to run background processes and essential functions. Since modded MC often needs 3-4GB to itself, if you have a 4GB RAM PC, you might find running even small modpacks a real challenge! So check what you actually have, work out what you can realistically afford to give and evaluate if a modpack is right for your PC.
Tips for Potato PCs that cannot allocate extra RAM:
- Keep your settings as low as possible to tolerate for render, simulation, graphics ETC.
- Close down background processes that you do not need; Discord and browsers etc are very greedy!
- Avoid shaders and HD Texturepacks if you can even run them at all.
- Avoid having or being near too many entities in game (ie keep that cow herd small!)
- You might get better performance on a server (depending on their modpack or settings), as SP actually requires the player to run both (solo) server + game.
- Use performance optimising mods such as ferritecore +/- cut out optional mods (client sides).