Community Packs
Community Packs are our integrated system to dynamically add custom content made by the community without the requirement for additional code.
- General Information [WIP]
- Creators' Corner [WIP]
- Coats [NEW]
- Tack [WIP]
- Animations [WIP]
- Community Packs [OLD]
- Resource Packs [WIP]
General Information [WIP]
This feature is available in 1.20.1-1.5+ and will NOT be added to outdated versions.
Community Packs is a feature that allows players to add NEW assets to the mod without the use of an add-on mod.
Important- Update Changes
Existing worlds should be safe to update but always take a backup in case you encounter an issue!
To support community packs, some changes have been made. See additional pages for feature-specific changes.
- Common, Client and Recipe configs now generate in
config/swem - Community Pack features will likely break add-on mods.
PLEASE BE PATIENT AND ALLOW CREATOR'S TIME TO UPDATE THEIR MODS
Supported Features
| Feature | Mod Version | Notes |
| Coats | 1.20.1-1.5 Beta + | Custom coats that do not override default, and support coat cycling + breeding tags. |
| Tack | 1.20.1-1.5 Release | Custom tack that does not override default tack and can be purchased via EQ Shop. |
| Animations | 1.20.1-1.5 Release | Custom animations that can be triggered via command (loop). |
Frequently Asked Questions
[1] Community & Content Packs
⮞ WHAT IS A COMMUNITY PACK?
Community Packs are folders that include all the files necessary to add NEW assets such as custom coats to SWEM.
⮞ WHAT IS A CONTENT PACK?
Content Packs is also a Community Pack, but usually with less content. It will merge into any Community Packs with the same name. This allows:
- Creators to set a consistent pack name and release smaller 'add-ons' to their main pack(s)
- Creators to easily provide updated file (ie fixes or improved) that override their original files
- Players to have fewer individual Community Packs to sort
- Players to have fewer Community Packs listed in game, and easier results by Creator
Example:artist_kofi:
Example:artist_fantasy:orartist_bays:
⮞ HOW DO I KNOW IF A PACK IS READY TO USE (PREMADE)?
This depends on the source, most creators should clearly state if their content is files only or a read to use pack.
- Look at the file contents (unzip the file if it comes zipped)
✅ Must be a folder, not a ZIP (or any other)file
✅ Must have a lowercase name with no spaces. ✅artist_packname❌Artist Pack Name
✅ Must have two folders inside it:jsonandtextures
✅ Must have at least one coats or tack item with all required files.
See Creator Corner if you are making a community pack and are unsure what is required.
❌ Individual files in a single folder
❌ PNG files injson > coatsor JSON files intextures > coats > legacy
❌ Files or folders with spaces, symbols or capital letters
There can still be other errors that prevent a pack working, but this criteria means the pack is structured correctly!
⮞ WHAT IF PACKS HAVE AN IDENTICAL NAME?
Community Packs that do not use recommended format could have a duplicate name like free_coats or kofi_coats.
- Duplicate folders will merge into one with the files of both folders
- Files will not override or replace each other unless they have identical names
Creators
- Avoid conflicting names with recommended unique format of
coatname_artistin all files and packs - Avoid content 'options' with the same name - if you offer variants (ie braids vs roached) give them a unique name
- Avoid creating packs with 'old' files that may override new versions (ie fixed or improved textures)
- Update or remove old packs that may have any such files.
Always check that merged files maintain the correct folder structure and file names are valid (ie not coat_name_copy)
⮞ WHAT IF IT ASKS ME TO REPLACE FILES?
There is no correct answer to this:
- Replacing existing files to update a texture error is usually safe.
- Replacing existing files to update coat info for breeding tags, inspiration info is usually fine.
- Replacing existing files with outdated files could revert changes (replace with pre-fix version)
If you replace a file with a broken texture or non-functional json, you will need to fix it or re-download the original!
⮞ CAN I HAVE MULTIPLE COMMUNITY PACKS?
Yes. You can install multiple Community Packs, but you should read [4] Performance if adding a lot of additional content.
[2] Modifying Community Packs
Always read the Creator's Terms Of Use (TOU) as significant non-private alterations or reupload may be prohibited!
⮞ CAN I REUPLOAD A COMMUNITY PACK +/- MODIFIED?
✅JSON FILES You can edit and distribute json files or overrides freely.
❌PNG FILES You should not modify, re-upload, distribute or monetize Creator's work without explicit consent.
PNG FILES Creators have the right to set and enforce appropriate use of their content.
- You must not modify, re-upload, distribute or monetize Creator's work without explicit consent.
JSON FILES Creators can set reasonable requests on json modification, but do not own this asset.
✅ You can provide FREE override files or packs.
❌ You must not create and distribute files that violate platform (ie Discord) or Community (ie SWEM) rules.
❌ You must not monetize file edits to profit off the original Creator(s) work without consent.
❌You must not provide premade packs that include the content (pngs) of Creator(s) without consent.
❌ You must not remove artist credits, or add false credits.
❌ You must not remove artist reference, excluding reasonable modification.Esperanza from Spirit -> ✅ Palomino (Dreamwork's Spirit: "Esperanza") ❌ N/A
⮞ CAN I RENAME A PACK (AS A PLAYER / CLIENT)?
Multiplayer No. This may prevent you from seeing any custom coats, even if you have all the correct files.
Singleplayer Yes. This can sometimes help you organize custom content or shorten pack IDs.
- You must use a unique lowercase name with no spaces or symbols
- You should not edit information in use by an existing save (will need to change coats / tack affected).
⮞ CAN I RENAME A COAT / TACK ITEM?
Multiplayer No. This may prevent you from seeing any custom coats or tack, even if you have all the correct files.
Singleplayer Yes, though this is not recommended.
- You must use a unique lowercase name with no spaces or symbols
- You must set this for the file names of both
json,png, and the texture path inside thejsonfile. - You should not edit information in use by an existing save (will need to change coats / tack affected).
You should use standard naming format coatname_artist with appropriate artist credit by name!
⮞ CAN I EDIT CUSTOM CONTENT INFORMATION (JSON)?
Multiplayer Yes. Important information:
- Client-side (player) edits will only apply to your singleplayer worlds.
- Server-side edits will apply to all players, regardless of their individual pack settings.
Texture PathPlayers must use the same path to avoid black horses (missing texture)
Singleplayer Yes, depending on type:
| Content | Variable | Comments |
| Coats | ✅ Artist Credits * ✅ Inspiration * ✅ lapis_cyclable✅ obtainable_by_breeding✅ base_colors❌ Model |
Can include capital letters, spaces and symbols inside the "" entry.
Can include capital letters, spaces and symbols inside the "" entry.
Effect will apply to future lapis/redstone changes. Must be true/false.
Effect will apply to future breeding. Must be true/false.
Effect will apply to future breeding. Must use valid tags.
Must use Legacy until additional models are supported. |
| Tack | TBC |
|
| Animations | TBC |
|
You must not remove or (unreasonably) modify Artist credits +/- reference and inspiration comments.
[3] Multiplayer Use
⮞ HOW TO ADD COMMUNITY PACKS TO A SERVER?
Multiplayer Paste the community pack(s) into the server's config > swem > communitypacks folder as normal.
- Players (clients) must also use the exact same mod version as the server.
- Players (clients) must have a copy of the same community pack folder(s).
- Clients can have additional community packs installed for SP use.
See individual pages for troubleshooting common issues for each feature.
⮞ CAN I USE THE OFFICIAL SWEM COMMUNITY PACK ON A SERVER?
Yes. You can use this on a multiplayer server provided it is free to all players, not re-uploaded externally or monetized.
You should not modify the contents, except to remove unwanted files or edit obtaining information (tags, breeding etc).
⮞ CAN I USE CREATOR'S COMMUNITY PACK ON A SERVER?
Always read the Creator's Terms Of Use (TOU) as public multiplayer use, alterations or reupload may be prohibited!
[4] Performance
⮞ WILL COMMUNITY PACKS MAKE MY GAME LAG?
Performance loss with the community pack features has not been reported, but individual results may vary.
- Community Packs store text and coat files in your config file which will occupy storage space.
- Community Packs require your game to load and register these on load, which may marginally increase load times.
- Community Packs add new content into the game, similar to adding more and more mods it can impact performance.
PCs with limited resources or low performance may have a limit on how much custom content it can realistically support.
Using Community Packs
This section explains how to use PREMADE Community Packs [1] - see Creators' Corner to create your own.
Read [2] Modifying Community Packs before you edit any Community Pack files.
To install your custom content, you need to download or create a Community Pack or Content Pack.
- You can install multiple packs if they have a unique and valid name such as
artist_packname. - Content packs will merge into community packs of the same name, or work as a new pack if one does not exist.
STEP ONE: GENERATE THE CONFIG FOLDER
This is only required the first time you add or update the 1.20.1-1.5+ mod file.
- [Optional] Backup any existing saves files (recommended)
- Install the latest 1.20.1-1.5 Beta file
- Load the game to the menu screen
- Exit the game
STEP TWO: INSTALL THE COMMUNITY PACK
- Download or Create your Community Pack
→ Free Official Community Pack can be found here!
→ Free and Paid Community Packs can be found on many creators pages here! - Check the file is ready to install
→ See [1] Community & Content Packs above (FAQ) - Copy the Community Pack
- Go to
config > swem > community-packs - Paste the Community Pack file
→ It should look like:config > swem > community-packs > artist_pack_name
STEP THREE: VIEW THE CONTENT IN-GAME
- Load the game
- Load into a save or (recommended) a new test world
- See relevant pages:
→ Coats
→ Tack
→ Animations
Known Issues
If you find an issue, please report it to our bugs channel on Discord. We ask that you look to see if your issue was reported first!
- 1.20.1-1.5.2 Pasture Blankets (equipped) disappear on world reload.
Changelog
View Changes
This is not a complete list of version changes / fixes. It is a changelog of relevant wiki-related version information.
| MC Version | Release | Notes |
| 1.20.1 |
1.20.1-1.5.2 | Bug Fix: Pasture Blankets not showing up on racks. |
| 1.20.1-1.5.0 | Public Release: Added support for custom tack and animations. | |
| 1.20.1-1.5-beta-7 | Bug Fix: Change JSON file formatting and fixed load errors. | |
| 1.20.1-1.5-beta-5 | Public Release: Added support for custom coats. |
Creators' Corner [WIP]
READ ME
The Community Pack features are in development. Changes may not reflect newest release immediately.
This page will be updated when possible, and information may not be correct for outdated versions!
Please contact Delphi via SWEM DC with any feedback or to contribute video resources for this guide!
Note To Content Creators
This update will support you in sharing your content to a wider audience, with or without coding experience.
- You will no longer need to create resource packs that override a limited number of default options for coat or tack.
- You can add limitless (within reason) options to expand the game without creating a separate mod (add-on).
- You can integrate your content into some existing features of the mod, such as coat cycling and breeding tags.
To properly transition towards community packs, we recommend:
- Read this page carefully to fully understand creating community packs.
- Create simple, clear and easy to follow / enforce Terms Of Use (TOU) if you share or sell your content.
- Upload content in a player-friendly format, such as Community Pack, Content Pack or standalone files.
You must read and follow the Content Creation Rules (below) to comply with SWEM's license and permitted use of assets.
Content Creation Rules
⮞ YOU MUST NOT SELL (OR TRADE FOR PROFIT) ANY ASSETS CREATED AND OWNED BY SWEM
EXCEPTIONS MAY BE MADE ON AN INDIVIDUAL BASIS WITH EXPLICIT CONSENT FROM SWEM (ALAHARRANHONOR)
- Modified versions of the horse model
- Modified versions of any blocks or items
- Modified version of any default coats
- Modified textures of any blocks or items
- Freely provided materials:
→ Shading layers
→ Rights to use standard techniques (eyes, nose, hoof etc)
→ Template resource packs
→ Template community packs
→ JSON files (not in a working community pack)
⮞ YOU MUST NOT SELL (OR TRADE FOR PROFIT) OR REDISTRIBUTE ASSETS OF OTHER CREATORS
EXCEPTIONS MAY BE MADE WITH EXPLICIT CONSENT FROM THE CREATOR OR THEIR T.O.U
- Modified textures
- Modified .json files that remove or alter credits
- Free resources
→ Including the Official Community Pack (free) and any donated works from community artists
⮞ YOU CAN PROVIDE FREE CONTENT THAT ACCEPTS AN OPTIONAL DONATION
COAT MODIFICATIONS ARE ONLY PERMITTED WITH WITH EXPLICIT CONSENT FROM SWEM (ALAHARRANHONOR)
- Modified horse model and "breed add-ons"
- Modified .json files
→ Altered breeding tags or coat cycling information
⮞ YOU CAN SELL CONTENT THAT IS AT LEAST 90%* YOUR OWN WORK
90% ACCOUNTS FOR THE 10% FAIRLY ACCREDITED TO SIMILAR ARTISTIC STYLE, INSPIRATION, REFERENCE OR COLOR PICKING
You can sell content that is at least 90%* your own work
→ Models for entities, blocks or items
→ Textures for entities, including coats using the freely provided shading layer or standard features (eyes, nose, hoof etc)
→ Textures for inventory icons of custom content using the default pixel outline (shape) of SWEM tack
→ Textures for blocks or items
→ Animations
Star Worm Equestrian is PG13: appropriate for users of all ages.
Any content or creators that modify it to be or appear otherwise do so against the terms of use for this project.
⮞ YOU MUST NOT SELL, PROMOTE OR FEATURE SWEM IN ANY CONTENT OR MEDIA THAT INCLUDES:
- Extreme violence or gore
- Mature (18+) themes
→ Including realistic gender anatomy or animations
Terms Of Use Information
WARNING
Creating a complicated or highly restrictive TOU will set you up for frustration when it is inevitably violated or misinterpreted.
To protect your content within the very limited legal recourse for TOUs we encourage creators to share their creations in a similar way to mods; allow public or private use with minimal restrictions, provided the creator receives the download or support.
- If you choose to share your content publicly, it is your responsibility to clearly inform users of appropriate use.
- It is unreasonable to expect users to be remain informed of alterations to TOU after the time of download.
- It recommended to:
→ Post your full TOU in a public source that can be accessed by anyone without membership or sign up/in.
→ Include your TOU as a text file in any premade community packs.
→ Include your TOU as a link or summary in any location your files are hosted or downloaded.
RECOMMENDATIONS
Avoid requiring credit for use in media; it should be encouraged but no credits does not equal insult!
→ It is not standard practice to credit every creation (ie mods) in casual images; nice if you do, but optional!
→ It should only be "required" to credit where appropriate (promotion, inspiration or reference), and not falsely claim.
Avoid prohibiting inspiration or reference; similarity is not proof of plagiarism!
→ It is possible for creators to have a similar idea, share the same reference, or take respectful inspiration!
→ It should be expected that work(s) clearly and directly referenced or inspired by your creation is fairly credited.
Avoid restrictive use policies that are difficult to monitor and enforce.
→ It is an unfortunate reality that players +/- servers will violate agreements, especially if they are restrictive.
→ There is limited legal recourse to address this; so state what you are willing and able to action if necessary!
Consider providing content in a compact format with minimal individual downloads!
→ Players and servers will be less likely to distribute (or more likely to use) easily accessible files.
→ It is suggested to provide creator pack(s) in bundles such as 'Bays', 'Pintos', '2023 Coats'
Avoid uploading to unsecure file hosting sites or encouraging users to engage in unsafe internet habits.
→ It is recommended to use popular sites such as Kofi, Google Drive.
EXAMPLE TERMS OF USE (NOT A LEGAL CONTRACT OR LICENSE)
OWNERSHIP & AGREEMENT
→ The creator (name) retains all rights of ownership to this content
→ The right to use this content is granted to you (player) in accordance with this agreementUSE
→ This creationcan/notbe used in content (images, videos) - credits are optional but appreciated.
→ This creationcan/notbe used privately in singleplayer or a small private group.
→ This creationcan/notbe used publicly in multiplayer.
→ This creationcan/notbe used in reasonable commercial serviceswith/withoutconsent.
✅🚫 Offered as part of a service (ie random / selected coat change) requiring real money
✅🚫 Offered as a prize or reward for activity or events requiring real money
✅🚫 Offered as an unlock via crowdfunding or engagement (ie server cost covered -> unlock)
NOTE: Commercial services must abide by Minecraft's EULADISTRIBUTION
→ This creationcan/notbe reuploadedwith/withoutconsentand/orcreditsand/orpayment.
✅🚫 Limited private use by friends or small groups
✅🚫 Custom Community Packs (folder)
✅🚫 Custom Modpacks (zip)
✅🚫 Exceptions: Paid vs Free, Commissions (paid) or Gifts (prizes)
✅🚫 Other: File Hosting Sites, Discord Servers etcALTERATIONS
→ This creationcan/notbe alteredwith/withoutconsent andwith/withoutcredits forpublic/privateuse.
✅🚫 Texture
✅🚫 Information (json: name, description, color tags etc)
✅🚫 Other conditions
Updating A Community Pack
Official Community Pack version is updated to work with SWEM 1.5.2 - please use the Beta 5 pack found here.
If you have a custom coat community pack for 1.20.1-1.5-beta7, you must modify it to stay compatible in newest release.
- Close Minecraft
- Locate your community pack(s)
- Go inside
packname > jsons > coats - Open the first coat file in a text editor
- Change
"legacy": "default:coats/legacy/coat_artist.png"to"legacy": "legacy/coat_artist.png" - Save and close the file
- Repeat for all coat files +/- all outdated packs
Texture Path Files (Older Versions)
Beta 5 "legacy": "default:coats/legacy/coat_artist.png"
Beta 7 "legacy": "default:legacy/coat_artist.png"
1.5.x "legacy": "legacy/coat_artist.png"
Creating A Community Pack
You can skip step 1-3 by downloading a template community pack found on our Discord.
You can skip or delete any folder that will not be used for your content (ie tack folders if you will not add any tack).
READ ME: RESOURCES
[EXPAND] Recommendations
⮞ REMOVE ANY UNUSED FOLDERS
Consider removing folders that do not contain any content (ie tack folder from a coat only pack). This will not prevent the pack from working, but it will be smaller, tidier and much clearer to users on the content contained within.
⮞ USE A STANDARD NAMING FORMAT
This keeps your creations consistent, well organized and easy to identify as your work.
PACKS artist_packname Example: arishant_freecoats
COATS coatname_artist Example: maple_arishant
TACK See naming format resources below.
You might notice some items recommend credits before or after the name, this is for a few reasons!
PACKS Sorted alphabetically in folder and in-game, so packs group by artist instead of pack name
COATS Listed alphabetically in game once filtered by pack. Example: apple_artist / banana_artist / coconut_artist
TACK Listed alphabetically in game, instead of by type. Example: midnight_bridle / midnight_halter / midnight_saddle
⮞ USE A UNIQUE NAME FOR PACKS
Naming a pack koficoats will work, but if another pack shares the same name they would merge together.
If you use artist_packname it significantly reduces the chance of name duplication and folder merging.
⮞ USE A UNIQUE NAME FOR FILES
Naming a coat coatname or tack item name_type without artist will work, but it increases the risk of file replacement.
Pack that use the same name and coats or tack with the same name, will replace existing files of the same name.
If you are an artist that offers different variations of content, always use a unique name.
Example: 2 files both named coatname_artist but one with braids and one with roached mane will replace the other if a player chooses to use both options. If you named one coatname_braids_artist and the other coatname_roached_artist the player can choose to have one or both without replacing the other.
⮞ USE CORE PACKS AND CONTENT PACKS
If you want to make every pack unique, that's up to you. Example: artist_pack1 artist_pack2 artist_pack3
However, if you create a lot of content this is going to be annoying for you to keep track of, and overwhelming to players.
Instead of using many packs with just one of two creations inside, consider using a core pack and offering add-ons via content packs. This is explained more in a section further down!
⮞ REMOVE (OR RENAME) OUTDATED FILES
If you fix and issue with a pack, file or texture it is recommended to remove the original download. If you want to keep it as a legacy version, consider renaming it (ie coatname_artist_old). Old files using the name name may replace newer ones if accidentally downloaded, or included in an outdated pack.
[EXPAND] File Structure Example
| 📂 config |
📂swem |
📂community-packs |
📂artist_packname |
📂jsons |
📂coats |
🗒️ |
|
📂tack |
📂blanket |
|||||
|
📂breast_collar |
||||||
|
📂bridle |
||||||
|
📂girth_strap |
||||||
|
📂halter |
||||||
|
📂horse_armor |
||||||
|
📂leg_wraps |
||||||
|
📂pasture_blanket |
||||||
|
📂saddle |
||||||
|
📂saddle_bag |
||||||
| 📂textures |
📂coats | 🗒️artist_coat.png files |
||||
| 📂tack |
📂blanket |
|||||
|
📂breast_collar |
||||||
|
📂bridle |
||||||
|
📂girth_strap |
||||||
|
📂halter |
||||||
|
📂horse_armor |
||||||
|
📂leg_wraps |
||||||
|
📂pasture_blanket |
||||||
|
📂saddle |
||||||
|
📂saddle_bag |
||||||
| 📂tokens | 🗒️token_name.png files |
|||||
| 🗒️ tokens.json |
||||||
|
Shown: The file structure for community packs, including correct placement inside |
||||||
STEP ONE: CREATE THE PACK FOLDER STRUCTURE
- Create a new folder
→ It can be inconfig > swem > community-packsor somewhere else (move later) - Name your community pack
→ It must be in lowercase letters with no spaces
→ It is recommended to useartist_packnamesuch asyourname_kofioryourname_bays - Go inside the empty folder
- Create two new folders here
→jsonsto store the information files
→texturesto store the coat and tack files
STEP TWO: CREATE THE JSONS FOLDER STRUCTURE
- Go inside the empty
jsonsfolder - Create two new folders here
→coatsto store .json information files for coats
→tackto store .json information files for tack - Go inside the empty
tackfolder - Create 10 new folders here
→blanket
→breast_collar
→bridle
→girth_strap
→halter
→horse_armor
→leg_wraps
→pasture_blanket
→saddle
→saddle_bag
STEP THREE: CREATE THE TEXTURES FOLDER STRUCTURE
- Go inside the empty
texturesfolder - Create two new folders here
→coats
→tack - Go inside the empty
coatsfolder - Create one new folder here:
→legacyto store .png texture files for coats - Go inside the empty
tackfolder - Create 10 new folders here
→blanket
→breast_collar
→bridle
→girth_strap
→halter
→horse_armor
→leg_wraps
→pasture_blanket
→saddle
→saddle_bag
Creating A Content Pack
If you are making a pack for personal use, you can skip this. Content packs are aimed at Creators providing expansion content.
A Content Pack is exactly the same as a community pack, but differs in how and why it is used.
- Content Packs use the same name as a 'core' community pack.
- Content Packs merge into any packs with the same name, or work as a standalone if one does not exist.
- Content Packs usually include less content, or content bundled by theme (ie Black Coats, Bay Coats)
[EXPAND] Content Packs Example
If you create a lot of content, you probably do not want to provide ALL of your coats in a single bundle, or maintain lots of individually named packs. This would quickly get confusing and difficult should any packs require a fix to files or textures.
Let's say you decide that your core pack will be yourname_koficoats. Each time you create a new coat, you will provide that coat in its own pack, using that name. You set it up like a normal community pack, and if a player downloads it it will work in-game when pasted into the community pack folder.
If you then create another new coat, you do the same thing; make a community pack named yourname_koficoats with just the NEW coat file and texture. If a player downloads that file and pastes it into the community pack folder, it will merge into any pack folders that share the same name.
This means you can offer optional content that players can pick and choose which files they want. They don't need to download any requirements, every pack will work on its own, or merge with others if they already exist.
Unfortunately, downloads get renamed if they have the same name, ie artist_pack [1] and artist_pack [2]
→ There is no way to avoid this without downloading packs one at a time, or manually renaming them to merge files.
Creating Content
If you followed the guide above, you have a basic community pack, but it needs content to work in game.
Community Packs can support custom coats, tack and animations - this can be all in one pack, or split into separate packs.
Adding Custom Coats
This guide will not cover how to create a coat, for information please read our resources on Discord.
STEP ONE: CREATE OR DOWNLOAD A CUSTOM COAT
- Save or rename the file as
artist_coatname
→ The file type should display asPNG File - Paste this file into your community pack
artist_packname > textures > coats > legacy > coatname_artist.png
STEP TWO: CREATE A JSON FILE
-
- Open a blank text editor file using Notepad (Windows) or TextEdit (Mac)
- Paste in the coat template code (below)
- Edit the template to your coat
→creditsthe name of the coat artist(s) ✅"credits": "Arishant",
→inspirationoptional notes on inspiration or reference ✅"inspiration": "Esperanza from Spirit",
→modelsthe texture path (location) for legacy model ✅"legacy": "legacy/esperanza_arishant_legacy.png"
→lapis_cyclableif the coat can be cycled using lapis or redstonetrueorfalse
→obtainable_by_breedingif the coat can appear from a (bred) foaltrueorfalse
→base_colorswhich color tags the coat uses ✅["black","gray"]✅"base_colors": ["creamy"] - Save the file as a .json file by using
save asand naming the fileartist_coatname.json
→ The file type should display asJSON File - Paste this file into your community pack
artist_packname > jsons > coats > coatname_artist.json
[EXPAND] Coat Template
{
"credits": "Artist(s)",
"inspiration": "N/A",
"models": {
"legacy": "legacy/coatname_artist_legacy.png"
},
"lapis_cyclable": true,
"obtainable_by_breeding": true,
"base_colors": ["black","gray","white","creamy","brown","dark_brown","chestnut"]
}
[EXPAND] Info & Common Mistakes
⮞ LEGACY MODEL
Legacy model is the current horse model in game, but more models are planned in future.
- Texture must use the
legacymodel texture path - Future model types may come pre-listed listed, but do not function in game
⮞ TEXTURE PATH
Texture path is the location of the coat file placed in artist_packname > jsons > coats > legacy > coatname_artist.png
- Texture path must match the exact name of the coat png file
→ Must be a lowercase name with no spaces or symbols
→ Can include numbers or underscores
→ Should use the formatartist_coatnameorartist_coatname_legacyto indicate it uses original model
→ Should share the same or similar name as the json file
⮞ COAT CYCLING
Coat cycling is the function that allows a player to cycle through coat options by right clicking a horse with redstone or lapis.
- Cycling a coat will only work if:
→ Set to"lapis_cyclable": true,in the json file
→ Coat cycling is enabled in server configallowCoatCycling = true
→ Coat is not blacklisted in server configblacklistedCoatIds
→ Server config is per-world; enabling settings in one world does not auto-apply it to others! - Summoning a (random) coat via command will only work if:
→ Set to"lapis_cyclable": true,in the json file
→ Coat is not blacklisted in server configblacklistedCoatIds
⮞ BREEDING & COLOR TAGS
- Color tags must use at least one of 7 valid choices:
→["black","gray","white","creamy","brown","dark_brown","chestnut"]
→ Separate multiple tags with a comma
→ There must not be a comma between"and] - Coats can appear from converting horses if:
→ Coat has at least one valid color tag
→ Coat has the same color tag as the vanilla horse (randomly chooses from coat options)
→ Set to"obtainable_by_breeding": true,in the json file
→ Converting is enabled in server config file (default)tokensBreeding = false
→ Coat is not blacklisted in server configblacklistedCoatIds
→ Server config is per-world; enabling settings in one world does not auto-apply it to others! - Coats can appear from breeding if:
→ Set to"obtainable_by_breeding": true,in the json file
→ Coat is not blacklisted in server configblacklistedCoatIds
→ Foals are assigned one tag from any their parents have and use one of 7 foal coats (one per tag)
→ Foals choose from a random adult coat with the same tag when they grow up - Color tags and breeding outcomes are very basic and do not support realistic genetics
→ Setting tags you expect the horse to 'pass on' is more likely to get your coat from those tags.
→ Example: Bay coat with "chestnut", "black", "brown" - any chestnut, black or brown foal can grow up to use it.
→ Setting tags for any color a coat has a small amount of will result in dramatic changes from foal to adult coats.
→ Example: Leopard Appaloosa with "black", "white" - a fully black foal would grow up to a mostly white coat.
RECOMMENDATION
→ Set one or two tag(s) for a foal color you would expect to get the coat from Example: Black Foal -> Black Horse
STEP THREE: TEST YOUR COMMUNITY PACK
-
- Paste the community pack file in
config > swem > community-packs
→ Read here if this is your first time installing a community pack. - Load the game
- Open a test world with cheats enabled
- Type
/swem summon LEGACY
→ Your pack should be listed in the options
→ It may be above or below the defaultswem:options
→ If your pack is not listed, you have made an error - Select your coat and enter the command
- Check the coat has the expected texture.
- Paste the community pack file in
If this worked as expected, you can repeat Step 1 + 2 to add additional coats to the pack.
[EXPAND] Troubleshooting Errors
COMMUNITY PACK TROUBLESHOOTING
FOLLOW EACH STEP CAREFULLY + NOTE ISSUES AS YOU GO. ONLY REQUEST HELP AFTER USING THIS!
⮞ [0] CORRECT INSTALLATION
- Check your community pack is correctly installed to work:
→ Pasted in config > swem > community-packs folder
→ Unzipped folder and not a .zip or .rar file
→ Direct inside your community pack should be folders forjsonsandtextures
✅config > swem > community-packs > yourpackname > jsons / textures
❌config > swem > community-packs > yourpackname > yourpackname (again) > jsons / textures
⮞ [1] MOD VERSION
- Double check you are using the latest 1.20.1 Beta version.
→ Even if you feel sure, go and check it. It's the most common error!
→Curseforge AppWill not auto-install beta files, go tomod's page > versions > install
→Multiplayer ServersCheck server is on latest release
→Multiplayer UsersCheck client + server use same version
⚠️ Community Packs are for 1.20.1-1.5 and above only.
⮞ [2] OFFICIAL COMMUNITY PACK VERSION
- Skip this step if you are not using the official Community Pack.
→ Check you haveswem_community_pack_beta_5or above.
→ Check this is the latest version posted - it may have a new release!
→Multiplayer ServersCheck server has the correct pack
→Multiplayer UsersCheck clients have the same pack name + contents as server
⮞ [3] COMMUNITY PACK LOADING
- Open the game and load into a world
- Type
/swem summon LEGACY
→ Is the pack listed?
→ Is any pack listed (excludingswem:)
✅ Pack(s) are recognized
❌ Pack(s) are not recognized, specific packs are invalid or have no valid files. Go to solutions [3].
⮞ [4] COAT REGISTERED
- Type
/swem summon LEGACY packname:
→ Is the coat(s) you expect to see listed? Examplekofi_coats:spirit_arishant_legacy
✅ Coat(s) have registered.
❌ Coats have not registered OR specific coat(s) are invalid. Go to solutions [4].
⮞ [5] JSON -> TEXTURE PATH
- Summon coat(s) from the pack
→ Do coat(s) have a texture that is correct for that horse?
✅ Coat(s) have the correct texture
❌Black TextureTexture path or file name is invalid or missing. Go to solutions [5].
MultiplayerPlayer is missing the pack or no texture for that coat path. Go to solutions [5].
❌White TextureCoat information has been changed. Revert changes OR change coat via lapis/command.
MultiplayerPlayer (client) pack is different to the server's files. Update pack to match server.
❌Wrong CoatTexture path or file name is incorrect. Go to solutions [4].
❌Looks WrongTexture or UV map error. Contact Coat Artist or request help.
⮞ [6] OTHER
Lapis Cycling
→ If you cannot cycle any coats using lapis or redstone, it is disabled in server config.
→ If you can cycle coats, but some options are missing, it is disabled in the coat .json file.White Texture
→ If a coat is white, the pack or coat .json files were removed or renamed
→ If that is not the case, information in .json may have an error (invalid format) Go to solutions [5].Texture Error
→ If a coat appears broken (color in wrong places, missing pixels, marker blocks) it needs a texture or UV fix.
→ If you are not the coat artist, contact the original creator.Error On Load / Crashing
→ Too many potential causes
→ Paste your latest.log file in Tech Help in our Discord with a description of the issue(s).All files correct but some do not load
→ Invalid files prevent subsequent (loaded after them alphabetically A-Z) from being loaded.
→ Note the names of coats you CAN summon or change coats of, then find the first letter you cannot.
→ Sort your community pack folder by ascending name - identify the file(s) AFTER the last one that works in game.
→ Check the JSON for the first coat that does not load in game. Check solutions [3] and [4].
→ Relaunch and check - you may need to fix more than one file!
SOLUTIONS & SUGGESTIONS
ALWAYS SHUT DOWN THE GAME + RELOAD AFTER MAKING CHANGES
It is not recommended to modify packs from a Creator unless you intend to customize it and solve any issues.
✅ You should follow this troubleshooting guide to identify your likely issue first.
✅ You should notify Creator's of potential problems with the default pack (might need a fix or update).
❌ You should NOT expect Creator's to troubleshoot an issue you might have caused by altering files!
⮞ ISSUE [3]
- Check the community pack:
→ Pack is directly inconfig > swem > community-packs
→ Pack is a folder and not a zip file!
→ Pack has a valid lowercase name with no spaces or symbols ✅artist_kofi❌Artist Kofi Coats (1)
→ Pack includes at least one.jsonand.pngfile in the correct folder
📁 jsons > 📁 coats >JSON FILES HERE
📁 textures > 📁 coats > 📁 legacy >PNG FILES HERE
If this is ALL correct the issue is not the community pack structure. Go back to Step [4] above.
⮞ ISSUE [4]
- Identify a coat that is missing in game
- Check the .json file for the coat
→ File is listed as aJSON Filetype
→ File is directly incommunity-packs > artist_packname > jsons > coats
→ File has a valid lowercase name with no spaces ✅coatname_artist❌Coat - Artist
→ File texture path uses ✅"legacy": "legacy/coatname_artist.png"❌"legacy": "default:legacy/
If this is correct, the most likely issue is formatting (invalid json).
→ Paste the text here and validate to check it has no errors.
→ Compare your json to the template and note any missing",or{ }or different indentation
→ If unsure, delete and rewrite the .json file using a blank template
→ Reload the game and repeat Step [4] above.
If this is ALL correct or changes did not work, paste your .json file in Tech Help in our Discord
⮞ ISSUE [5]
- Identify a coat with a black (missing) texture
- Check the .json file for the coat
→ File useslegacymodel line (not any for future models)
→ File texture path uses ✅"legacy": "legacy/coatname_artist.png"❌"legacy": "default:legacy/
→ File texture path has the exact name used by the coat texture .png file - Check the .png file for the coat
→ File is listed as aPNG Filetype
→ File is directly incommunity-packs > artist_packname > textures > coats > legacy
→ File has a valid lowercase name with no spaces ✅coatname_artist❌Coat - Artist MULTIPLAYER SERVERS
→ Client (player) has community pack(s) with the same name (ID) as those on the server.
→ Client (player) has .png files with the same names as those in the server pack.
If you cannot check this due to permissions, you will need to contact server admins.
⮞ [6] OTHER OR NOTHING WORKED
- Create a post in Tech Help in our Discord
→ Describe your issue(s) and what you have tried
→ Upload your latest.log file to provide info that may help others assist you
DO NOT UPLOAD PAID/PRIVATE PACKS WITH TEXTURES FROM CREATORS WITHOUT CONSENT
Adding Custom Tack
This guide will not cover how to create tack, for information please read our [RESOURCES] on Discord.
[EXPAND] Files & Naming Format
This is the standard format used in the Beta pack. It is recommended to use a consistent naming format as shown here.
| Type | Texture + Name | Comment |
| Bridle | name_bridle_icon |
Inventory Icon |
name_bridle_legacy |
Horse Texture | |
name_bridle_bit_legacy |
Horse Texture | |
rack_bridle_name_blanket |
Bridle Rack Texture | |
| Blanket |
name_blanket_icon |
Inventory Icon |
name_blanket_legacy |
Horse Texture | |
rack_saddle_name_blanket |
Saddle Rack Texture | |
rack_saddle_5_name_blanket |
Blanket Rack (5X) Texture | |
| Saddle | name_saddle_icon |
Inventory Icon |
name_saddle_legacy |
Horse Texture | |
rack_saddle_name_saddle |
Saddle Rack Texture | |
rack_horse_armor_name_saddle |
Armor Rack Texture | |
| Girth Strap | name_girth_strap_icon |
Inventory Icon |
name_girth_strap_legacy |
Horse Texture | |
rack_saddle_name_girth_strap |
Saddle Rack Texture | |
| Breast Collar |
name_breast_collar_icon |
Inventory Icon |
name_breast_collar_legacy |
Horse Texture | |
| Leg Wraps |
name_leg_wraps_icon |
Inventory Icon |
name_leg_wraps_legacy |
Horse Texture | |
name_leg_wraps_hoof_legacy |
Horse Texture (hoof) | |
| Saddlebag |
name_saddle_bag_icon |
Inventory Icon |
name_saddle_bag_legacy |
Horse Texture | |
| Horse Armor | name_horse_armor_icon |
Inventory Icon |
name_horse_armor_legacy |
Horse Texture | |
name_horse_armor_wings_legacy |
Horse Texture Optional (Default: Amethyst Tier) | |
rack_horse_armor_name_horse_armor |
Armor Rack Texture | |
| Halter | name_halter_icon |
Inventory Icon |
name_halter_legacy |
Horse Texture | |
rack_halter_lead_name_halter |
Lead Rack Texture | |
| Pasture Blanket |
name_pasture_blanket_icon |
Inventory Icon Optional (One or Both) |
name_pasture_blanket_armored_icon |
Inventory Icon Optional (One or Both) | |
name_pasture_blanket_legacy |
Horse Texture Optional (One or Both) | |
name_pasture_blanket_armored_legacy |
Horse Texture Optional (One or Both) | |
rack_pasture_blanket_3_short_name |
Pasture Blanket Rack (3X) Texture | |
rack_pasture_blanket_5_long_name |
Pasture Blanket Rack (5X) Texture |
STEP ONE: CREATE OR DOWNLOAD TACK ICONS
This is the icon that will display in inventory slots of when held in hand. Each tack item needs ONE icon.
- Save or rename the files as
name_type_icon
→ Use the recommended naming in Files & Naming Format above.
→ Name should relate to in-game name ✅ Midnight Saddle →midnight_saddle_icon
→ Type should match a valid tack type ✅midnight_blanket_iconmidnight_girth_strap_icon
→ The file type should display asPNG File
→ Icons should be default 16 x 16 pixels - Paste this file into your community pack
artist_packname > textures > tack > [type] > name_type_icon.png
→ Type should use the relevant folder Example Midnight Saddle →textures > tack > saddle
STEP TWO: CREATE OR DOWNLOAD TACK TEXTURES
This is the texture for the tack on the horse. Note, there are a few optional variations:
- Bridles need a texture for both the 2D components and the 3D bit.
- Leg wraps require
leg_wrapsandleg_wraps_hooffor hoof rendered textures. - Horse armor has
horse_armorfor default tiers up to diamond andhorse_armor_wingsfor default amethyst tier
→ Custom armor can support wings without being amethyst tier, or non-winged armor at amethyst tier. - Pasture Blanket has
pasture_blanket(cosmetic only) andpasture_blanket_armoredwith amethyst tier armor protection.
- Save or rename the files as
name_type_artist
→ Name and Type means the same as in Step One.
→ Legacy is optional, but recommended to indicate it is for the original horse model.
→ The file type should display asPNG File - Paste this file into your community pack
artist_packname > textures > tack > [type] > name_type_artist.png
→ Type means the same as in Step One.
STEP THREE: CREATE OR DOWNLOAD RACK TEXTURES
This is the texture for the tack on compatible storage racks. Not all tack supports rack storage.
- Bridles and halters can be stored on Bridle Racks
rack_bridle - Halters can be stored on Halter & Lead Racks
rack_halter_lead - Blankets (Saddle Pads) can be stored on Blanket Racks
rack_saddle_5 - Saddles, Blankets (Saddle Pads) and Girth Straps can be stored on Saddle Racks
rack_saddle - Saddles and Horse Armor can be stored on Armor Racks
rack_horse_armor - Pasture Blankets can be stored on Pasture Blanket Racks
rack_pasture_blanket_3_shortrack_pasture_blanket_5_long - Breast Collars, Leg Wraps and Saddle bags do not support any tack storage racks.
Rack textures are default for blankets (saddle pads), girth straps and pasture blanket.
- They can support a premade grayscale template with a color overlay.
- The texture template can be copied from
assets > swem > textures > block - The color code (RGB code) is specified in the tack
.jsonfile - You can make a custom texture instead; retexture the template.
- If you create a custom texture, use [255, 255, 255] (white) overlay in .json to disable the overlay.
- If you create a custom grayscale texture, use the RGB color overlay as normal.
Rack textures are custom for bridles, halters, saddles and horse armor.
- [TBC] They use a modified version of the horse tack texture.
- [TBC] This can be found in...
- Save or rename the files as
racktype_name_type
→ Name and Type means the same as in Step One.
→ Rack Type means the compatible storage type (see list above)
→ The file type should display asPNG File - Paste this file into your community pack
→artist_packname > textures > tack > [type] > racktype_name_type_artist.png
→ Type means the same as in Step One.
STEP FOUR: CREATE JSON FILE(S)
This is the information file that registers custom tack as an item in game, and specifies its properties.
- Open a blank text editor file using Notepad (Windows) or TextEdit (Mac)
- Copy the template code for your tack item (below)
- Edit the template to your coat
→ You only need to edit the BOLDED PURPLE text - leave the rest unless you know what you're doing!
→creditsthe name of the texture artist(s) ✅"credits": "Arishant",
→inspirationoptional notes on inspiration or reference ✅"inspiration": "Midnight Tack Set",
→cointier of coin required to purchase at EQ Shop✅"coin": "iron"
Note: Valid tiers arecopper>iron>emerald>gold>diamond>netherite>amethyst
→amountnumber of tokens required to purchase at EQ Shop ✅"amount": 2
→nameitem name (ID) in lowercase letters ✅"name": "midnight_bridle"
→icontexture path for the inventory icon ✅"icon": "bridle/midnight_bridle_icon.png"
→typethe tack type and tack slot it is equipped in ✅"type": "bridle"
→model_typeif it is western or english tack (specific items) - input ONE type ✅"model_type": "western"
→colorRGB color code overlay for rack textures (specific items) ✅"color": [0, 51, 102],<- Dark Blue
Note: Custom rack textures should use a white overlay [255, 255, 255] to not alter colors.
→tiertier of horse armor (inherits the benefits of all previous tiers) ✅"tier": "amethyst"
Note: Valid tiers arecloth>iron>gold>diamond>amethyst
→can_wear_armorif it supports armor equipping (specific items) - set to true or false ✅"can_wear_armor": false→texturestexture path for the horse texture ✅"bridle": "bridle/midnight_bridle_bit_legacy.png"
Note: The path and textures required vary by tack type - only modify the template where shown!
→racktexture path for tack storage racks (specific items) ✅"bridle": "bridle/rack_bridle_name_bridle.png"
Note: The path and supported storage racks vary by tack type - only modify the template where shown! - Save the file as a .json file by using
save asand naming the filename_type.json
→ Use the Files & Naming Format guide (above)
→ The file type should display asJSON File - Paste this file into your community pack
artist_packname > jsons > tack > [type] > name_type.json
→ Type should use the relevant folder Example Midnight Bridle →textures > tack > bridle
[EXPAND] Bridle Template
{
"display": {
"name": "Name Bridle",
"credits": "Artist(s)",
"inspiration": "N/A"
},
"cost": {
"coin": "iron",
"amount": 2
},
"meta": {
"name": "name_bridle",
"icon": "bridle/name_bridle_icon.png",
"type": "bridle",
"data": {
"model_type": "western / english (select one)",
"can_wear_armor": true
},
"textures": {
"horse": {
"legacy": {
"bridle": "bridle/name_bridle_bit_legacy.png",
"halter": "bridle/name_bridle_legacy.png"
}
},
"rack": {
"bridle": "bridle/rack_bridle_name_bridle.png"
}
}
}
}
[EXPAND] Blanket Template (Saddle Pad)
{
"display": {
"name": "Name Blanket",
"credits": "Artist(s)",
"inspiration": "N/A"
},
"cost": {
"coin": "iron",
"amount": 2
},
"meta": {
"name": "name_blanket",
"icon": "blanket/name_blanket_icon.png",
"type": "blanket",
"data": {
"color": [255, 190, 0],
"can_wear_armor": true
},
"textures": {
"horse": {
"legacy": {
"blanket": "blanket/name_blanket_legacy.png"
}
},
"rack": {
"saddle": "blanket/rack_saddle_name_blanket.png",
"blanket_5": "blanket/rack_blanket_5_name_blanket.png"
}
}
}
}
[EXPAND] Saddle Template
{
"display": {
"name": "Name Saddle",
"credits": "Artist(s)",
"inspiration": "N/A"
},
"cost": {
"coin": "gold",
"amount": 4
},
"meta": {
"name": "name_saddle",
"icon": "saddle/name_saddle_icon.png",
"type": "saddle",
"data": {
"model_type": "western / english (select one)",
"can_wear_armor": true
},
"textures": {
"horse": {
"legacy": {
"saddle": "saddle/name_saddle_legacy.png"
}
},
"rack": {
"saddle": "saddle/rack_saddle_name_saddle.png",
"horse_armor": "saddle/rack_horse_armor_name_saddle.png"
}
}
}
}
[EXPAND] Girth Template
{
"display": {
"name": "Name Girth Strap",
"credits": "Artist(s)",
"inspiration": "N/A"
},
"cost": {
"coin": "copper",
"amount": 3
},
"meta": {
"name": "name_girth_strap",
"icon": "girth_strap/name_girth_strap_icon.png",
"type": "girth_strap",
"data": {
"color": [255, 190, 0],
"can_wear_armor": true
},
"textures": {
"horse": {
"legacy": {
"girth_strap": "girth_strap/name_girth_strap_legacy.png"
}
},
"rack": {
"saddle": "girth_strap/rack_saddle_name_girth_strap.png"
}
}
}
}
[EXPAND] Breast Collar Template
{
"display": {
"name": "Name Breast Collar",
"credits": "Artist(s)",
"inspiration": "N/A"
},
"cost": {
"coin": "copper",
"amount": 5
},
"meta": {
"name": "name_breast_collar",
"icon": "breast_collar/name_breast_collar_icon.png",
"type": "breast_collar",
"data": {
"can_wear_armor": true
},
"textures": {
"horse": {
"legacy": {
"breast_collar": "breast_collar/name_breast_collar_legacy.png"
}
},
"rack": {
"blanket": ""
}
}
}
}
[EXPAND] Leg Wraps Template
{
"display": {
"name": "Name Wraps",
"credits": "Artist(s)",
"inspiration": "N/A"
},
"cost": {
"coin": "iron",
"amount": 1
},
"meta": {
"name": "name_leg_wraps",
"icon": "leg_wraps/name_leg_wraps_icon.png",
"type": "leg_wraps",
"data": {
"can_wear_armor": true
},
"textures": {
"horse": {
"legacy": {
"leg_wraps": "leg_wraps/name_leg_wraps_legacy.png",
"hoof": "leg_wraps/name_leg_wraps_hoof_legacy.png"
}
},
"rack": {
"blanket": ""
}
}
}
}
[EXPAND] Saddle Bag Template
{
"display": {
"name": "Name Saddle Bag",
"credits": "Artist(s)",
"inspiration": "N/A"
},
"cost": {
"coin": "gold",
"amount": 1
},
"meta": {
"name": "name_saddle_bag",
"icon": "saddle_bag/name_saddle_bag_icon.png",
"type": "saddle_bag",
"data": {
"color": [255, 190, 0]
},
"textures": {
"horse": {
"legacy": {
"saddle_bag": "saddle_bag/name_saddle_bag_legacy.png"
}
},
"rack": {
}
}
}
}
[EXPAND] Horse Armor Template
{
"display": {
"name": "Name Horse Armor",
"credits": "Artist(s)",
"inspiration": "N/A"
},
"cost": {
"coin": "amethyst",
"amount": 4
},
"meta": {
"name": "name_horse_armor",
"icon": "horse_armor/name_horse_armor_icon.png",
"type": "horse_armor",
"data": {
"tier": "amethyst"
},
"textures": {
"horse": {
"legacy": {
"armor": "horse_armor/name_horse_armor_legacy.png",
"wings": "horse_armor/name_horse_armor_wings_legacy.png"
}
},
"rack": {
"horse_armor": "horse_armor/rack_horse_armor_name_horse_armor.png"
}
}
}
}
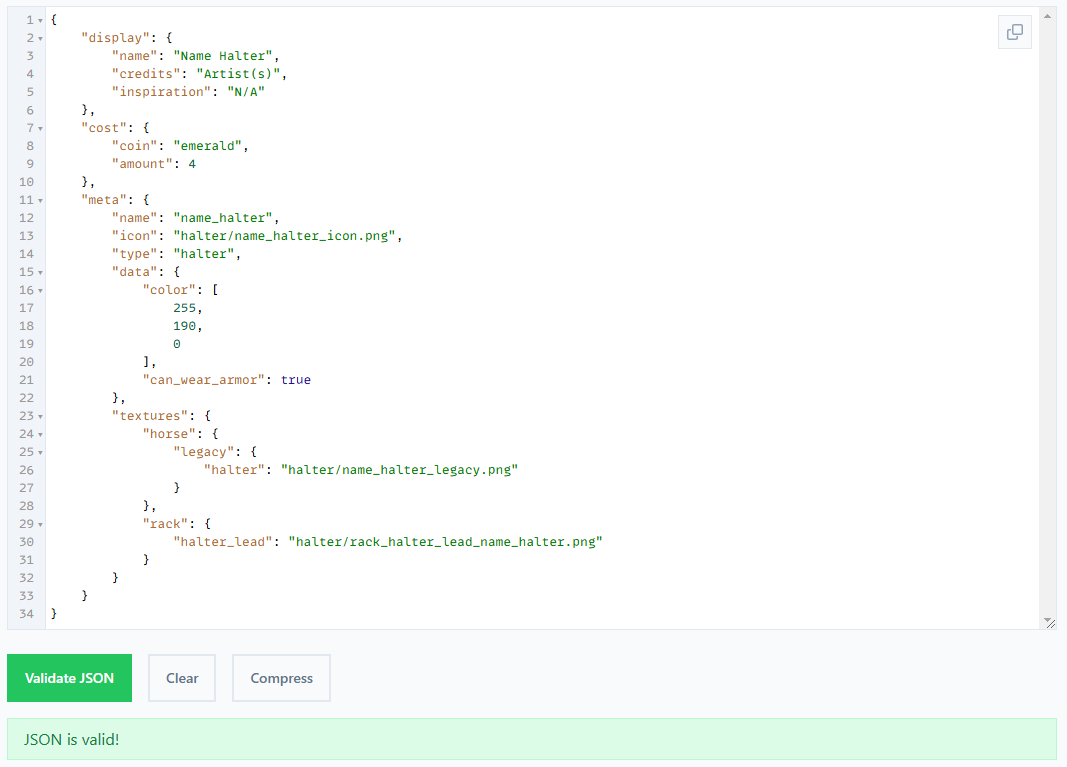
[EXPAND] Halter Template
{
"display": {
"name": "Name Halter",
"credits": "Artist(s)",
"inspiration": "N/A"
},
"cost": {
"coin": "emerald",
"amount": 4
},
"meta": {
"name": "name_halter",
"icon": "halter/name_halter_icon.png",
"type": "halter",
"data": {
"color": [255, 190, 0],
"can_wear_armor": true
},
"textures": {
"horse": {
"legacy": {
"halter": "halter/name_halter_legacy.png"
}
},
"rack": {
"halter_lead": "halter/rack_halter_lead_name_halter.png"
}
}
}
}
[EXPAND] Pasture Blanket Template
{
"display": {
"name": "Name Pasture Blanket",
"credits": "Artist(s)",
"inspiration": "N/A"
},
"cost": {
"coin": "emerald",
"amount": 4
},
"meta": {
"name": "name_pasture_blanket",
"icon": "pasture_blanket/name_pasture_blanket_icon.png",
"type": "pasture_blanket",
"data": {
"color": [255, 190, 0]
},
"textures": {
"horse": {
"legacy": {
"pasture_blanket": "pasture_blanket/name_pasture_blanket_legacy.png"
}
},
"rack": {
"pasture_blanket_long_5": "pasture_blanket/rack_pasture_blanket_5_long_name.png",
"pasture_blanket_short_3": "pasture_blanket/rack_pasture_blanket_3_short_name.png"
}
}
}
}
[EXPAND] Armored Pasture Blanket Template
{
"display": {
"name": "Armored Name Pasture Blanket",
"credits": "Artist(s)",
"inspiration": "N/A"
},
"cost": {
"coin": "diamond",
"amount": 2
},
"meta": {
"name": "name_pasture_blanket_armored",
"icon": "pasture_blanket/name_pasture_blanket_armored_icon.png",
"type": "pasture_blanket",
"data": {
"color": [255, 190, 0],
"is_armored": true
},
"textures": {
"horse": {
"legacy": {
"pasture_blanket": "pasture_blanket/name_pasture_blanket_armored_legacy.png"
}
},
"rack": {
"pasture_blanket_long_5": "pasture_blanket/rack_pasture_blanket_5_long_name.png",
"pasture_blanket_short_3": "pasture_blanket/rack_pasture_blanket_3_short_name.png"
}
}
}
}
STEP FIVE: TEST YOUR COMMUNITY PACK
It is recommended to check your pack early after doing just one or two items to ensure you have followed instructions correctly.
-
- Paste the community pack file in
config > swem > community-packs
→ Read here if this is your first time installing a community pack. - Load the game
- Open a test world with cheats enabled
- Place an EQ Shop Block
- Give yourself some tokens
→ Choose a type that is a valid currency for your tack (as specified in .json) - Place the tokens into the input slot
- Check your tack items display and can be purchased
- Check the tack item has the correct inventory icon
- Check the tack can be equipped and:
→ The tack has the expected texture
→ The tack has the expected features (ie supports armor if it should, armor tier, wings etc) - Check the tack can be placed on supported racks (if relevant) and displays the correct texture
- Paste the community pack file in
[EXPAND] Troubleshooting Errors
COMMUNITY PACK TROUBLESHOOTING
FOLLOW EACH STEP CAREFULLY + NOTE ISSUES AS YOU GO. ONLY REQUEST HELP AFTER USING THIS!
⮞ [1] MOD VERSION
- Double check you are using the latest 1.20.1 Beta version.
→ Even if you feel sure, go and check it. It's the most common error!
→Curseforge AppWill not auto-install beta files, go tomod's page > versions > install
→Multiplayer ServersCheck server is on latest release
→Multiplayer UsersCheck client + server use same version
⚠️ Community Packs are for 1.20.1-1.5 and above only.
⮞ [2] COMMUNITY PACK LOADING
- Open the game and load into a world
- Type
/give @p <id:>Example/give @p artist_packname:
→ Is the command valid? (displays autofill options)
✅ Pack is recognized
❌ Pack is not recognized or has failed to register at least one item. Go to solutions [2].
⮞ [3] ITEM REGISTERED
- Type
/give @p <id:>Example/give @p artist_packname:
→ Is every item you expect to see registered listed?
✅ Items are registered
❌ Item(s) have invalid or missing files. Go to solutions [3].
⮞ [4] JSON -> TEXTURE PATH
- Give yourself an item from the pack
→ Does it have the correct inventory texture?
→ Does it have the correct horse texture (when equipped)?
→ Does it apply to the required parts of the horse or tack model (ie Bridle bit)?
→ Does it have the correct rack texture (if supported)?
✅ Item texture paths are correct
❌Missing TextureTexture path or file name is invalid or missing. Go to solutions [4].
MultiplayerPlayer is missing the pack or no texture for that coat path. Go to solutions [4].
❌Wrong TextureTexture path or file name is incorrect. Go to solutions [4].
❌Looks WrongTexture or UV map error. Contact Coat Artist or request help.
❌Wrong Perks / Protection / FeaturesJSON information is incorrect.
⮞ [5] OTHER
Texture Error
→ If a texture appears broken (color in wrong places, missing pixels, marker blocks) it needs a texture or UV fix.
→ If you are not the texture artist, contact the original creator.Error On Load / Crashing
→ Too many potential causes
→ Check you have no duplicate JSON files
→ Check no JSON information uses the same item name as another item in the pack (ie midnight_saddle x 2)
→ Paste your latest.log file in Tech Help in our Discord with a description of the issue(s).Pasture Blanket Rack Textures (Black or Wrong Texture)
→ Check the rack texture path uses5_longor3_shortand notlong_5orshort_3All Text Appears as ▯ in MinecraftPotentially caused by invalid packs.
SOLUTIONS & SUGGESTIONS
ALWAYS SHUT DOWN THE GAME + RELOAD AFTER MAKING CHANGES
It is not recommended to modify packs from a Creator unless you intend to customize it and solve any issues.
✅ You should follow this troubleshooting guide to identify your likely issue first.
✅ You should notify Creator's of potential problems with the default pack (might need a fix or update).
❌ You should NOT expect Creator's to troubleshoot an issue you might have caused by altering files!
⮞ ISSUE [2]
- Check the community pack:
→ Pack is directly inconfig > swem > community-packs
→ Pack is a folder and not a zip file!
→ Pack has a valid lowercase name with no spaces ✅artist_tackpack❌Artist: Tack Pack!
→ Pack includes at least one.jsonand.pngfile in the correct folder
📁 jsons > 📁 tack > 📁 [type] >JSON FILES HERE
📁 textures > 📁 tack > 📁 [type] >PNG FILES HERE
If this is ALL correct the issue is not the community pack structure. Go back to Step [3] above.
⮞ ISSUE [3]
- Identify an item that is missing in game
- Check the .json file for the tack item
→ File is listed as aJSON Filetype
→ File is directly incommunity-packs > artist_packname > jsons > tack > [type]<- Correct folder for the tack type
→ File has a valid lowercase name with no spaces ✅name_type❌Itemname - Type
→ File information uses the correct template for the tack type
→ Folder contains .json files only - no .pngs or any other file type
If this is correct, the most likely issue is formatting (invalid json).
→ Paste the text here and validate to check it has no errors.
→ Compare your .json to the template and note any missing",or{ }or different indentation
→ If unsure, delete and repaste the .json file text from a valid template for the specific tack type
→ Reload the game and repeat Step [3] above.
KNOWN ISSUE Opening or modifying a pack on a Mac creates a .DS_store file. Should be fixed in 1.5.x.
→ This is usually invisible to Mac users and prevents the pack from working. Discord: Bug Report
If this is ALL correct or changes did not work, paste your .json file in Tech Help in our Discord
⮞ ISSUE [4]
- Identify an item with a missing or incorrect texture
- Check the .json file for the coat
→ File uses the correct path:
"icon":for inventory textures
(horse > legacy >) "type":for horse textures
Note: Specific items have more than one texture, such as bridles (bit = halter + bridle) and leg wraps (wraps + hoof)
→ File texture path has the exact name used by the coat texture .png file - Check the .png file for the coat
→ File is listed as aPNG Filetype
→ File is directly incommunity-packs > artist_packname > textures > tack > [type]
→ File has a valid lowercase name with no spaces ✅name_type❌Item Name - Tack Type
→ File uses the correct naming format (see Files & Naming Format) MULTIPLAYER SERVERS
→ Client (player) has community pack(s) with the same name (ID) as those on the server.
→ Client (player) has .png files with the same names as those in the server pack.
If you cannot check this due to permissions, you will need to contact server admins.
⮞ [5] OTHER OR NOTHING WORKED
- Create a post in Tech Help in our Discord
→ Describe your issue(s) and what you have tried
→ Upload your latest.log file to provide info that may help others assist you
DO NOT UPLOAD PAID/PRIVATE PACKS WITH TEXTURES FROM CREATORS WITHOUT CONSENT
[EXPAND] Checking JSON Validity
It is easy to make small errors when creating or editing JSON files. Even a simple missing { can make your pack invalid.
There is a simple way to check if your JSON files have any formatting errors, using an online validator.
- Open an online validator like THIS
- Paste in the contents of your JSON file
- Click
Validate JSONto check the file - View the output below
This is a valid JSON File with no formatting errors!
→ Packs can still fail to register or work if the files and folders are incorrect or duplicated.
→ Packs can still fail to register if other files have format errors, or files have invalid or missing data.
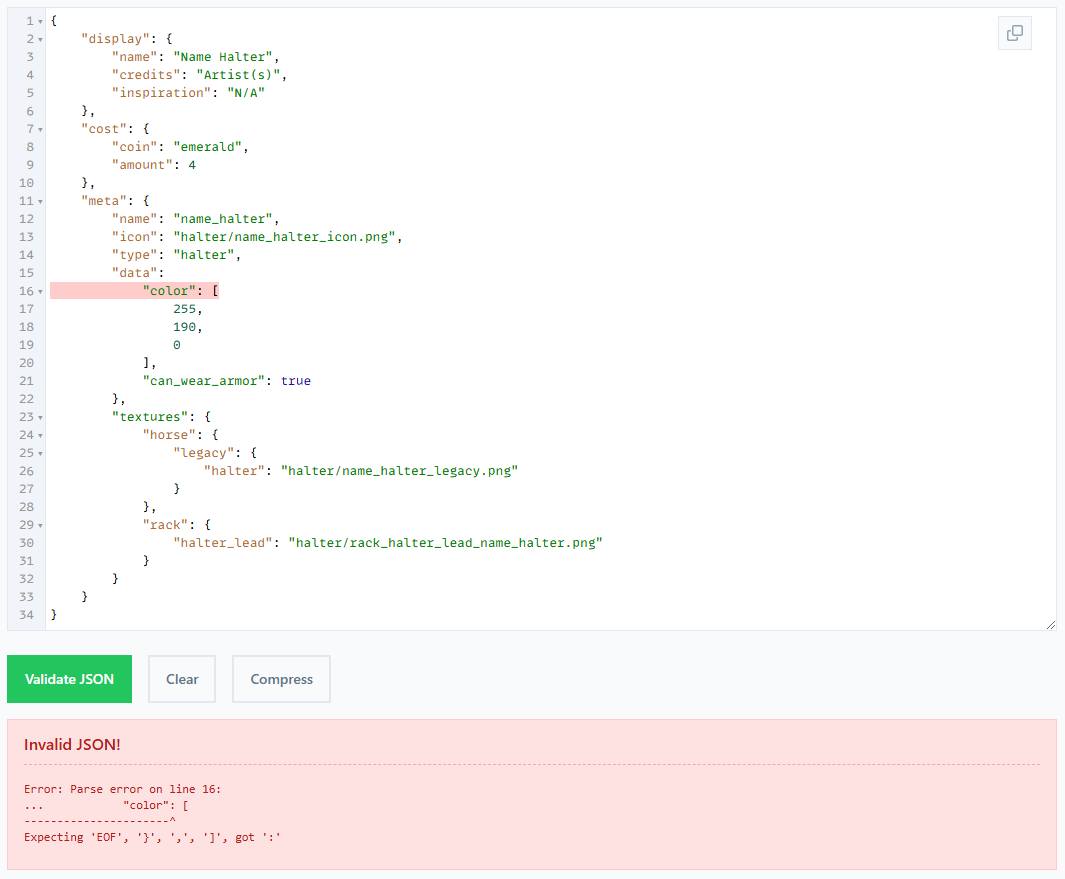
This is an invalid JSON where the { is missing after "data": making "color": invalid
→ You may not necessarily understand what it is telling you, but you can use this section to compare to examples.
→ If you cannot resolve your issue, sharing a screenshot of this output may assist helpers in tech help to find your issue.
Adding Custom Animations
It is recommended to provide a command list with Animation Packs, as they will not auto-fill in game.
This guide will not cover how to create animations, for information please read our [RESOURCES] on Discord.
- Create your custom animation(s) in blockbench
- Create an animation resource pack
→ Replaceassets > swem > animations > swem_horse.jsonwith a custom animation file
→ This must include all the existing animations and any new animations - Install the resource pack in the
resourcepackfolder - Use
/swem rrp anim <Animation Name>to trigger the animation
Additional information:
- Animations cannot be triggered via keys (like gaits) but must use a command.
→ Default animations can still be replaced if you want to override gaits - Animations will loop until the command is re-run to stop it.
- All clients (players) must install the resource pack to view triggered animations
- TBC Multiplayer Servers
Resources
Creating Tack Textures [WIP]
Credits: Jenny
HORSE TACK TEXTURES
- Download a copy of the latest SWEM .jar (mod file)
- Unzip the .jar file to access the SWEM files
- Download / Open Blockbench
- File > Open Model
→ Open Horse Model:assets > swem > geo > entity > horse > swem_horse - View the blocks menu on the bottom right
- Toggle all blocks to Off using the eye icon
→ This is to prevent accidental texturing of the wrong element
→ Each tack type renders specific blocks - ie painting neck for leg wraps will not show! - Toggle on only relevant elements for your chosen tack type
→ This might include multiple blocks - see chart below - TBC Create a new texture that is 512 x 512 pixels (16x)
→ Alternatively, import a base texture to use as a template
Note: These are found inassets > swem > textures > entity > horse > [type] - Switch to the paint tab and texture
- Right click the completed texture in the texture menu >
save as - Save the file as
name_typeorname_type_descriptor✅midnight_blanketmidnight_blanket_blue
→ Using a descriptor is useful for multiple variant sets ✅blanket_blueblanket_red
|
Blockbench has a search function (magnifying glass) in the outliner (blocks) menu to search by name or keyword. |
||
| Tack Type | Group | Element(s) |
| Bridle (Western) |
|
WesternBridleLeftBit (5X) |
|
|
WesternBridleLeftRein | |
|
|
WesternBridleLeftRein1 | |
|
|
WesternBridleLeftRein2 | |
|
|
WesternBridleRightBit (5X) | |
|
|
WesternBridleRightRein | |
|
|
WesternBridleRightRein1 | |
|
|
WesternBridleRightRein2 | |
|
TBC: HEADPIECE |
||
| Bridle (English) | ||
| Bridle (Adv) | ||
| Blanket | Middle > BlanketMiddle |
Blanket Middle (2X) |
| Saddle (Western) |
Middle > WesternSaddle |
WesternSaddle |
Middle > WesternSaddle > WesternSaddleMiddle |
WesternSaddleMiddle (10X) | |
Middle > WesternSaddle > WesternSaddleLeftSide |
WesternSaddleLeftSide (3X) | |
Middle > WesternSaddle > WesternSaddleRightSide |
WesternSaddleRightSide (3X) | |
| Saddle (English) |
Middle > EnglishSaddle > EnglishSaddleMiddle |
EnglishSaddleMiddle (3X) |
Middle > EnglishSaddle > EnglishSaddleRightSide |
EnglishSaddleRightSide (4X) | |
Middle > EnglishSaddle > EnglishSaddleLeftSide |
EnglishSaddleLeftSide (4X) | |
| Saddle (Adv) | Middle > AdventureSaddle |
AdventureSaddle |
Middle > AdventureSaddle > AdventureSaddleMiddle |
AdventureSaddleMiddle (6X) | |
Middle > AdventureSaddle > AdventureSaddleLeftSide |
AdventureSaddleLeftSide (3X) | |
Middle > AdventureSaddle > AdventureSaddleRightSide |
AdventureSaddleRightSide (3X) | |
| Girth Strap |
Middle > Belly > GirthStrapBelly |
GirthStrapBelly (2X) |
Middle > GirthStrapMiddle |
GirthStrapMiddle (2X) | |
| Breast Collar |
Front > BaseFront > BreastCollarBase |
BreastCollarBase (2X) |
Front > BaseFront > BreastRight > BreastCollarBreastRight |
BreastCollarBreastRight | |
Front > BaseFront > BreastLeft > BreastCollarBreastLeft |
BreastCollarBreastLeft | |
Front > BaseFront > FrontLeft > BreastCollarFrontLeft |
BreastCollarFrontLeft (3X) | |
Front > BaseFront > FrontRight > BreastCollarFrontRight |
BreastCollarFrontRight (3X) | |
Middle > BreastCollarBelly |
BreastCollarBelly | |
Middle > BreastCollarMiddle |
BreastCollarMiddle | |
| Leg Wraps |
Front > FrontLeft > FrontLeftLeg > .. > .. > LegWrapsFrontLeftHoof | LegWrapsFrontLeftHoof |
| Front > FrontLeft > FrontLeftLeg > .. > .. > LegWrapsFrontLeft | LegWrapsFrontLeft | |
| Front > FrontRight > FrontRightLeg > .. > .. > LegWrapsFrontRightHoof | LegWrapsFrontRightHoof | |
| Front > FrontRight > FrontRightLeg > .. > .. > LegWrapsFrontRight | LegWrapsFrontRight | |
Back > BackLeft > .. > .. > .. > .. > LegWrapsBackLeftHoof |
LegWrapsBackLeftHoof | |
Back > BackLeft > Bone4 > KneeLeft > Bone6 > LegWrapsBackLeft |
LegWrapsBackLeft | |
Back > BackRight > .. > .. > .. > .. > LegWrapsBackRightHoof |
LegWrapsBackRightHoof | |
Back > BackRight > Bone7 > KneeRight > .. > LegWrapsBackRight |
LegWrapsBackRight | |
Front > Neck > NeckJoint1 > Head > Skull > LegWrapsSkull |
LegWrapsSkull | |
Front > . > . > . > Skull > BridgeOfNose > LegWrapsBridgeOfNose |
LegWrapsBridgeOfNose | |
| Saddle Bag | Back > Base > SaddleBag > SaddleBagLeft |
SaddleBagLeft |
Back > Base > SaddleBag > SaddleBagRight |
SaddleBagRight | |
Back > Base > BedRoll |
BedRoll (7X) | |
| Horse Armor |
Front > FrontLeft > ArmorLeftShoulder |
ArmorLeftShoulder (4X) |
Front > FrontRight > ArmorRightShoulder |
ArmorRightShoulder (4X) | |
Front > Neck > NeckJoint1> MainNeck1 > ArmorNeck > ArmorNeck1 |
ArmorNeck1 (3X) | |
Front > Neck > NeckJoint1 > Head > ArmorHead > ArmorHead1 |
ArmorHead1 (8X) | |
Middle > ArmorCloth > ArmorClothLeft |
ArmorClothLeft | |
Middle > ArmorCloth > ArmorClothRight |
ArmorClothRight | |
Back > Base > ArmorButt > 10X |
ArmorButt (10X) | |
| Wings |
Front > BaseFront > WingsScapular > LeftGROUP > WingsScapularLeft |
WingsScapularLeft |
Front > BaseFront > WingsScapular > LeftGROUP > WingsMarginalLeft |
WingsMarginalLeft | |
Front > BaseFront > WingsScapular > LeftGROUP > WingsMarginalLeft2 |
WingsMarginalLeft2 | |
Front > BaseFront > WingsScapular > LeftGROUP > WingsMarginalLeft2 > WingsAlulaLeft |
WingsAlulaLeft | |
Front > BaseFront > WingsScapular > LeftGROUP > WingsMarginalLeft2 > WingsAlulaLeft > WingsFlightFeathersLeft |
WingsFlightFeathersLeft | |
Front > BaseFront > WingsScapular > RightGROUP > WingsScapularRight |
WingsScapularRight | |
Front > BaseFront > WingsScapular > RightGROUP > WingsMarginalRight |
WingsMarginalRight | |
Front > BaseFront > WingsScapular > RightGROUP > WingsMarginalRight2 |
WingsMarginalRight2 | |
Front > BaseFront > WingsScapular > RightGROUP > WingsMarginalRight2 > WingsAlulaRight |
WingsAlulaRight | |
Front > BaseFront > WingsScapular > RightGROUP > WingsMarginalRight2 > WingsAlulaRight > WingsFlightFeathersRight |
WingsFlightFeathersRight | |
| Halter | Front > Neck > NeckJoint1 > Head > Skull > HalterSkull |
HalterSkull |
Front > Neck > NeckJoint1 > Head > Skull > BridgeOfNose > HalterBridgeOfNose |
HalterBridgeOfNose | |
Front > Neck > NeckJoint1 > Head > Skull > Cheeks > HalterCheeks |
HalterCheeks | |
Front > Neck > NeckJoint1 > Head > Mouth > HalterMouth |
HalterMouth | |
| Pasture Blanket | Front > FrontLeft > PBFrontLeft |
PBFrontLeft (4X) |
Front > FrontRight > PBFrontRight |
PBFrontRight (4X) | |
Middle > PBMiddle |
PBMiddle (5X) | |
Back > Base > PBBack |
PBBack (6X) | |
TACK RACK TEXTURES
TACK ICON TEXTURES
- Download / Open Blockbench
- File > New > Image
→ Set name asname_type_icon✅midnight_blanket_icon
→ Set resolution as default 16x16 pixels - Confirm
- Create an icon to represent your tack in inventory slots
→ Alternatively, drag a default icon texture to use as a template
→ SelectAdd Imagefrom options
Note: These are found inassets > swem > textures > item [item_name] - TBC Saving
COMING SOON
Known Issues
Credits
Special thanks to the following contributors:
- Quarris for feature documentation, example pack and wiki information support
- Jenny for creator resources, testing and documentation
- Neehra for creator resources, testing and Mac information
- Legend for recommending JSON validation resources
Coats [NEW]
This feature is available in 1.20.1-1.5+ and will NOT be backported to any outdated versions.
Features
Community packs add NEW custom coats in-game without overriding the default variants.
- Supports simple breeding "color tags"
- Supports lapis / redstone cycling (if enabled)
- Supports summon command
- Supports natural spawning via compatible community datapacks
Important - Update Changes
This update has made changes to coat NBT data, summon commands as well as some smaller (less gameplay significant) changes.
Expand the drop-down to read more about specific changes and how that might impact you as a player or creator.
[EXPAND] Changelog
| Feature | Changes |
| Summon |
Minecraft
NEW SWEM SUMMON COMMANDS
|
| Coat Data |
Removed
NEW SWEM COAT CHANGE COMMANDS
MINECRAFT COMMANDS (OP) MC Commands are exempt from role keys (ie swem:mod) - which may be useful to servers.
Identify a coat (ID)
Change a coat
Foals use |
| Model |
Coats and commands must state a supported model - this will be expanded in future.
|
Frequently Asked Questions
This section has drop-downs for FAQs and expanded information about Community Pack Coats.
If your question is not answered here, check out General Information.
[EXPAND] FAQs
⮞ CAN COMMUNITY PACKS ADD NEW FOAL VARIANTS?
No. The current system allows for 1 foal per color tag; support for additional foals will require an expanded breeding system.
⮞ CAN COMMUNITY PACKS MODIFY DEFAULT SWEM COATS?
No. Information such as obtainable by breeding, color tags, lapis cycling is hard coded for default coats (included in SWEM).
You can use a resource pack to override any coat texture if you want to replace it.
⮞ CAN COMMUNITY PACKS ADD NEW MODELS?
No. It should continue to work with resource packs that override the SWEM model.
This feature will support the new Destrier model (and any others) when it is released in future.
⮞ CAN CUSTOM COATS APPEAR NATURALLY ON HORSES?
Yes. If the coat information (json) file allows breeding and cycling, it can occur when a horse is summoned or converted.
⮞ CAN CUSTOM COATS NATURALLY SPAWN?
No. Neither default nor custom coats naturally spawn in the wild (replace MC horses) unless you use a custom datapack.
This update has been modified to continue support for Ace's Datapack found HERE in our Discord.
⮞ CAN CUSTOM COATS SUPPORT LAPIS / REDSTONE CYCLING?
Yes. This must be set to true for lapis_cycling in the coat json file, and allowCoatCycling in the server config file.
⮞ CAN CUSTOM COATS APPEAR FROM BREEDING DEFAULT +/- CUSTOM COATS?
Yes. This must be set to true for obtainable_by_breeding in the coat json file. You must set at least one base_colors tag - this will determine which color tags your horse can pass on if bred, as well as which foal color(s) can grow up into this coat.
⮞ CAN I MAKE A CUSTOM COAT 'SECRET'?
Yes, but not in the same way as special default coats. You can set lapis_cycling and obtainable_by_breeding to false in the coat json file, which will prevent cycling and appearance by breeding or converting. The coat will only appear if summoned via command. If you have the right kind of knowledge, you could probably create a custom datapack or redstone system loop to check for and convert horses that meet 'secret coat criteria' (ie height and name), or other crafty ways to achieve this result.
[EXPAND] Community Pack vs Content Pack
⮞ WHAT IS A COMMUNITY PACK?
Community Packs are folders that include all the files necessary to add NEW assets and are ready to play once installed.
⮞ WHAT IS A CONTENT PACK?
Content Packs is also a Community Pack, but usually with less content. It will merge into any Community Packs with the same name, like an 'expansion' pack or add-on.
Using A Community Pack
To install a Content Pack or PREMADE Community Pack, see General Information.
Information
Every custom coat has a "JSON" file which contains all the information on name, texture, obtaining conditions etc.
If you did not create the community pack yourself, it will include settings decided by the pack creator, or coat artist.
Obtaining
If lapis_cyclable is true, custom coats can occur in cantazarite potion conversion, or coats cycled with redstone/lapis.
If obtainable_by_breeding is true, custom coats can occur in bred horses when they grow up to an adult.
If both of these are false, horses can only be obtained via commands.
- To summon a specific coat use
/swem summon LEGACY <id:coat> - To summon a random coat use
/swem summon random LEGACY-lapis_cyclablemust be true to enable cusom coat(s).
Breeding
Custom coats are supported in the breeding system - your horse has a chance to "pass on" their color to foals.
Read the drop down to learn more.
[EXPAND] Color Tags
⮞ WHAT IS A COLOR TAG?
Color tags determine which coat a horse receives when it is converted from a vanilla horse, or grows up from a foal.
There are seven possible tags: black, gray, white, creamy, brown, dark_brown, chestnut
⮞ HOW DOES CONVERTING VANILLA -> SWEM HORSES WORK?
Vanilla horses are categorized so you should receive a similar coat color, ie a black horse stays black on conversion.
⮞ HOW DOES BREEDING SWEM HORSES WORK?
The coat your horse has will have one or more color tags assigned in code. Example If your horse is a black tobiano horse they may (depending on info file) have black and white color tags.
When breeding two horses together, the foal will be randomly assigned one tag from its parents and use that color foal coat.Example If the mare has white and black and the stallion has chestnut, the foal could be black, white or chestnut only.
When the foal grows up, they will randomly roll for ALL adult coats that include their foal color.Example If the foal is brown it will choose from any coat that includes the brown tag.
If you change a horse's coat via lapis/redstone or command, any future breeding will use the new coat's tag(s).
⮞ THESE ARE NOT REAL GENETICS - YOU DON'T GET REALISTIC RESULTS FROM BREEDING!
The color tags are very simple with just seven total tags. You may get coats that make no sense for genetics such as a pure white foal growing up into a leopard appaloosa because the coat tag includes white. This system is in no way trying to be accurate to real life genetics as the current breeding code was intended to be "vanilla style" until a more complex genetics system is possible!
⮞ HOW CAN I EDIT THE COLOR TAGS A HORSE HAS?
You can tweak the information for custom coats in config > swem > community-packs > [pack_name] > jsons > coats
- You can add or remove color tags but be sure to use the correct format and only enter valid color values!
- You can edit obtaining conditions such as
lapis_cyclableorobtainable_by_breedingfrom true / false
It is not recommended to edit community packs that you require on a server - try to keep server / client files the same!
Wrongly formatted JSON files can break your pack - use Creators Corner for info if you don't know what you're doing!
Creating A Community Pack Coat
To create or modify a Content Pack or Community pack, see Creators' Corner.
Troubleshooting
If you experience an issue with content packs in game, please follow this troubleshooting guide.
[EXPAND] Troubleshooting Errors
COMMUNITY PACK TROUBLESHOOTING
FOLLOW EACH STEP CAREFULLY + NOTE ISSUES AS YOU GO. ONLY REQUEST HELP AFTER USING THIS!
⮞ [1] MOD VERSION
- Double check you are using the latest 1.20.1 Beta version.
→ Even if you feel sure, go and check it. It's the most common error!
→Curseforge AppWill not auto-install beta files, go tomod's page > versions > install
→Multiplayer ServersCheck server is on latest release
→Multiplayer UsersCheck client + server use same version
⚠️ Community Packs are for 1.20.1-1.5 and above only.
⮞ [2] OFFICIAL COMMUNITY PACK VERSION
FOR VERSION 1.20.1-1.5 OR ABOVE, YOU NEED TO MANUALLY UPDATE THE OFFICIAL PACK. SEE HERE (DISCORD)
- Skip this step if you are not using the official Community Pack.
→ Check you haveswem_community_pack_beta_5or above.
→ Check this is the latest version posted - it may have a new release!
→Multiplayer ServersCheck server has the correct pack
→Multiplayer UsersCheck clients have the same pack name + contents as server
⮞ [3] COMMUNITY PACK LOADING
- Open the game and load into a world
- Type
/swem summon LEGACY
→ Is the pack listed?
→ Is any pack listed (excludingswem:)
✅ Pack(s) are recognized
❌ Pack(s) are not recognized, specific packs are invalid or have no valid files. Go to solutions [3].
⮞ [4] COAT REGISTERED
- Type
/swem summon LEGACY packname:
→ Is the coat(s) you expect to see listed? Examplekofi_coats:spirit_arishant_legacy
✅ Coat(s) have registered.
❌ Coats have not registered OR specific coat(s) are invalid. Go to solutions [4].
⮞ [5] JSON -> TEXTURE PATH
- Summon coat(s) from the pack
→ Do coat(s) have a texture that is correct for that horse?
✅ Coat(s) have the correct texture
❌Black TextureTexture path or file name is invalid or missing. Go to solutions [5].
MultiplayerPlayer is missing the pack or no texture for that coat path. Go to solutions [5].
❌Wrong CoatTexture path or file name is incorrect. Go to solutions [4].
❌Looks WrongTexture or UV map error. Contact Coat Artist or request help.
⮞ [6] OTHER
Lapis Cycling
→ If you cannot cycle any coats using lapis or redstone, it is disabled in server config.
→ If you can cycle coats, but some options are missing, it is disabled in the coat .json file.White Texture
→ If a coat is white, the pack or coat .json files were removed or renamed
→ If that is not the case, information in .json may have an error (invalid format) Go to solutions [5].Texture Error
→ If a coat appears broken (color in wrong places, missing pixels, marker blocks) it needs a texture or UV fix.
→ If you are not the coat artist, contact the original creator.Error On Load / Crashing
→ Too many potential causes
→ Paste your latest.log file in Tech Help in our Discord with a description of the issue(s).
SOLUTIONS & SUGGESTIONS
ALWAYS SHUT DOWN THE GAME + RELOAD AFTER MAKING CHANGES
It is not recommended to modify packs from a Creator unless you intend to customize it and solve any issues.
✅ You should follow this troubleshooting guide to identify your likely issue first.
✅ You should notify Creator's of potential problems with the default pack (might need a fix or update).
❌ You should NOT expect Creator's to investigate issues you might have caused by altering their original files!
⮞ ISSUE [3]
- Check the community pack:
→ Pack is directly inconfig > swem > community-packs
→ Pack is a folder and not a zip file!
→ Pack has a valid lowercase name with no spaces ✅artist_kofi❌Artist Kofi Coats
→ Pack includes at least one.jsonand.pngfile in the correct folder
📁 jsons > 📁 coats >JSON FILES HERE
📁 textures > 📁 coats > 📁 legacy >PNG FILES HERE
If this is ALL correct the issue is not the community pack structure. Go back to Step [4] above.
⮞ ISSUE [4]
- Identify a coat that is missing in game
- Check the .json file for the coat
→ File is listed as aJSON Filetype
→ File is directly incommunity-packs > artist_packname > jsons > coats
→ File has a valid lowercase name with no spaces ✅coatname_artist❌Coat - Artist
→ File texture path uses ✅"legacy": "legacy/coatname_artist.png"❌"legacy": "default:legacy/
If this is correct, the most likely issue is formatting (invalid json).
→ Compare your json to the template and note any missing",or{ }or different indentation
→ If unsure, delete and rewrite the .json file using a blank template
→ Reload the game and repeat Step [4] above.
If this is ALL correct or changes did not work, paste your .json file in Tech Help in our Discord
⮞ ISSUE [5]
- Identify a coat with a black (missing) texture
- Check the .json file for the coat
→ File useslegacymodel line (not any for future models)
→ File texture path uses ✅"legacy": "legacy/coatname_artist.png"❌"legacy": "default:legacy/
→ File texture path has the exact name used by the coat texture .png file - Check the .png file for the coat
→ File is listed as aPNG Filetype
→ File is directly incommunity-packs > artist_packname > textures > coats > legacy
→ File has a valid lowercase name with no spaces ✅coatname_artist❌Coat - Artist MULTIPLAYER SERVERS
→ Client (player) has community pack(s) with the same name (ID) as those on the server.
→ Client (player) has .png files with the same names as those in the server pack.
If you cannot check this due to permissions, you will need to contact server admins.
⮞ [6] OTHER OR NOTHING WORKED
- Create a post in Tech Help in our Discord
→ Describe your issue(s) and what you have tried
→ Upload your latest.log file to provide info that may help others assist you
DO NOT UPLOAD PAID/PRIVATE PACKS WITH TEXTURES FROM CREATORS WITHOUT CONSENT
Tack [WIP]
This feature is available in 1.20.1-1.5+ and will NOT be backported to any outdated versions.
Features
Community packs add NEW custom tack in-game without overriding the default variants.
- Supports in-game purchase via tokens at an EQ Shop
- Supports use on storage items such as tack racks (compatible items)
- Supports buffs on armor items, including tier-specific perks and flight
Important - Update Changes
This update has not made any significant changes to default tack obtaining or use.
Custom tack can be purchased via the EQ Shop Block using craftable coins .
Frequently Asked Questions
This section has drop-downs for FAQs and expanded information about Community Pack Tack.
If your question is not answered here, check out General Information.
[EXPAND] FAQs
⮞ CAN COMMUNITY PACKS ADD NEW TACK SLOTS AND TYPES?
No. Creators must use the same default tack types and slots, but with some creative effort they can expand on the limited set to suit almost any need.
⮞ CAN COMMUNITY PACKS MODIFY OR REMOVE DEFAULT SWEM TACK?
No. Default tack sets are hard coded.
You can use a resource pack to retexture, rename or modify the crafting requirements of core tack items.
⮞ CAN COMMUNITY PACK TACK SUPPORT REDYING FEATURES?
No. This only works for core tack which has one type per discipline (English, Western) and all 16 color variants.
⮞ CAN THE EQ SHOP SUPPORT TOKEN PURCHASING OF CORE TACK?
No.
⮞ CAN THE EQ SHOP EXCHANGE UNWANTED TACK FOR TOKENS (REFUND)?
No.
⮞ CAN THE EQ SHOP EXCHANGE TOKENS FOR MATERIALS?
No, however 4 tokens can be uncrafted into (most of) the original items in a crafting table or player inventory.
Using A Community Pack
To install a Content Pack or PREMADE Community Pack, see General Information.
[EXPAND] Community Pack vs Content Pack
⮞ WHAT IS A COMMUNITY PACK?
Community Packs are folders that include all the files necessary to add NEW assets and are ready to play once installed.
⮞ WHAT IS A CONTENT PACK?
Content Packs is also a Community Pack, but usually with less content. It will merge into any Community Packs with the same name, like an 'expansion' pack or add-on.
Creating A Community Pack Tack Set
To create or modify a Content Pack or Community pack, see Creators' Corner.
Troubleshooting COMING SOON
If you experience an issue with community packs in game, please follow this troubleshooting guide.
[EXPAND] Troubleshooting Errors
COMMUNITY PACK TROUBLESHOOTING
FOLLOW EACH STEP CAREFULLY + NOTE ISSUES AS YOU GO. ONLY REQUEST HELP AFTER USING THIS!
⮞ COMING SOON
DO NOT UPLOAD PAID/PRIVATE PACKS WITH TEXTURES FROM CREATORS WITHOUT CONSENT
Animations [WIP]
This feature is available in 1.20.1-1.5+ and will NOT be backported to any outdated versions.
Features
This update can support adding custom animations with or without overriding the default variants.
It was not possible to add animations via community pack, they require a resource pack.
- Animations must be triggered via the command
/swem rrp anim <Animation> - Animations will loop (repeat) until the command is repeated
- Animations will not auto-fill (list possible options), creators should provide the valid options
- Animations will be seen by any player with the animation pack installed
Important - Update Changes
This update has not made any significant changes to default animations.
Frequently Asked Questions
This section has drop-downs for FAQs and expanded information about Animation Resource Packs.
If your question is not answered here, check out General Information.
[EXPAND] FAQs
⮞ CAN ANIMATIONS BE TRIGGERED WITHOUT COMMANDS?
No. While this is not ideal for discipline specific commands (ie dressage moves), there is currently no way to support keybind(s) to trigger custom animations.
⮞ CAN ANIMATION PACKS MODIFY DEFAULT ANIMATIONS?
Yes, this was already possible and several packs exist to override specific default animations.
⮞ CAN I INSTALL MULTIPLE ANIMATION PACKS AT ONCE?
[TBC] Yes. Animation packs must include both the default animations and any custom animations, so if you install more than one pack, you should load any that override default animations at the top.
Example If you have an animation pack that adds new dressage moves and modifies default gait or jump animations, you should load this above any other packs that only add new animations. Since they include the unaltered default animations, they will override your modified defaults unless lower in the list.
⮞ WHERE CAN I SEE A LIST OF ANIMATION NAMES FOR THE TRIGGER COMMAND?
Animation names will not auto-fill when using the command. Short of opening up the files, it is recommended to confirm valid options with the creator. Check their content or site(s) for a list of valid commands before contacting them directly.
⮞ CAN I INSTALL ANIMATION PACKS IN A MULTIPLAYER SERVER?
[TBC] Animation packs should work on multiplayer servers, but all players require the resource pack to view the triggered animations. This should all work client-side, servers should not need to make any alterations to support custom animations (ie not required on the server).
⮞ HOW DO ANIMATION PACKS WORK ON MULTIPLAYER SERVERS WITH KEYS / PERMISSIONS?
[TBC]
⮞ HOW DO ANIMATION PACKS APPEAR IF A PLAYER IS MISSING THE RESOURCE PACK?
[TBC]
Using An Animation Resource Pack
To install an animation resource pack, paste it into the resourcepack folder.
If you have multiple animation packs, put any packs that override default animations at the top.
Creating A Community Pack Tack Set
To create an animation resource pack, see Creators' Corner.
Troubleshooting COMING SOON
If you experience an issue with animation packs in game, please follow this troubleshooting guide.
[EXPAND] Troubleshooting Errors
ANIMATION PACK TROUBLESHOOTING
FOLLOW EACH STEP CAREFULLY + NOTE ISSUES AS YOU GO. ONLY REQUEST HELP AFTER USING THIS!
⮞ COMING SOON
DO NOT UPLOAD PAID/PRIVATE PACKS WITH FILES FROM CREATORS WITHOUT CONSENT
Community Packs [OLD]
READ ME
This page is OUTDATED and information is relevant to 1.20.1-1.5 Beta 7.
For 1.20.1-1.5 Public Release, please see the community pack category for updated pages.
It is public to accept feedback and external input from creators prior to final additions and corrections.
This page will remain public until the new category is completed.
Community Packs are available for SWEM 1.20.1-1.5+. This feature will not be backported to older releases!
Update Changes - Important
The community pack feature allows users to add NEW coats to the game instead of overriding existing coats (texture pack).
To support this feature, the following changes were made:
| Change | Information |
| Coats are named, not numbered |
Coats cannot be altered via Variant NBT |
| Coats appear white via /summon |
Coats cannot be summoned via Minecraft's /summon. |
| Coats apply to a specific model | Continue to use legacy (original) until new models are supported. |
Updating An Existing World
Please read this information carefully and backup your save (recommended) before updating to 1.20.1-1.5.0+.
- Existing coats should be unaffected.
- Texture packs (swem override) should be unaffected.
- Datapack (fan-made) for naturally spawning horses is patched to work as normal!
- Config will need to be copied (or edited again) in new folders to keep settings:
→ Common, Client and Recipe configs now generate inconfig/swem - THIS UPDATE WILL PROBABLY BREAK ADD-ONS: PLEASE BE PATIENT AS CREATORS UPDATE THEIR MODS!
→ Reported: Tre's Tackshop, Bagek's, Blossom EQ
Frequently Asked Questions (Dropdown)
FAQs
SUPPORT & FEATURES
⮞ NEW MODELS?
It is planned to expand on the models as part of development, but breeds will not be added.
This update will not break texture packs that override the SWEM model.
⮞ NEW ANIMATIONS?
Support for new animations is planned for a later date.
⮞ NEW TACK?
Support for new tack is in progress and will be released in the near future.
⮞ NEW FOALS?
Foals are limited to 7 variants, one per possible color tag inherited from breeding.
Support for additional foals will require an expanded genetics system - this is planned for future development.
⮞ MODIFYING DEFAULT COAT INFO?
Information such as obtainable by breeding, color tags, lapis cycling cannot be edited for default coats, only custom coats.
⮞ NATURALLY SPAWNING HORSES?
Custom coats can appear on converted vanilla or RHG horses, but default or custom coats do not naturally spawn in the wild.
This update supports the community creation datapack for naturally spawning horses.
⮞ BREEDING AND LAPIS CYCLING?
Custom coats can be obtained from lapis cycling or breeding if set to enabled in the coat json file.
Coat cycling must be enabled in serverconfig to allow the use of lapis or redstone cycling coats.
USE ON SAVES & SERVERS
⮞ EXISTING SAVES?
Community packs should be safe to use with existing save files.
⮞ DIFFERENT SAVE FILES?
Community packs apply to all saves for that instance or profile. It is not possible to have save-specific community packs without manually changing switching them each time.
⮞ MULTIPLAYER SERVERS?
Community packs should work on servers, provided all players have the community pack.
Please be mindful of creators and do not distribute or use content in a way that is not explicitly permitted!
⮞ MULTIPLAYER SERVERS (SERVER SIDE ONLY)?
Community packs on server only may not be possible and would likely violate the terms of use for custom content.
⮞ OVERRIDE MULTIPLAYER SERVER COATS?
Community packs are essentially a resource pack when you are a client. You can replace png(s) with different textures, provided they are named the same. This will only be visible to you.
⮞ MODIFY THE JSON INFO OF A CUSTOM COAT ON MULTIPLAYER SERVERS?
Community packs use the data of the server or host - client side edits will only apply to your singleplayer saves.
⮞ PLAY SERVERS (NO CUSTOM COATS) WITH A COMMUNITY PACK INSTALLED?
TBC. Probably fine.
MODIFYING A COMMUNITY PACK
⮞ ADD NEW COATS (EXISTING SAVE)
You can add a new coat at any time, but need to close and reload the game to apply the new coats.
⮞ MODIFY COATS (EXISTING SAVE)
You can modify coats at any time, but need to close and reload the game for changes to apply.
→ If you rename a coat, it will be registered as a NEW coat and any horses using it will turn white.
→ If you modify the model path, any horses using it will appear fully black unless a valid texture is provided.
→ If you alter json information, it will only apply to future instances (ie breeding colors to pass on).
→ DO NOT REMOVE CREDITS (original creator) or falsely claim ownership (plagiarism / art theft).
⮞ REMOVE COATS (EXISTING SAVE)
You can remove coats at any time, but need to close and reload the game for changes to apply.
→ If you remove a coat, any horses using retains their coat ID but becomes white unless a new coat is assigned.
→ If you only remove the PNG, any horses using it will appear fully black unless a texture is provided.
⮞ FIX ACCIDENTALLY REMOVED COATS (EXISTING SAVE)
You can fix white horses (default coat) by re-adding community packs or coat file(s) to restore them on next reload.
⮞ REASSIGN REMOVED COATS (EXISTING SAVE)
You can change coats easily with /swem set coat <id:coat> or cycle with lapis (if enabled). An alternative command is:/data modify entity @e[type=swem:swem_horse,limit=1,sort=nearest] Behaviors[6].Coat set value <id:coat>
OTHER
⮞ SEE COAT NAME?
It is not currently possible to find out the name or artist for a coat in-game without using a command:/data get entity @e[type=swem:swem_horse,sort=nearest,limit=1] Behaviors[6].Coat
Using Community Packs
To add a prepared (ready to use) community pack:
STEP ONE: GENERATE THE NEW FOLDERS (FIRST TIME LOAD)
- Install the mod update.
- Load the game to the menu screen.
- Exit the game.
STEP TWO: DOWNLOAD A COMMUNITY PACK
- Download a community pack.
→ A prepared community pack including FREE coat donations can be found here! - Unzip (if necessary) so the file is a folder.
→ You should have a folder withpack_name > json / textures etc
→ Check the folder is NOT embedded inside another iepack_name > pack_name - Cut or copy the
pack_namefolder. - Go to
config > swem > community-packsand paste it.
→ It should look like:config > swem > community-packs > pack_name > json / textures etc
OTHER INFORMATION
- You can have multiple packs but they must have a unique name ie
pack_1andpack_2 - You can rename a texture pack, but you should not if it is already in use.
→ Community packs must be in lowercase with underscores for any spaces.
→ ✅kofi_coats❌Kofi Coats - You can add, alter or remove from community packs - see FAQ above.
- You can access coats in game by the following methods:
→ Converting vanilla or RHG horses ifbreeding tokensconfig is FALSE.
→ Cycling coats ifcycle coatin config andlapis_cyclablein json is TRUE.
→ Breeding ifobtainable_by_breedingin json is TRUE.
→ Summon via/swem summon LEGACY pack_name:coat_artist
If you have not altered configs already, you probably do not need to do so, these should all be DEFAULT settings.
Creating & Modifying Custom Community Packs
To create a new community pack:
OPTION A: DOWNLOAD THE TEMPLATES (DISCORD)
- A downloadable (blank) Community Pack and JSON can be found HERE.
OPTION B: CREATE A COMMUNITY PACK
- Inside
config > swem > community-packs:
→ Create a folder with the pack name ✅kofi_coats❌Kofi Coats - Inside
pack_name:
→ Create a folder calledjsons
→ Create a folder calledtextures - Inside
jsons:
→ Create a folder calledcoats - Inside
textures:
→ Create a folder calledcoats - Inside
textures > coats:
→ Create a folder calledlegacy
To add content to a new or existing community pack:
- Create or download the coat .png file
→ Name it usingcoat_artist_modelformat ✅hidalgo_arishant_legacy❌Hidalgo Arishant-legacy
→ Put this incommunity-packs > pack_name > textures > coats > legacy - Create or download a .json file with the coat credits and information
→ Name it the same as the coat .png!
→ Put this incommunity-packs > pack_name > jsons > coats
| 📂 config |
📂swem |
📂community-packs |
📂pack_1 |
📂jsons |
📂coats |
🗒️coat1_artist.json | |
| 📂textures | 📂coats |
📂legacy |
🖼️coat1_artist.png |
||||
| 📂pack_2 |
📂jsons |
📂coats |
🗒️coat2_artist.json | ||||
| 🗒️coat3_artist.json | |||||||
| 📂textures |
📂coats |
📂legacy | 🖼️coat2_artist.png | ||||
| 🖼️coat3_artist.png | |||||||
|
Shown: The file structure for community packs, this example shows 2 packs (1 + 2) with 3 total coats. |
|||||||
| File Type | Location | Description |
| 🖼️ .png | config > swem > community-packs > textures > coats > legacy |
Texture to be used for the custom coat. |
| 🗒️ .json | config > swem > community-packs > jsons > coats |
Information on artist(s) and obtaining. |
JSON files
JSON is a file that contains the important information SWEM needs to integrate a custom asset into the game and systems such as coat cycling or breeding. This is essentially code and needs to be filled out carefully to avoid causing errors!
- Type within the quotations
" "unless directed to do otherwise. - Keep all formatting including brackets
( ) { } [ ] - Separate coat tags by a comma (delete as applicable) until the final variable.
✅["white","chestnut"]❌["white","chestnut",] lapis_cyclableandobtainable_by_breedingmust betrueorfalsebase_colorsmust use valid color tags options
✅["black","gray","white","creamy","brown","dark_brown","chestnut"]❌["buckskin","dun"]
| Credits | The artist(s) to credit. This can be one, or multiple separated by a comma. |
| Inspiration | The inspiration or reference, ie "Secretariat" or "Bay Roan Sabino" |
| Models | The horse model it uses, this should use legacy model (original) until Destrier+ is added! |
| Lapis Cyclable | Obtainable by cycling with lapis and redstone, if enabled. |
| Obtainable By Breeding | Obtained by breeding, using color tags (below). |
| Base Colors | Determines 'genetics' to pass on to foal, and selection of adult coats on growing up. |
|
Set tags you would expect to get a coat from (IE: black foal -> black horse) and NOT the genetics the horse might pass on. Color tags and breeding outcomes are very basic and realism (IE: bay = red + black will result in unrealistic breeding and coat selection outcomes such as chestnut foal -> bay horse). |
|
Default JSON
{
"credits": "Artist(s)",
"inspiration": "N/A",
"models": {
"legacy": "default:coats/legacy/coatname_artist_legacy.png",
"destrier": "",
"heavy_draft": "",
"western_sport": "",
"english_sport": "",
"riding_pony": ""
},
"lapis_cyclable": true,
"obtainable_by_breeding": true,
"base_colors": ["black","gray","white","creamy","brown","dark_brown","chestnut"]
}
Example JSON
{
"credits": "Bob Jones, Jon Bobs",
"inspiration": "Inspired by Valegro (Dressage Horse)",
"models": {
"legacy": "default:coats/legacy/valegro_bobjones_legacy.png",
"destrier": "",
"heavy_draft": "",
"western_sport": "",
"english_sport": "",
"riding_pony": ""
},
"lapis_cyclable": false,
"obtainable_by_breeding": true,
"base_colors": ["brown","dark_brown"]
}
PNG files
To create a new coat, or edit and existing one for the SWEM horse model you will need to use a program like Blockbench. The resources for this are pinned in our blockbench channel on Discord.
Overriding Default Coats
You will still need to use a texture pack to override default SWEM coats. This has not changed with this update.
Texturepack: Coat Overrides
| 📂 TXP_name |
📂 assets | 📂 swem |
📂 textures |
📂 entity |
📂 horse |
📂 coats |
🖼️ coat_name.png |
| 🖼️ pack.png | 🖼️ coat_name.png | ||||||
| 🗒️ pack.mcmeta | 📂 foal (optional) | ||||||
|
Shown: The file structure for texture packs overriding default horse +/- foal coats. |
|||||||
| File Type | Description | Note |
| 📂 TXP_name | A folder with the name of your texture pack | |
| 🖼️ pack.png | PNG image for your pack - displayed in game. | This must remain named pack.png |
| 🗒️ pack.mcmeta | Info on your pack's credits, description and version(s) | This is a text-type document (ie notepad) |
| 🖼️ coat_name.png | PNG for the coat to override. | This must be named as in swem files |
Coat names in SWEM files might not accurately align to in-game values. Example: swem:sweetboi = 13_m_sweetboi
Shown: Coat file names for all default SWEM coats in 1.20.1-1.5.0
Note To Content Creators
This update will support you in sharing your content to a wider audience, as players no longer have to carefully pick and choose for a limited number of coats to override, and your coats can integrated into breeding and coat cycling (if enabled). To transition properly away from texture packs, we recommend:
- Upload your content in an appropriate format, such as a pack or individual json and png files.
→ Continuing to provide texture packs is up to you! - Set simple, clear and easy to follow terms of use (TOU) or fair-use guidelines.
TOU Info + Example
WARNING
By sharing your content publicly, you should acknowledge that there is very limited legal recourse to enforce appropriate use of your content, license or not. Using a highly restrictive terms of use is setting yourself up for frustration when it is inevitably violated, so for your sake and enjoyment of players we encourage sharing in a similar way to mods; allow anyone to use it for public or private use provided downloads or support goes directly to the creator (ie via Kofi).
RECOMMENDATIONS
Avoid editing an agreement or expecting users to remain informed of any minor (or major) alterations.
Post your agreement where it can be easily referenced when browsing or downloading your content.
→ It is ideal to have a public reference (ie Kofi post) and provide it with files or included in descriptions.
→ It is not recommended to require access to an external source (ie Discord server) unless you host files there!
Avoid requiring credit for use in media; it should be encouraged but no credits does not equal insult!
→ It is not standard practice to credit every creation (ie mods!) in images you upload; nice if you do, but optional!
→ It should only be "required" that users credit where appropriate (inspiration or reference), and not falsely claim.
Avoid prohibiting inspiration or reference; similarity is not proof of plagiarism!
→ It is possible for users to have the same idea, share the same reference, or take respectful inspiration!
→ It should be expected that any work clearly and directly referenced or inspired by your creation is credited.
Avoid restrictive use policies that are difficult to monitor and enforce.
→ It is an unfortunate reality that players +/- servers will violate agreements, especially if they are restrictive.
→ There is limited legal recourse to address this; so state what you are willing and able to action if necessary!
Consider providing content in a compact format with minimal individual downloads!
→ It is your choice, but players and servers will be less likely to distribute (or more likely to use) easily accessible files.
→ It is suggested to provide creator pack(s) in bundles such as 'Bays', 'Pintos', '2023 Coats'
Avoid uploading to unsafe file hosting sites or encouraging users to engage in unsafe internet habits.
→ It is recommended to use popular sites such as Kofi, Google Drive.
EXAMPLE TERMS OF USE (NOT A LEGAL CONTRACT OR LICENSE)
OWNERSHIP & AGREEMENT
→ The creator (name) retains all rights of ownership to this content
→ The right to use this content is granted to you (player) in accordance with this agreementUSE
→ This creationcan/notbe used in content (images, videos) - credits are optional but appreciated.
→ This creationcan/notbe used privately in singleplayer or a small private group.
→ This creationcan/notbe used publicly in multiplayer.
→ This creationcan/notbe used in reasonable commercial serviceswith/withoutconsent.
✅🚫 Offered as part of a service (ie random / selected coat change) requiring real money
✅🚫 Offered as a prize or reward for activity or events requiring real money
✅🚫 Offered as an unlock via crowdfunding or engagement (ie server cost covered -> unlock)
NOTE: Commercial services must abide by Minecraft's EULADISTRIBUTION
→ This creationcan/notbe reuploadedwith/withoutconsentand/orcreditsand/orpayment.
✅🚫 Limited private use by friends or small groups
✅🚫 Custom Community Packs (folder)
✅🚫 Custom Modpacks (zip)
✅🚫 Exceptions: Paid vs Free, Commissions (paid) or Gifts (prizes)
✅🚫 Other: File Hosting Sites, Discord Servers etcALTERATIONS
→ This creationcan/notbe alteredwith/withoutconsent andwith/withoutcredits forpublic/privateuse.
✅🚫 Texture
✅🚫 Information (json: name, description, color tags etc)
✅🚫 Other conditions
Known Issues
If you find an issue, please report it to our bugs channel on Discord. We ask that you look to see if your issue was reported first!
- Community Packs not loading - fixed in swem-1.20.1-1.5-beta-5 (COMING ASAP)
Changelog
View Changes
This is not a complete list of version changes / fixes. It is a changelog of relevant wiki-related version information.
| MC Version | Release | Notes |
Resource Packs [WIP]
Resource Packs
Resource Packs enable you to modify certain assets of Minecraft or Mods, like SWEM.
Purpose
You can use Resource Packs to:
- Modify default horse coats
- Modify entity animations
- 1.20.1-1.5+ Add new animations
- Modify default horse model
- Modify item inventory or block textures
Limitations
Resource packs are an override, meaning the content a resource pack contains will replace the default asset.
You cannot* use Resource Packs to:
- Add new coats*
- Add new entities or breeds (see section on model overrides)
* There are some clever Resource Packs out there with entity variations, but this is not straightforward or simple!
[EXPAND] Model Overrides
Several talented Creators have created "Add On" Resource Packs with "breed" models, or custom features (ie mane variations).
- Packs may include one option (ie Arabian or Fjord)
- Packs may support multiple breeds +/- features
- Packs may support the default model coats (ideally) or override it entirely
RELEVANT INFORMATION (USERS / SERVERS)
Model Overrides are used at your own "risk" and support for issues should be sought via the Pack Creator not SWEM.
How do they work?
- In simple terms, it works by adding extra blocks to the default model
- If a coat artist leaves the blocks uncolored (invisible) you will see all / some of the default horse
- If a coat artist colors the blocks in, you will see those additional blocks on the default horse
EXAMPLEIf a coat texture color in blocks added around the hoof, a horse would have "feathers"
Can I use more than one model?
- If you install multiple model override packs, only the highest in load order will apply
- If you want models from different Creators, they would have to merge their packs
Can I use model overrides with a community pack or coat replacement resource pack?
- If the model does not modify (only add on to) the default model, custom coats should work fine
- If not, this may 'break' default or custom coats
Example:Horses with no mane or tail using some models - It might be rare to get a 'custom model coat' if you are mostly using ones designed for the default model
Can I use model overrides with an animation pack (ie Dressage animations)?
- TBC It is unlikely custom models will support all animation packs
- If you load a model pack above an animation pack, it will override any animations they both share
- If you load a model pack below an animation pack, it may not correctly animate the custom model
Can I use model overrides on a server?
SERVERYou may be able to install a model resource pack server-sideCLIENT (PLAYER)If you install a model override in multiplayer, only you will see it
→ Read the section about community packs + coat replacements above (may affect what you see in game)
→ TBC Server packs may override client side unless you can opt out of using it
RELEVANT INFORMATION (CREATORS)
Model overrides use copyrighted SW assets and must be FREE USE ONLY
→ You can accept optional donations
→ You can sell coat textures that require your add on, provided it is 100% your own work (no SW coat edits)
- You should not modify any of the core blocks involved in tack rendering
- You should add to (not modify where possible) the model to avoid breaking default + custom coats
- You will need to adjust the default animations for any additional blocks added
- You should be able to (optional) add support for custom animations in animation packs
→ Consent may be required to include a modified animation from other Creators
→ TBC If add on models can support "new" custom animations via 1.20.1-1.5+ features
Creating Basic Resource Pack Files
This guide covers how to create a basic resource pack folder. Alternatively, download the premade template on Discord.
[EXPAND] Instructions
STEP ONE: CREATE YOUR RESOURCE PACK FOLDER
- Create a new folder
→ It can be anywhere for now (ie Documents) - Name your resource pack
→ This can include capitals, some symbols and spaces - Go inside the folder
- Create a new folder here
- Name it
assets
→ This must be in lowercase exactly as shown
STEP TWO: CREATE YOUR PACK.MCMETA FILE
- Open a blank text editor file using Notepad (Windows) or TextEdit (Mac)
- Paste in the pack template (below)
- Edit the template to your pack
→descriptionAny information to display in game ✅"description": "Pack Name V1.0 By Creator Name"
Note: Supports color + format&l&9Pack Name V1.0 &0By &dCreator=Pack Name V1.0 By Creator
→pack_formatWhich format (MC version) is supported ✅"pack_format": 15=MC 1.20 - 1.20.1
Note: Format gives a harmless warning when a resource pack is used in other versions (even if it works fine) - Select
file > save as - Select the resource pack folder (not assets)
- Name the file
pack.mcmetain lowercase - Save as the correct file type:
→ Windows:Save As Type: All Files(Drop down menu, change from .txt)
→ Mac: - Check it displays as a
MCMETAfile type in your folder
[EXPAND] pack.mcmeta Template
{
"pack": {
"description": "Text Here",
"pack_format": 15
}
}
STEP THREE: CREATE YOUR PACK ICON
- Choose or create an icon for your pack
- Name it
packand save it as a.png - Paste it in your resource pack folder (not assets)
STEP FOUR: ADD YOUR CONTENT
Go to the section(s) below for the content you want to add.
Custom Coat Overrides
This is to override one or more default coats - to add new coats use a Community Pack!
It is not permitted to modify SW mod assets for sale or re-upload. Textures must be 100% your own work from scratch!
This guide will not cover how to create a coat, for information please read our resources on Discord.
[EXPAND] Instructions
STEP ONE: CREATE A COAT TEXTURE
- Create your coat texture in Blockbench
- Choose a coat to override from the list of default coats
- Save the texture as a
.pngfile - Name the texture to match the coat it will replace
STEP TWO: CREATE ASSETS SUB-FOLDERS FOR YOUR COAT
- Go inside
assets - Create a folder called
swem - Inside that, create a folder called
textures - Inside that, create a folder called
entity - Inside that, create a folder called
horse - Inside that, create a folder called
coats - Paste your texture file here
→ If you have more than one override you can add them also
STEP THREE: FINAL STEPS
- Your pack is ready and may work unzipped
- You can zip it so it is easier to share or keep it unzipped to add new files
→ If your zip does not show up in game, check your files are not too deep
→ ✅Pack Name (Zip) > assets / pack.mcmeta / pack
→ ❌Pack Name (Zip) > Pack Folder > assets / pack.mcmeta / pack - Load into Minecraft
- Open the Resource Pack menu
- Open the folder (button)
- Paste in your Resource Pack
- Enable the Resource Pack
- Check it is working in game
→ Summon the coat you chose to override
→ Confirm it uses the replacement coat, not original
→ Check there are no texture errors and it looks correct on the horse
This page will not provide any resources for troubleshooting errors with texture files.
You can look up a tutorial for texturing entities or ask for assistance with details on your issue in our Tech Help channels.
[EXPAND] Default Coat Names

| 📂 TXP_name |
📂 assets | 📂 swem |
📂 textures |
📂 entity |
📂 horse |
📂 coats |
🖼️ coat_name.png |
| 🖼️ pack.png | 🖼️ coat_name.png | ||||||
| 🗒️ pack.mcmeta | 📂 foal (optional) | ||||||
|
Shown: The file structure for texture packs overriding default horse +/- foal coats. |
|||||||
| File Type | Description | Note |
| 📂 Pack Name | A folder with the name of your resource pack | |
| 🖼️ pack.png | PNG image for your pack - displayed in game. | This must remain named pack.png |
| 🗒️ pack.mcmeta | MCMETA file with your pack's description and version(s) | This must remain named pack.mcmeta |
| 🖼️ coat_name.png | PNG for the coat to override. | This must be the name of a valid swem coat |
Coat names in files might not be identical to in-game names or values. Example swem:sweetboi = 13_m_sweetboi
→ You must use the file names, a list of valid names can be found above
Custom Animation Overrides / Additions
It is not permitted to modify SW mod assets for sale or re-upload. Animations must be 100% your own work from scratch!
This guide will not cover how to create animations. You can request help from other creators in our Tech-Help channel (Discord).
[EXPAND] Instructions
STEP ONE [A]: CREATE A NEW ANIMATION
- Create an animation in Blockbench
- Save the
swem_horse.jsonfile
→ This should include your animation(s) and all default animations
STEP ONE [B]: MODIFY AN EXISTING ANIMATION
- Modify one or more default animation in Blockbench
- Save the
swem_horse.jsonfile
STEP ONE [B]: CREATE ASSETS SUB-FOLDERS FOR YOUR COAT
- Go inside
assets - Create a folder called
swem - Inside that, create a folder called
animations - Paste your
swem_horse.jsonfile here
STEP THREE: FINAL STEPS
- Your pack is ready and may work unzipped
- You can zip it so it is easier to share or keep it unzipped to add new files
→ If your zip does not show up in game, check your files are not too deep
→ ✅Pack Name (Zip) > assets / pack.mcmeta / pack
→ ❌Pack Name (Zip) > Pack Folder > assets / pack.mcmeta / pack - Load into Minecraft
- Open the Resource Pack menu
- Open the folder (button)
- Paste in your Resource Pack
- Enable the Resource Pack
- Check it is working in game
→ Tame and mount a horse
→ Use/swem rrp anim <Animation Name>to trigger the animation
→ Confirm the animation works as expected
This page will not provide any resources for troubleshooting errors with animations.
You can look up a tutorial for animating or ask for assistance with details on your issue in our Tech Help channels.
| 📂 Pack Name |
📂 assets | 📂 swem |
📂 animations |
🗒️ swem_horse.json |
| 🖼️ pack.png |
🗒️ swem_horse_foal.json |
|||
| 🗒️ pack.mcmeta | ||||
|
Shown: The file structure for animation packs overriding default horse +/- foal coats. |
||||
| File Type | Description | Note |
| 📂 Pack Name | A folder with the name of your resource pack | |
| 🖼️ pack.png | PNG image for your pack - displayed in game. | This must remain named pack.png |
| 🗒️ pack.mcmeta | MCMETA file with your pack's description and version(s) | This must remain named pack.mcmeta |
| 🗒️ swem_horse.json | JSON file with your new / modified animations | This must remain named swem_horse.json |
Custom Item Texture Overrides
It is not permitted to modify SW mod assets for sale or re-upload. Textures must be 100% your own work from scratch!
This guide will not cover how to create icons or how to override models.
[EXPAND] Instructions
STEP ONE [A]: EXTRACT THE MOD FILE
- Download a copy of whatever version of the swem mod you intend to modify
- Right click the jar file in your downloads and extract it
→ This may require a program such as WinRar (Windows) - Go inside
assets > swem > textures - Locate the folder for whatever you want to override
→blockIncludes any textures for building blocks or items that can be placed. Example: Wheelbarrows
→entityIncludes any textures for horse poop, rope knots and the wormieboi entity.
→entity_iconIncludes textures for entity icons named the same as an existing coat.
→guiIncludes textures for jump bar and the jump creation tool
→gui > containerIncludes textures for various inventory items Example: Saddle Bags or Tack Boxes
→itemIncludes the textures of virtually every item you can have in your inventory (inventory icon)
→models > armorIncludes the textures of some armor pieces.
→paintingIncludes the textures of any paintings added by the mod.
→particleIncludes the textures of any particle effects emitted by horses for various interactions or events. - Locate the texture(s) for whatever asset(s) you want to override:
→ Note the exact file names
→ Note the exact types - some assets need multiple textures (ie for different blockstates, sides etc)
→ Note the texture size - for some blocks and items you may be able to scale textures up or down, but not for all!
STEP TWO [B]: CREATE A NEW TEXTURE
- Create an texture in your preferred painting program
- Save the file as a png with the exact name for the item/block etc you are overriding (above).
STEP THREE [C]: CREATE ASSETS SUB-FOLDERS FOR YOUR TEXTURE
- Go inside
assets - Create a folder called
swem - Inside that, create a folder called
textures - Create a folder that matches your item (step one)
→ Example: If you're replacingrack_saddlefromblockthen create ablockfolder - Paste your
png(texture) file here - Repeat for any addition textures you want to override (correct folders for each item)
STEP FOUR [D]: FINAL STEPS
- Your pack is ready and may work unzipped
- You can zip it so it is easier to share or keep it unzipped to add new files
→ If your zip does not show up in game, check your files are not too deep
→ ✅Pack Name (Zip) > assets / pack.mcmeta / pack
→ ❌Pack Name (Zip) > Pack Folder > assets / pack.mcmeta / pack - Load into Minecraft
- Open the Resource Pack menu
- Open the folder (button)
- Paste in your Resource Pack
- Enable the Resource Pack
- Check it is working in game
→ Obtain or place your item(s) and check the new texture shows
→ Check for any texture errors (missed pixels etc)
This page will not provide any resources for troubleshooting errors with textures.
You can look up a tutorial for animating or ask for assistance with details on your issue in our Tech Help channels.
| 📂 Pack Name |
📂 assets | 📂 swem |
📂 textures |
📂 block |
🖼️ block_name.png |
| 🖼️ pack.png |
📂 entity |
||||
| 🗒️ pack.mcmeta |
📂 entity_icon |
🖼️ coat_artist.png |
|||
|
📂 gui |
🖼️ gui_type.png |
||||
|
📂 container -> 🖼️ container_type.png |
|||||
|
📂 item |
🖼️ item_name.png |
||||
|
📂 models |
📂 armor -> 🖼️ armor_layer.png |
||||
|
📂painting |
🖼️ painting_name.png |
||||
|
📂particle |
🖼️ particle_name.png |
||||
|
Shown: The file structure for animation packs overriding default textures - only use folders you are creating overrides for. |
|||||