# Resource Packs [WIP]
# Resource Packs
Resource Packs enable you to modify certain assets of Minecraft or Mods, like SWEM.
#### Purpose
You can use Resource Packs to:
- Modify **default** horse coats
- Modify entity animations
- **1.20.1-1.5+** Add new animations
- Modify default horse model
- Modify item inventory or block textures
---
#### Limitations
Resource packs are an **override**, meaning the content a resource pack contains will **replace** the default asset.
You cannot\* use Resource Packs to:
- Add new coats\*
- Add new entities or breeds (see section on model overrides)
\* *There are some clever Resource Packs out there with entity variations, but this is not straightforward or simple!*
\[EXPAND\] Model Overrides
Several talented Creators have created "Add On" Resource Packs with "breed" models, or custom features (ie mane variations).
- Packs may include one option (ie Arabian or Fjord)
- Packs may support multiple breeds +/- features
- Packs may support the default model coats (ideally) or override it entirely
**RELEVANT INFORMATION (USERS / SERVERS)**
Model Overrides are used at your own "risk" and support for issues should be sought via the **Pack** **Creator** not SWEM.
**How do they work?**
- In simple terms, it works by adding extra blocks to the default model
- If a coat artist leaves the blocks uncolored (invisible) you will see all / some of the default horse
- If a coat artist colors the blocks in, you will see those additional blocks on the default horse
`EXAMPLE` If a coat texture color in blocks added around the hoof, a horse would have "feathers"
**Can I use more than one model?**
- If you install multiple model override packs, only the **highest in load order will apply**
- If you want models from different Creators, they would have to merge their packs
**Can I use model overrides with a community pack or coat replacement resource pack?**
- If the model does not modify (only add on to) the default model, custom coats should work fine
- If not, this may 'break' default or custom coats `Example:` Horses with no mane or tail using some models
- It might be rare to get a 'custom model coat' if you are mostly using ones designed for the default model
**Can I use model overrides with an animation pack (ie Dressage animations)?**
- **TBC** It is unlikely custom models will support all animation packs
- If you load a model pack **above** an animation pack, it will override any animations they both share
- If you load a model pack **below** an animation pack, it may not correctly animate the custom model
**Can I use model overrides on a server?**
- `SERVER` You may be able to install a model resource pack server-side
- `CLIENT (PLAYER)` If you install a model override in multiplayer, only you will see it
→ Read the section about community packs + coat replacements above (may affect what you see in game)
→ **TBC** Server packs may override client side unless you can opt out of using it
**RELEVANT INFORMATION (CREATORS)**
Model overrides use copyrighted SW assets and must be **FREE USE ONLY**
→ You can accept **optional** donations
→ You can sell coat textures that require your add on, provided it is 100% your own work (no SW coat edits)
- You should not modify any of the core blocks involved in tack rendering
- You should **add to** (not modify where possible) the model to avoid breaking default + custom coats
- You will need to adjust the default animations for any additional blocks added
- You should be able to (optional) add support for custom animations in animation packs
→ Consent may be required to include a modified animation from other Creators
→ **TBC** If add on models can support "new" custom animations via 1.20.1-1.5+ features
\[EXPAND\] Instructions
** STEP ONE: CREATE YOUR RESOURCE PACK FOLDER**
1. Create a new folder
→ It can be anywhere for now (ie Documents)
2. Name your resource pack
→ This can include capitals, some symbols and spaces
3. Go inside the folder
4. Create a new folder here
5. Name it `assets`
→ This must be in lowercase exactly as shown
** STEP TWO: CREATE YOUR PACK.MCMETA FILE**
1. Open a blank text editor file using Notepad (Windows) or TextEdit (Mac)
2. Paste in the pack template (below)
3. Edit the template to your pack
→ `description` Any information to display **in game** **✅** `"description": "Pack Name V1.0 By Creator Name"`
**Note:** Supports [color + format](https://minecraftitemids.com/color-codes) `&l&9Pack Name V1.0 &0By &dCreator` = `Pack Name V1.0 By Creator`
→ `pack_format` Which [format](https://minecraft.wiki/w/Pack_format) (MC version) is supported **✅** `"pack_format": 15` = `MC 1.20 - 1.20.1`
**Note:** Format gives a harmless warning when a resource pack is used in other versions (even if it works fine)
4. Select `file > save as`
5. Select the resource pack folder (not assets)
6. Name the file `pack.mcmeta` in lowercase
7. Save as the correct file type:
→ **Windows:** `Save As Type: All Files` (Drop down menu, change from .txt)
→ **Mac:**
8. Check it displays as a `MCMETA` file type in your folder
\[EXPAND\] pack.mcmeta Template
{
"pack": {
"description": "Text Here",
"pack\_format": 15
}
}
This is to **override one or more default coats** - to add **new** coats use a [Community Pack](https://wiki.swequestrian.com/books/star-worm-equestrian/page/creators-corner-wip)!
It is not permitted to modify SW mod assets for sale or re-upload. **Textures must be 100% your own work from scratch!**
This guide will not cover how to create a coat, for information please read our **[resources](https://discord.com/channels/715626418893095012/748632231257440336/1117996750842630194)** on Discord.
\[EXPAND\] Instructions
** STEP ONE: CREATE A COAT TEXTURE**
1. Create your coat texture in Blockbench
2. Choose a coat to override from the list of default coats
3. Save the texture as a `.png` file
4. Name the texture to match the coat it will replace
** STEP TWO: CREATE ASSETS SUB-FOLDERS FOR YOUR COAT**
1. Go inside `assets`
2. Create a folder called `swem`
3. Inside that, create a folder called `textures`
4. Inside that, create a folder called `entity`
5. Inside that, create a folder called `horse`
6. Inside that, create a folder called `coats`
7. Paste your texture file here
→ If you have more than one override you can add them also
** STEP THREE: FINAL STEPS**
1. Your pack is ready and may work unzipped
2. You can zip it so it is easier to share or keep it unzipped to add new files
→ If your zip does not show up in game, check your files are not too deep
→ **✅Pack Name (Zip)** > assets / pack.mcmeta / pack
→ **❌Pack Name (Zip)** > Pack Folder > assets / pack.mcmeta / pack
3. Load into Minecraft
4. Open the Resource Pack menu
5. Open the folder (button)
6. Paste in your Resource Pack
7. Enable the Resource Pack
8. Check it is working in game
→ Summon the coat you chose to override
→ Confirm it uses the replacement coat, not original
→ Check there are no texture errors and it looks correct on the horse
This page will not provide any resources for troubleshooting errors with texture files.
You can look up a tutorial for texturing entities or ask for assistance with details on your issue in our Tech Help channels.
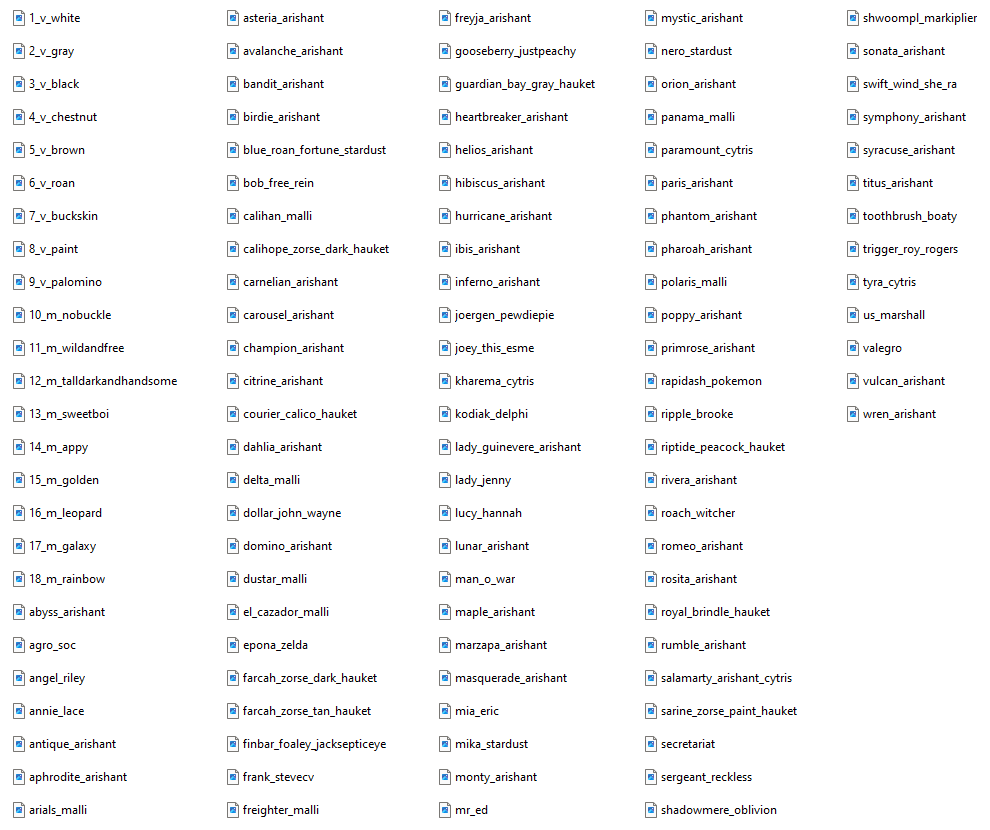
\[EXPAND\] Default Coat Names
| 📂 TXP\_name
| 📂 assets | 📂 swem
| 📂 textures
| 📂 entity
| 📂 horse
| 📂 coats
| 🖼️ coat\_name.png |
| 🖼️ pack.png | 🖼️ coat\_name.png |
| 🗒️ pack.mcmeta | 📂 foal **(optional)** |
Shown: The file structure for texture packs overriding default horse +/- foal coats.
|
| **File Type** | **Description** | **Note** |
| 📂 Pack Name | A folder with the name of your resource pack |
|
| 🖼️ pack.png | PNG image for your pack - displayed in game. | This must remain named `pack.png` |
| 🗒️ pack.mcmeta | MCMETA file with your pack's description and version(s) | This must remain named `pack.mcmeta` |
| 🖼️ coat\_name.png | PNG for the coat to override. | This must be the name of a valid swem coat |
Coat names in files might not be identical to in-game names or values. **Example** `swem:sweetboi` = `13_m_sweetboi`
→ You must use the **file** names, a list of valid names can be found above
---
#### Custom Animation Overrides / Additions
It is not permitted to modify SW mod assets for sale or re-upload. **Animations must be 100% your own work from scratch!**
This guide will not cover how to create animations. You can request help from other creators in our [**Tech-Help**](https://discord.com/channels/715626418893095012/997404105704210432) channel (Discord).
\[EXPAND\] Instructions
** STEP ONE \[A\]: CREATE A NEW ANIMATION**
1. Create an animation in Blockbench
2. Save the `swem_horse.json` file
→ This should include your animation(s) **and** all default animations
** STEP ONE \[B\]: MODIFY AN EXISTING ANIMATION**
1. Modify one or more default animation in Blockbench
2. Save the `swem_horse.json` file
** STEP ONE \[B\]: CREATE ASSETS SUB-FOLDERS FOR YOUR COAT**
1. Go inside `assets`
2. Create a folder called `swem`
3. Inside that, create a folder called `animations`
4. Paste your `swem_horse.json` file here
** STEP THREE: FINAL STEPS**
1. Your pack is ready and may work unzipped
2. You can zip it so it is easier to share or keep it unzipped to add new files
→ If your zip does not show up in game, check your files are not too deep
→ **✅Pack Name (Zip)** > assets / pack.mcmeta / pack
→ **❌Pack Name (Zip)** > Pack Folder > assets / pack.mcmeta / pack
3. Load into Minecraft
4. Open the Resource Pack menu
5. Open the folder (button)
6. Paste in your Resource Pack
7. Enable the Resource Pack
8. Check it is working in game
→ Tame and mount a horse
→ Use `/swem rrp anim ` to trigger the animation
→ Confirm the animation works as expected
This page will not provide any resources for troubleshooting errors with animations.
You can look up a tutorial for animating or ask for assistance with details on your issue in our Tech Help channels.
| 📂 Pack Name
| 📂 assets | 📂 swem
| 📂 animations
| 🗒️ swem\_horse.json
|
| 🖼️ pack.png | 🗒️ swem\_horse\_foal.json
|
| 🗒️ pack.mcmeta |
Shown: The file structure for animation packs overriding default horse +/- foal coats.
|
| **File Type** | **Description** | **Note** |
| 📂 Pack Name | A folder with the name of your resource pack |
|
| 🖼️ pack.png | PNG image for your pack - displayed in game. | This must remain named `pack.png` |
| 🗒️ pack.mcmeta | MCMETA file with your pack's description and version(s) | This must remain named `pack.mcmeta` |
| 🗒️ swem\_horse.json | JSON file with your new / modified animations | This must remain named `swem_horse.json` |
---
#### Custom Item Texture Overrides
It is not permitted to modify SW mod assets for sale or re-upload. **Textures must be 100% your own work from scratch!**
This guide will not cover how to create icons or how to override models.
\[EXPAND\] Instructions
** STEP ONE \[A\]: EXTRACT THE MOD FILE**
1. Download a copy of whatever version of the swem mod you intend to modify
2. Right click the jar file in your downloads and extract it
→ This may require a program such as WinRar (Windows)
3. Go inside `assets > swem > textures`
4. Locate the folder for whatever you want to override
→ `block` Includes any textures for building blocks or items that can be placed. **Example:** Wheelbarrows
→ `entity` Includes any textures for horse poop, rope knots and the wormieboi entity.
→ `entity_icon` Includes textures for entity icons named **the same as an existing coat.** → `gui` Includes textures for jump bar and the jump creation tool
→ `gui > container` Includes textures for various inventory items **Example:** Saddle Bags or Tack Boxes
→ `item` Includes the textures of virtually every item you can have in your inventory (inventory icon)
→ `models > armor` Includes the textures of some armor pieces.
→ `painting` Includes the textures of any paintings added by the mod.
→ `particle` Includes the textures of any particle effects emitted by horses for various interactions or events.
5. Locate the texture(s) for whatever asset(s) you want to override:
→ Note the **exact** file names
→ Note the **exact** types - some assets need multiple textures (ie for different blockstates, sides etc)
→ Note the **texture size** - for some blocks and items you may be able to scale textures up or down, but not for all!
** STEP TWO \[B\]: CREATE A NEW TEXTURE**
1. Create an texture in your preferred painting program
2. Save the file as a png with the **exact** name for the item/block etc you are overriding (above).
** STEP THREE \[C\]: CREATE ASSETS SUB-FOLDERS FOR YOUR TEXTURE**
1. Go inside `assets`
2. Create a folder called `swem`
3. Inside that, create a folder called `textures`
4. Create a folder that matches your item (step one)
→ **Example:** If you're replacing `rack_saddle` from `block` then create a `block` folder
5. Paste your `png` (texture) file here
6. Repeat for any addition textures you want to override (correct folders for each item)
** STEP FOUR \[D\]: FINAL STEPS**
1. Your pack is ready and may work unzipped
2. You can zip it so it is easier to share or keep it unzipped to add new files
→ If your zip does not show up in game, check your files are not too deep
→ **✅Pack Name (Zip)** > assets / pack.mcmeta / pack
→ **❌Pack Name (Zip)** > Pack Folder > assets / pack.mcmeta / pack
3. Load into Minecraft
4. Open the Resource Pack menu
5. Open the folder (button)
6. Paste in your Resource Pack
7. Enable the Resource Pack
8. Check it is working in game
→ Obtain or place your item(s) and check the new texture shows
→ Check for any texture errors (missed pixels etc)
This page will not provide any resources for troubleshooting errors with textures.
You can look up a tutorial for animating or ask for assistance with details on your issue in our Tech Help channels.
| 📂 Pack Name
| 📂 assets | 📂 swem
| 📂 textures
| 📂 block
| 🖼️ block\_name.png
|
| 🖼️ pack.png | 📂 entity
| |
| 🗒️ pack.mcmeta
| 📂 entity\_icon
| 🖼️ coat\_artist.png
|
| 📂 gui
| 🖼️ gui\_type.png
|
| 📂 container -> 🖼️ container\_type.png
|
| 📂 item
| 🖼️ item\_name.png
|
| 📂 models
| 📂 armor -> 🖼️ armor\_layer.png
|
| 📂painting
| 🖼️ painting\_name.png
|
| 📂particle
| 🖼️ particle\_name.png
|
Shown: The file structure for animation packs overriding default textures - only use folders you are creating overrides for.
|